This article was co-authored by wikiHow Staff. Our trained team of editors and researchers validate articles for accuracy and comprehensiveness. wikiHow's Content Management Team carefully monitors the work from our editorial staff to ensure that each article is backed by trusted research and meets our high quality standards.
The wikiHow Video Team also followed the article's instructions and verified that they work.
This article has been viewed 72,629 times.
Learn more...
Glitter adds a beautiful, alluring sparkle to just about anything. When you add glitter to candles, the flickering flame makes it twinkle and sparkle. There are lots of ways of adding glitter to candles, from gluing it on to sealing it in with a heat gun. Whichever method you chose, you are sure to end up with a truly spectacular candle!
Steps
Gluing Glitter to a Candle
-
1Choose a candle to cover with glitter. The best type of candles for this project are pillar, votive, or taper candles, but you can also use birthday cake candles too. LED or battery-operated candles will work great for this as well. If the candle has a plastic wrapper on it, be sure to peel that off first.
- You can use a candle that's been poured into a jar or glass votive by decorating the glass part instead of the candle part.
-
2Mask off any areas that you do not want glittered with painter's tape. If you want to cover only part of the candle with glitter, then wrap painter's tape around the areas that you do not want glittered. You can wrap the tape around the middle of the candle for a simple design, or in a spiral for a festive, candy-cane design.[1]
- Skip this step if you want to cover the entire candle with glitter.
- Fold the end of the tape to make a small tab. This will make it easier to find the end and pull it off of your candle.
Advertisement -
3Paint the candle with 2 coats of decoupage glue. Choose a decoupage glue, such as Mod Podge, and apply it to the candle with a foam brush or a wide paint brush. Let the glue dry, then apply a second coat. Do not wait for this second coat to dry—move immediately onto the next step.[2]
- If you don't have any decoupage glue, spray the candle once with spray adhesive, then move on to the next step. Don't let the glue dry.
- If you are using a paint brush, choose one with synthetic, taklon bristles. Do not use soft camelhair brushes or coarse boar bristle brushes.
-
4Sprinkle glitter onto the wet glue until it is covered. Rotate the candle as you go so that it gets coated in a thick, even layer of glitter. If the glue starts to dry before you pour glitter over it, apply more glue to to the candle, then continue pouring the glitter.
- Work over a tray or a sheet of paper. This way, you can pour the glitter back into its jar when you are done.
- Extra-fine glitter will look beautiful, but you can mix it with some chunky glitter for a more textured look.[3]
-
5Let the candle dry completely before removing the tape. Set the candle down onto a piece of wax paper or parchment paper, and let it dry overnight. Once the candle has dried, you can peel the tape away. Don't drag the tape across the candle, or you may chip the glitter.[4]
- Stand pillar candles and votive candles upright. Lay taper and birthday candles on their sides or into candle holders.
- Some of the fancier birthday candles come mounted on toothpicks. Stick these into Styrofoam or balls of clay.
-
6Remove the excess glitter and touch up any mistakes. Use a dry paintbrush to dust off any excess glitter. If you notice any bare patches, fill then in with glue using a small, pointed brush, then sprinkle more glitter on top. Let the glue dry before moving on.
-
7Set the glitter with a clear, glossy, acrylic sealer. You can use a brush-on sealer, such as Mod Podge, or you can use a spray-on sealer instead. Let the sealer dry completely before using the candle. Depending on the type of sealer you used, this can take anywhere from 20 minutes to a couple of hours.
- If you are using a brush-on sealer, you can apply it to just the glittered parts or to the entire candle. A spray sealer will cover the entire candle.
- Make sure that the sealer is clear and glossy. If the sealer is satin or matte, it will dull the glitter and your candle won't sparkle anymore.
- You don't have to seal the candle, but be aware that the glitter may flake off and get everywhere.


Using Double-Sided Tape
-
1Find a candle with smooth sides to decorate. You can use a real candle or an LED/battery-operated candle, but it needs to be smooth. You can also use candles that have been poured into glass jars; you'll just have to decorate the glass part instead. Do not use novelty or shaped candles such as birds, eggs, or numbers. The tape won't stick smoothly to them.
-
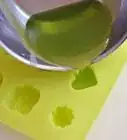
2Get a roll or sheet of double-sided scrapbooking adhesive. You can also use double-sided tape, but do not use double-sided foam mounting tape. It is too thick and will not look very nice. If you are using a sheet of double-sided adhesive, use a pair of scissors or a craft blade to cut it into your desired shape first.
- If you own a die cutting machine, use it to cut double-sided adhesive sheets into more unique shapes, such as circles, hearts, or monograms.[5]
-
3Stick the tape to your candle where you want the glitter to go. If the adhesive has a backing on both sides, peel the backing off of 1 side first. Wrap the adhesive around your candle, making sure to smooth down any wrinkles.[6]
- Wrap thin pieces of adhesive or double-sided tape to make stripes or candy cane spirals.
- Use different widths of double-sided tape for a unique effect.
-
4Peel the backing off of the front of the adhesive, if needed. Some types of double-sided adhesive sheets have a backing on both sides. If you already removed 1 side in order to stick it to the candle, now is the time to remove the other side of the backing.[7]
- If you used a roll of basic, double-sided tape, you probably won't have any backing to remove.
-
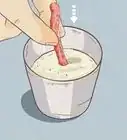
5Sprinkle extra-fine glitter onto the candle. Rotate the candle as you sprinkle the glitter onto it so that the adhesive gets evenly coated. Work over a tray or a sheet of wax paper/parchment paper. This way, you can pour the glitter back into its jar when you are done.
- If you want to, roll the candle across the excess glitter when you are done to make sure that you didn't miss any adhesive.
- Extra-fine glitter will stick to the adhesive the best because it is so fine. Regular or chunky glitter will not work as well and may leave behind small gaps.
-
6Tap or brush off the excess glitter. Gently tap the candle across your finger to remove any excess glitter. You can also use a dry paintbrush or a tissue to brush off any glitter that is stuck to the wax.[8]
- If you don't like the way something looks, simply peel the adhesive off and start again!
- Pour the excess glitter back into its jar when you are done using it.


Melting Glitter into a Candle
-
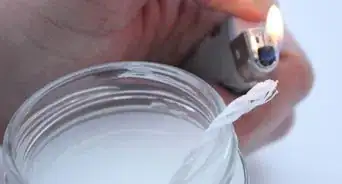
1Choose a pillar or votive candle that you wish to glitter. Because you will be using a heat gun on this candle, LED or battery candles are not recommended as you can ruin the electronics inside.
-
2Mask off the areas that you do not want to be glittered. You can glitter the entire candle, or you can glitter just 1 part. For example, you can wrap masking tape around the middle of the candle, or in a spiral for a candy cane effect. You can even apply an adhesive stencil!
- Skip this step if you want to apply glitter to the entire candle.
-
3Pour some glitter onto a tray or a sheet of wax paper or parchment paper. You will be rolling the candle across this glitter, so make sure that you use enough to cover the width and circumference of the area you will be covering, plus extra. Make the glitter thick enough so that you don't see the tray/wax paper/parchment paper.
- Use more glitter than you think you might need. If you use too little, the candle will stick to the surface you are working on and make a mess.
-
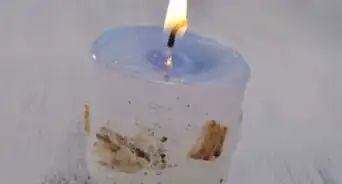
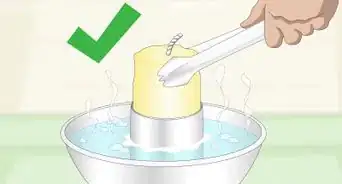
4Heat the side of the candle with a heat gun until the wax turns glossy. Set the candle down on its side, next to the glitter. Hold the heat gun over the candle and aim the nozzle at it. Turn the heat gun on and heat the candle until the wax starts to turn glossy and wet.
- If you are glittering the entire candle or a large part (i.e. half of the candle), then heat a small section first.
-
5Roll the candle across the glitter. Roll the candle back and forth across the glitter a few times, then roll it across a flat, smooth surface. This will help further press the glitter into the melted wax. A cold, metal tray will work great for this.
- If you are working in sections, let first section cool before heating up the next one, and covering it with glitter. Work 1 section at a time until you are done.
-
6Let the wax cool, then remove the masking tape and excess glitter. It should only take a few minutes for the candle to harden again, but if you are in a hurry, stick the candle in the fridge or freezer for a few seconds. Peel the tape or stencil off, then use a dry paintbrush to dust off any excess glitter.
-
7Reheat and re-roll the candle. Heat the glittered part of the candle with your heat gun, then quickly roll the candle across your flat, smooth surface once again. This will seal the glitter completely inside the candle.
- Do not roll the candle across glitter this second time.
-
8Let the wax harden completely before you use the candle. Because you heated the wax, the glitter is completely sealed inside it. You should notice little to no shedding.


Making a Poured Glitter Candle
-
1Understand that only the top of the candle will be glittered. Glitter is very light, so it will float to the top of your candle, no matter how much you mix it in. As such, this project is best for candles that are poured into little tins. This way, you will only see the glittered top, and not the un-glittered sides.
- If you want the candle to be completely coated with glitter, use 1 of the other methods.
-
2Secure a tabbed wick to the bottom of a 6-ounce (178-mL) metal tin. Purchase a 6-ounce (178-mL) metal tin and a pack of tabbed wicks. Take out 1 wick, and secure a glue dot or a piece of double-sided tape to the bottom of the metal tab. Press the tab into the tin, making sure that it is centered.[9]
- A glue dot is a piece of round, double-sided adhesive. You can find it in rolls or in sheets in the scrapbooking or adhesive section of a craft store.
- Tabbed wicks are pre-cut candle wicks that have metal disks attached to the bottom. You can find them in the candle-making section of a craft store.
- You can find metal tins in the gift box section and in the candle/soap-making section of a craft store.
-
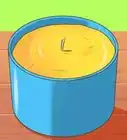
3Melt the soy wax flakes according to the instructions on the package. Set a candle-making pouring pot on the stove. Measure out 4 ounces (125 grams) of soy wax flakes for each candle that you will be making, and pour it into the pot. Turn the heat up to low, then wait for the wax to melt, stirring it occasionally. This will take about 10 minutes.[10]
- If you are working with a lot of wax, pour the wax in 8 ounces (250 grams) at a time.
- You can find these pouring pots in the candle-making section of a craft store.
- If you can't find a pouring pot, fill a saucepan with a couple of inches/centimeters of water, then set a tin can into it, then melt the wax in the can.
-
4Remove the wax from the stove, then add any desired fragrances. Once the wax has liquified and turned clear or translucent, take it off of the stove and set it down onto a heat-safe surface. Stir in some essential oil or candle-making fragrance. Plan on using 1 ounce (30 mL) of fragrance per 1 pound (500 grams) of wax.[11]
- Some fragrances have a flash point. Read the label, then check the temperature of the wax with a candy making thermometer.
-
5Pour the wax slowly into the prepared tin. Make sure that you pour around the wick so that you don't get the wick coated with wax. If you used the entire 1-pound bag of wax, you'll be able to make 4 candles.[12]
-
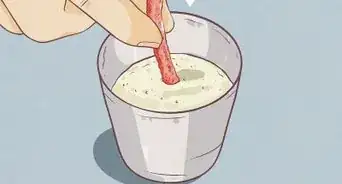
6Pour extra-fine glitter onto the wax while the wax is still melted. How much glitter you use depends on how wide the tin is. You need to use enough glitter so that the entire top of the candle is covered with glitter, so the wider the tin is, the more glitter you should use.[13]
- If the glitter doesn't reach the edges, gently swirl the tin until it does.
- You can find extra-fine glitter in the scrapbooking section of a craft store. The kids' craft section sometimes sells fine glitter too.
-
7Prop the wick up up between 2 sticks, then trim it if needed. Place 2 sticks across the top of the tin. Move the sticks together so that the wick is pinched between them. Keep the sticks together by taping them, tying them with string or wire, or clamping them with a clothespin.[14]
- If the wick is so long that it droops over the side of the tin, trim it with scissors so that it is about 1⁄2 to 1 inch (1.3 to 2.5 cm) above the sticks.
- You can also use skewers, pens, pencils, or paintbrushes instead of sticks.
-
8Let the candle set before trimming the wick down to 1⁄8 inch (0.32 cm). Wait at least half a day before trimming the wick down. Remove the sticks, then use scissors to cut the wick until it is 1⁄8 inch (0.32 cm) long. This will prevent the candle from creating too much smoke as it burns.[15]
- Be careful not to scratch the wax with your scissors, or you will scrape the glitter off.
- If you accidentally scratch the wax, heat it with a heat gun (not a hairdryer), and sprinkle more glitter on top to cover up the bare wax.
-
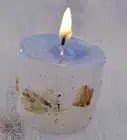
9Use the candle with care. Set the candle on a heat-safe surface, and light the wick with a match or lighter. When you are done using it, blow it out and let the wax harden. Do not pour the wax out, or you will lose the glitter. Never leave the candle burning unattended.
- Trim the wick down to 1⁄8 inch (0.32 cm) each time before you light it.
- These candles make great gifts. Pop the tin's lid on, then stick a pretty, handmade label on top.


Community Q&A
-
QuestionIs icon powder glitter safe to use in candles?
 Community AnswerAs long as you are careful with it, try not to use it too close to the wick. I would recommend using a plain lit candle to drip wax onto the sides of another plain candle, and then dusting it with the powder.
Warnings
- Never leave a burning candle unattended. Always place the candle on a heat-safe surface before burning it.⧼thumbs_response⧽
Things You'll Need
Glueing Glitter to a Candle
- Candle
- Painter's tape
- Decoupage glue (i.e. Mod Podge)
- Glitter
- Foam brush or synthetic paintbrush
- Clear, glossy, acrylic sealer
- Tray, wax paper, or parchment paper
Using Double-Sided Tape
- Candle
- Double-sided tape or adhesive sheet
- extra-fine glitter
- Tray, wax paper, or parchment paper
Melting Glitter into a Candle
- Candle
- Heat gun (not a hairdryer)
- Glitter
- Tray, wax paper, or parchment paper
Making Poured Glitter Candles
- 6-ounce (178-mL) metal tin
- 1 pound (500 grams) soy wax flakes
- Extra-fine glitter
- Tabbed candle wicks
- Glue dots or double-sided tape
- 2 sticks, pens, or pencils
- Candle-making pouring pot
- Candle-making fragrance oil

References
- ↑ https://www.honeybearlane.com/2012/09/glitter-striped-candles.html
- ↑ https://www.realcoake.com/how-to-make-a-glitter-candle-diy-home-decor/
- ↑ https://www.realcoake.com/how-to-make-a-glitter-candle-diy-home-decor/
- ↑ https://www.realcoake.com/how-to-make-a-glitter-candle-diy-home-decor/
- ↑ http://blog.consumercrafts.com/decor-home/polka-dot-diy-candles/
- ↑ http://blog.consumercrafts.com/decor-home/polka-dot-diy-candles/
- ↑ http://blog.consumercrafts.com/decor-home/polka-dot-diy-candles/
- ↑ http://blog.consumercrafts.com/decor-home/polka-dot-diy-candles/
- ↑ http://somethingturquoise.com/2012/11/16/diy-poured-glitter-tin-candles/
- ↑ http://somethingturquoise.com/2012/11/16/diy-poured-glitter-tin-candles/
- ↑ http://somethingturquoise.com/2012/11/16/diy-poured-glitter-tin-candles/
- ↑ http://somethingturquoise.com/2012/11/16/diy-poured-glitter-tin-candles/
- ↑ http://somethingturquoise.com/2012/11/16/diy-poured-glitter-tin-candles/
- ↑ http://somethingturquoise.com/2012/11/16/diy-poured-glitter-tin-candles/
- ↑ http://somethingturquoise.com/2012/11/16/diy-poured-glitter-tin-candles/
About This Article

To make glitter candles, start by removing the plastic wrap off of a votive, taper, or pillar candle. Then, paint the candle with a decoupage glue like Mod Podge, let the glue dry, then paint on another layer. Before the second layer dries, sprinkle glitter onto the candle, rotating as you pour to coat the whole candle evenly. Let the glue dry completely, then seal in the glitter with a clear, glossy, acrylic sealer. To learn how to melt glitter right into the wax of a candle, keep reading!