This article was co-authored by wikiHow Staff. Our trained team of editors and researchers validate articles for accuracy and comprehensiveness. wikiHow's Content Management Team carefully monitors the work from our editorial staff to ensure that each article is backed by trusted research and meets our high quality standards.
wikiHow marks an article as reader-approved once it receives enough positive feedback. In this case, 86% of readers who voted found the article helpful, earning it our reader-approved status.
This article has been viewed 118,750 times.
Learn more...
A sand candle is a wax candle set into a shell made of sand. You can make sand candles in all sorts of shapes and sizes. They are fun and easy to make, and no two candles are alike.
Steps
Setting Up
-
1Choose a flat-bottomed object with smooth sides to make your mold. It can taper downward, like a bowl, but it should not have anything that sticks out, like a handle. Objects that make great molds include:
- Cans, cups, and pillar candles
- Cubes and square candle votives
- Bowls
- Seashells (you will need to smooth the bottom out later)
-
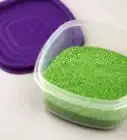
2Fill a large container with damp sand. Make sure the sand is packed tightly into the container, and that the surface is smooth. You can use anything you want to hold the sand: a bucket, a plastic bin, etc. Whatever you use must be twice the height you want the final candle to be.
- The sand will stick to your candle, so make sure that you are happy with the grain, color, and texture.
- The sand should be damp enough so that it holds its shape when you squeeze it in your hand. It should not be so wet that it is soupy.
Advertisement -
3Press the object bottom-first into the sand. Press the object down until the top is level with the sand. You should only see the top of the object. For a shorter candle, press the object only part-way down into the sand.
-
4Pull object out very carefully, so that the sand keeps the shape of your object. If you accidentally messed up any sand on the surface, smooth it down with your hand after you pull the object out.
-
5Consider pressing some objects into the walls of your mold. Choose some glass gems, sea glass, or small shells, and press them party-way into the walls of your mold. Don't press them all the way into the sand, or they won't stick the to candle. Make sure that the bottom of your object is the part that is sticking out, and the designed part is inside the sand.
- Leave these objects in the sand. When you pull the candle out, these items will be embedded inside the candle, and peek through the sand.
-
6Press a tabbed wick into bottom of your mold. Make sure that the wick is sticking up out of the hole. If it is too short, you won't be able to use your candle. Don't worry if it is too long; you will trim it down later, after the candle sets.
-
7Place two sticks across the opening of your mold, one to either side of the wick. The wick should be sandwiched between the two sticks. This will hold the wick straight up while you pour the wax.[1]


Heating and Pouring the Wax
-
1Set up a double boiler. Fill a large saucepan with 2 inches (5.08 centimeters) of water, and place it on a stove. Place a spouted melting pot inside the saucepan. You can buy spouted melting pots from the candle making section of an arts and crafts shop. If you can't find any, use a heat-safe, glass measuring cup instead.
-
2Add the candle wax into the melting pot and heat it between 260°F and 275°F (126°C and 135°C). Use a candy or cooking thermometer to gauge the temperature. You can use wax flakes or wax cubes. How much wax you melt will depend on how big your mold is. Plan on having some extra wax handy for the second pour, however, as the wax will sink into the sand.
- Don't add any color or fragrance into the wax yet. The high temperature may change the color and ruin the scent.
- Never leave the melting wax unattended.
- If your wax has specific melting instructions, follow those instead. Some waxes have a lower melting and ignition point.
-
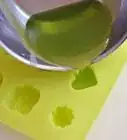
3Pour the melted wax slowly into the sand form, all the way to the top. Don't be alarmed if the wax starts to sink into the sand. You will add more wax later.
- Consider pouring the wax over the back of a spoon to prevent too much splattering.
- Keep your face away from the mold and wax; there may be some splattering.
-
4Wait for your first pour of wax to set. As the wax sets, it will sink into the sand. This is normal, and is what creates that sandy shell.
-
5Heat more wax for your second pour, this time between 175°F and 190°F (80°C and 88°C). Use a higher temperature if you want a thicker shell, and a lower temperature if you want a thinner shell.
-
6Consider adding some color or fragrance. Because you are using a lower temperature, you don't have to worry about the color or scent changing. Try using some ocean or tropical-themed scents, such as:
- Ocean breeze
- Coconut
- Orchid
- Pomegranate
-
7Pour the wax slowly into the mold, all the way to the top. Again, keep your face away from the mold and wax, in case of any splattering. Because your mold is already filled with a wax shell, this second pouring of wax won't sink into the sand as much.


Finishing the Candle
-
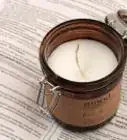
1Let the candle sit overnight.[2] The wax may set up sooner than that, but you will need to wait for the sand to dry as well. If you pull the candle out too soon, the sand may not stick properly.
-
2Remove the candle from the sand carefully the next day. Use a spoon to loosen the sand around the candle, then carefully lift the candle out.
-
3Gently brush the excess sand off using a soft-bristled brush. This will prevent the candle from making a mess on your table when you use it. Depending on how hot your wax was, you may have a subtle sand texture, or a thick shell of sand.
-
4Consider carving designs into the sand to expose the candle underneath. You can do this with a small spoon. Try doing some organic designs, such as swirls and loops.
-
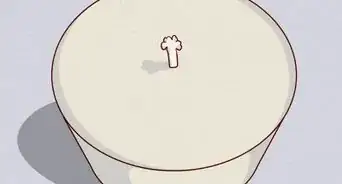
5Trim the wicks to about ¼ inch (0.63 centimeters), if necessary. Depending on how long or short your wick is, you may need to trim it down. If it is too long, it will become a fire hazard.
-
6Flatten the bottom of the candle, if necessary. If th candle wobbles too much, turn the candle over and look at the bottom. If you see any lumps or bumps, you will need to smooth them out using a knife.
-
7Use your candle. Always place a candle stand under your candle to catch any drips or melted wax.


Community Q&A
-
QuestionWill the shells crack when I light the candles?
 Community AnswerNo, the shells shouldn't crack when you light the candles.
 -
QuestionWhen you say let your candle set before the second pour, do you mean set completely hard or just until it doesn't sink any more?Community AnswerWhen I made these, I just waited until the wax didn't sink.
-
QuestionWe have added wax first, so how will we add blue wax without melting the first color?
 Community AnswerIt might melt a little, but it will create a cool blending affect with the 2 colors so the color change isn't sudden.
Warnings
- Do not add dyes or fragrances to the first wax pour, as such chemicals could alter the wax's setting temperature. Worse, the fragrance could ignite at such a high temperature.⧼thumbs_response⧽
- Never leave melting wax unattended.⧼thumbs_response⧽
Things You'll Need
- Large container
- Damp sand
- Flat-bottomed object
- Tabbed wick
- 2 skewers or popsicle sticks
- Candle wax
- Candle wax dye and/or fragrance (optional)
- Spouted melting pot
- Deep saucepan
- Cooking/candy thermometer
- Wooden stirring sticks
- Spoon
- Soft bristled brush


References
About This Article

To make sand candles, fill a large container with damp, tightly packed sand and press the flat-bottomed object you're using to create the mold all the way down into the sand before pulling the object out. Next, press a long tabbed wick into the bottom of the sand mold and sandwich it between 2 sticks to keep it in place when you pour the wax. Then, slowly poor melted wax into the sand mold and let it set overnight before removing the candle from the mold! For tips on adding fragrance to your candles, read on!