wikiHow is a “wiki,” similar to Wikipedia, which means that many of our articles are co-written by multiple authors. To create this article, 34 people, some anonymous, worked to edit and improve it over time.
wikiHow marks an article as reader-approved once it receives enough positive feedback. In this case, 93% of readers who voted found the article helpful, earning it our reader-approved status.
This article has been viewed 152,323 times.
Learn more...
For an art project keepsake, create handprint art that will capture your child’s small handprint for a moment in time. Even babies can participate in this project as long as there is a willing adult ready to guide his or her precious hand to paper (and clean up the mess).
Steps
Imagine Your Project
-
1Determine what you hope to accomplish with this project. Do you want to create a single piece of artwork to give to a grandparent or relative or are you planning to track your child’s hand size through time using artful designs?
- If tracking the changes in hand size, purchase a large art folder to keep the paintings in. Always date the back of each piece of artwork for reference. (It's a good idea to keep digital copies too, in case of damage or loss of the original handprint artwork.)
- Another method to keep a series that tracks your child’s development, is to create small cards with your child’s hand and mount them to a long piece of tag board.
-
2Choose your designs. How will you create art from your child’s handprint? Will you turn his or her chubby print into swimming fish or animals or perhaps recreate the alphabet? Have a design game plan ahead of time and even sketch out how it will look.
- You may want to design something more permanent, possibly using clay or even plaster. Take your child’s age, time commitment and supplies into consideration before deciding which type of art project you will attempt.
Advertisement -
3Decide if your child is ready to participate. Although even a baby can make handprint art, be sure your child is in the right frame of mind and whether the project will be more of a difficult task rather than an enjoyable experience.
- Identify who will help you with the project. It's helpful to have someone else helping out with supplies if possible. But it's not essential unless you're supervising a group of children.


Prepare for the Project
-
1Choose a time when your child is rested, fed and happy. Your child will be more willing to participate when contented.
-
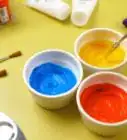
2Gather all the supplies you will need ahead of time. Instead of finding items as you go, have everything purchased and unpacked before you bring your child into the project. If you are using paint, pour paint into separate bowls or plates and have plenty of towels and water for clean up. Also, if you plan to create a project (such as a plaster handprint), read the directions ahead of time so the project goes smoothly when your child is ready to participate.
-
3Find an area where you can create the art. A picnic table outside or the kitchen table covered in newspaper is a great spot for an art project.
-
4Explain the project to your child. If your child will be actively participating in the project, explain what he or she will be doing and every step that will be taken along the way. That way, your child can mentally prepare for what will need to be done and may be more patient.


Create the Design
-
1Brush your child’s hand with the paint or plaster to create the print. Instead of having your child’s hand in a bowl of paint or plaster, apply the material with a brush. Spread paint or plaster evenly over the child's hand for full coverage.
-
2Guide your child’s hand to the paper, canvas or board. Gently press down on his or her hand to make sure you leave an actual handprint. Tell your child to hold his or her hand still (if he or she understands) and then gently lift the hand.
-
3Allow the paint/plaster to dry, depending upon your project. If you're working with plaster, you may not be able to wait for the material to dry in order to decorate. Follow the kit’s directions for best results.
-
4Decorate the handprint using your design. If you waited for the handprint to dry, tap into your imagination and create art from your child’s handprint. Ideas for what to do are listed next:
- Using a marker, draw in faces, wings, fins, arms and legs, etc., to create creatures from the handprints. Add scenery.
- Draw a background pattern around the hands. Use interesting patterns, neon colors, bright lines, etc.
- Make modern art. Turn the handprints into imitations of famous modern art pieces. Check online for images of such artworks.
- Ask your child to decorate the handprints. He or she will be bound to come up with fun ideas.
- Draw around the handprints several times, so that it looks like the lines are radiating out from the original handprints. Use the colors of the rainbow to do this.
- If it's holiday time, use holiday themes to inspire the artwork touch-ups.


Community Q&A
-
QuestionI don't have a child. What do I do?
 PaigexCommunity AnswerUse your own handprints, or those of any nieces or nephews. Basically anyone with a hand is alright.
 -
QuestionWhat kind of paint should I use on fabric?
 Community AnswerYou should use fabric paint that you can buy at most art and craft stores. You could even try using fabric pens.
 -
QuestionWhat kind of paint works best?Community AnswerAcrylic paint is popular and works on most surfaces.
Things You'll Need
- Paint or plaster
- Canvas or similar medium
- Art smocks
- Table surface cover
- Paintbrushes
- Drying space

About This Article
To make handprint art, first cover your workspace with newspaper for easy clean-up. Next, brush an even layer of non-toxic acrylic paint over the hand you’re using for the art. To make a perfect handprint, press the painted hand down on canvas or thick paper and hold it still for 2 seconds before lifting it gently. Repeat this process until you have the amount of handprints that you want. Then, let your project dry fully before decorating it further. For decorating ideas and advice on doing handprint art with a child, read through the rest of this article!