X
wikiHow is a “wiki,” similar to Wikipedia, which means that many of our articles are co-written by multiple authors. To create this article, 12 people, some anonymous, worked to edit and improve it over time.
The wikiHow Video Team also followed the article's instructions and verified that they work.
This article has been viewed 44,185 times.
Learn more...
Who says that ice has to come in cubes? Whether you're looking for a way to keep your favorite alcoholic beverage cool without diluting it or simply trying to keep your soda colder, longer, ice balls are the way to go. Luckily, there's an easy way to make ice balls on almost any budget!
Steps
Method 1
Method 1 of 3:
Using an Easy Water Balloon Method
-
1Buy a package of water balloons. This method is cheap, quick, and easy — perfect if you don't want to spend money on specialty molds for making ice balls. All you'll need is a few round water balloons (and, of course, water and a freezer.)
- Remember that, if you're using your ice balls to cool your drinks, they'll need to be able to fit inside your glasses. Thus, when it comes to water balloons, generally, the smaller, the better.
-
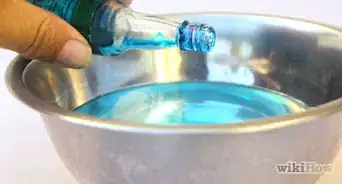
2Fill your balloons with enough water to make small spheres. If you want color ice balls add two drops of food coloring when you do this. Grab a balloon, open the neck, and slide it over your faucet. Turn the water on at a low level so that it gradually fills the balloon. You want enough water so that you have a small globe that you can easily handle with one hand — this is probably a lot less than you'd use if you were going to have a water balloon fight.
- Once again, you'll want to make sure that your ice balls are small enough to fit in whichever glass you plan to use. A good way to check this is to put your glass around the balloon as it fills. Keep in mind that water expands when it freezes, so you want to leave a little extra room on each side.[1]
Advertisement -
3Tie the balloons. When each balloon is full enough, remove it from the faucet and tie it off. Use tight knots — having a leaky balloon in your freezer can lead to an icy mess.
-
4Leave the balloons in the fridge. Now comes the easy part — waiting. Simply leave your water balloons in the fridge until they are frozen all the way through. For the most round shapes, don't pack the balloons into a container — they will push against each other and create oblong-shaped pieces of ice. Instead, give each balloon its own space on a plastic tray or baking sheet so that none are touching.
- Note that, even with this precaution, ice balls made using this method won't be perfectly round. Instead, they'll have one side that's a little flattened (the side of the balloon that it was resting on.)
-
5Pop and peel off the balloon before using each ball. Once your ice balls are completely frozen, they're ready to use. Simply use a knife or a pair of scissors to cut the balloon off each one and drop the (mostly) spherical pieces of ice into your drink. Voila!


Advertisement
Method 2
Method 2 of 3:
Using Commercial Molds
-
1Buy a set of molds. If you'd like perfectly-round ice balls or you simply don't want to deal with the hassle of filling and popping water balloons, investing in a good ice ball mold is your best bet. These are available in specialty stores and online for typically about $8-$20.[2] Several types of molds are available, including:
- Silicone molds: Made from flexible silicone material, which makes it easy to "pop" the frozen balls into drinks.
- Screw-together molds: Made from hard plastic, but screw construction eliminates much of the danger of spillage.
- Novelty molds: Usually designed to make the ice take the shape of a specific spherical object, like a baseball, the Death Star, etc.
-
2Fill the molds. Regardless of the type of mold you're using, most work in the same way. Secure the top half of the mold to the bottom half, then position the small hole in the top half of the mold underneath a running faucet. Fill until the mold is full, then remove the mold from the water.
- Some molds may come with caps for the filling hole — if this is so, secure the cap before freezing.
-
3Freeze the molds. Next, simply place your mold in the freezer and wait until the balls freeze all the way through. Depending on the size of the balls in your mold, this can take anywhere from one hour to six or so. When the balls are frozen, remove from the freezer, take the mold apart, and serve.
- Be wary if you are using a silicone mold — some models may not be sturdy enough to retain their shape unless you put them on a flat surface.


Advertisement
Method 3
Method 3 of 3:
Spicing up Ordinary Ice Balls
-
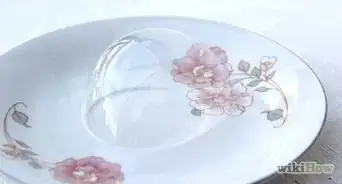
1Use insulated mugs to get clear ice balls. Once you've frozen a few ice balls, you've probably noticed that the centers of these balls tend to be white and cloudy. However, it's possible to get crystal-clear ice balls if you have individual ball molds (not "tray-style" molds) and a freezer-proof cup or mug that's big enough for the ball mold to fit snugly in the rim. Use the following steps:
- Fill the cup or mug to the brim. Set aside.
- Fill your mold.
- Keep a finger over the mold's fill hole. Turn the mold so that the hole points down and your finger is blocking the flow of water.
- Put the cup in the sink (or somewhere else where you don't mind spilling water.) Slide the mold into the cup hole-down (keep your finger over the hole as long as possible as you slide it into the cup.) The extra water should flow over the sides of the cup. The hole in the mold should point down at an angle — not straight down.
- Put the cup and mold into the freezer. If you have trouble removing the mold when the ice is frozen, run warm water over the outside of the cup where it meets the mold.
-
2Add color. Ice balls don't have to be white or clear. If you'd like to add a little color to your ice balls, consider putting a drop or two of food coloring in each ball and gently shaking the mold or balloon before putting it in the fridge. This won't effect the taste of the ice, but it can be great in terms of giving cocktails and other drinks eye-catching presentation.
- If you're throwing a party, try putting out a serving bowl full of ice balls of many different colors. This way, guests can add whatever color they want to their drinks!
-
3Freeze ingredients inside the ice balls. To add flavor to your ice balls (and make a great conversation piece), try freezing different ingredients in each ice ball. As each ball melts (which, compared to ordinary ice cubes, will typically take some time), the flavor of the ingredient will leech into the drink. Here are just a few ideas to get you started:
- Lime slices
- Lemon slices
- Mint leaves
- Basil
- Berries
- Candy
- For these ingredients, you'll want to make smaller ice balls than you normally would — ideally, just bigger than whatever you put in them. If you make full-sized ice balls, your fillings will sink to the bottom or float on the top, concentrating them all in one part of the ball.
-
4Make ice balls from liquids other than water. Giving your drinks an unexpected burst of flavor is as easy as simply making your ice balls something other than ice balls! Substituting fruit juices, soft drinks, and so on for water can allow you to make some interesting flavor combinations — just make sure that whatever you use compliments the taste of the actual drink.
- If you're using flavored liqueurs, note that alcohol has a lower freezing point than water and a colder the temperature will be needed to freeze it. Hard liquor is very difficult to freeze with anything but a commercial freezer.


Advertisement
Community Q&A
-
QuestionCan I put the ice balls (still in the balloons) directly into a large dispenser to keep the drink cold without watering it down?
 T. ChinsenTop AnswererThe rubber of the balloons can react with the drink and add unwanted flavor. Balloons are not a food-safe product. There are shaped freezer "cubes" that can keep drinks cold without watering them down. Search online for reusable ice cubes to find specific shapes and where to purchase them.
Advertisement
Warnings
- Though ice balls are roughly snowball-sized, you should not plan on throwing them at anyone.⧼thumbs_response⧽
- Don't be surprised if your ice balls are a little smaller than you expect after leaving them in the freezer for a long time. Due to a process called sublimation, ice will very gradually convert into gas over time in the freezer.⧼thumbs_response⧽
Advertisement
Things You'll Need
- Balloon
- Water
- Food coloring
References
About This Article
Advertisement