wikiHow is a “wiki,” similar to Wikipedia, which means that many of our articles are co-written by multiple authors. To create this article, volunteer authors worked to edit and improve it over time.
This article has been viewed 25,745 times.
Learn more...
Making your own sweet pickle relish can be a time-consuming process, but when done properly, the results are well worth the wait. You can enjoy the relish immediately or can it for long-term storage.
Ingredients
Makes 4 pints (2 L)
- 2-1/2 lbs (1.13 kg) cucumbers
- 1 large yellow onion
- 1 small red bell pepper
- 1 small green bell pepper
- 3 garlic cloves
- 1/4 cup (60 ml) pickling salt or pure kosher salt
- 3 cups (750 ml) white vinegar, cider vinegar, or red wine vinegar
- 3/4 cup (180 ml) white granulated sugar or light brown sugar
- 2 tsp (10 ml) dill seeds
- 2 tsp (10 ml) mustard seeds
- 2 tsp (10 ml) celery seeds
- 1/2 tsp (2.5 ml) turmeric
Steps
Preparing the Ingredients
-
1Wash the vegetables. Rinse the cucumbers and peppers under cool, running water. Dry well with clean paper towels.
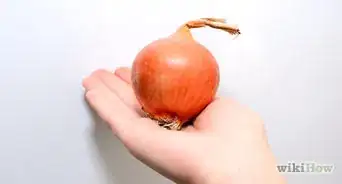
- Peel the onion and garlic cloves. You can peel the cucumbers too, if desired, but doing so is not necessary and only a matter of personal preference.
-
2Remove the seeds from the cucumbers. Slice each cucumber in half lengthwise. Drag a spoon down the lengthwise center of each half, removing the strip of seeds.[1]
- While pickling cucumbers and English cucumbers are the easiest to work with, you can actually use regular cucumbers for this, too. The process will be the same and the relish should still taste just as great.
Advertisement -
3Dice the cucumbers. Using a knife, cut off both ends of each cucumber. Dice the cucumbers into small pieces measuring 1/8 to 1/4 inch (3 to 6 mm).
- Chopping the cucumbers by hand will give you the greatest control over the size of the pieces, but to save time, you could use a food processor instead. Use a medium "chop" blade, and process the cucumbers very slowly to avoid turning them into mush.
-
4Dice the remaining vegetables. Dice the peppers and onion into 1/8 to 1/4 inch (3 to 6 mm) chunks. Mince the garlic as finely as possible.
- You'll also need to discard the stems, membranes, and seeds of the peppers before dicing them.
- As with the cucumbers, chopping by hand will give you more control, but you can use a food processor if desired. Process each vegetable separately.


Soaking the Vegetables
-
1Toss the vegetables with salt and water. Place the diced cucumbers, peppers, and onions in a large bowl. Toss the vegetables together with the salt, then cover the entire batch with cold water.
- Note that you should not add the minced garlic to this mixture. Set it aside until later.
- The bowl you use should be made of glass, plastic, or another non-reactive material.
- The water should be very cold to keep the vegetables as fresh as possible. If desired, you can add 1 cup (250 ml) of ice to the water, as well, to cool the mixture further.
-
2Let the mixture rest. Set the mixture aside and let it rest for 4 to 6 hours at room temperature.
- Technically, you can move onto the next step after 2 hours if you're in a hurry. You can also allow the vegetables to soak overnight. Longer resting times should help prolong the lifespan of the relish, which is beneficial if you plan on storing it long-term.
- Check the mixture every hour or so. If the water level decreases significantly, add more cold water. If the water temperature becomes too warm, add more ice.
-
3Drain and rinse the vegetables. Pour the contents of the bowl through a fine mesh colander, discarding the soaking water. Thoroughly rinse the vegetables with cool, running water.
- Agitate the colander carefully while rinsing the vegetables to promote even coverage.
- Allow the rinse water to completely drain from the vegetables before continuing.
-
4Soak in fresh water. Return the vegetable mixture to the bowl and cover it with additional cold water. Allow the mixture to soak for another hour.
-
5Drain the vegetables again. Pour the contents of the bowl through the colander, discarding the water and keeping the vegetables.
- You do not need to rinse the mixture this time, but you may need to gently press the vegetables against the sides and bottom of the colander to squeeze out as much excess moisture as possible.


Cooking the Relish
-
1Combine the vinegar, sugar, and spices. Place the vinegar, sugar, minced garlic, dill seeds, mustard seeds, celery seeds, and turmeric in a 4-qt (4-L) saucepan. Set the pan on the stove over medium-high heat.[2]
- You can use white vinegar, cider vinegar, or red wine vinegar; each will add a slightly different flavor profile and tint to the finished relish.
- Similarly, you can use white sugar or brown sugar. White sugar works best with white vinegar and red wine vinegar, while brown sugar works best with cider vinegar.
- You can add the spices directly to the vinegar and sugar, but if you prefer a clear relish, consider placing them in a spice bag or cheesecloth satchel instead. This bundle of spices can be removed before you pour the relish into jars.
-
2Let the pickling mixture simmer. Allow the mixture to reach a rolling boil, then reduce the heat to medium and drop the liquid to a simmer.
- Allow the pickling mixture to simmer for 5 minutes, stirring frequently. The sugar should be fully dissolved before you continue.
-
3Add the vegetables. Add the cucumbers, onions, and peppers to the simmering liquid. Increase the heat to medium-high again, and allow the liquid to reach a boil.
- After the mixture boils, reduce the heat to medium again to drop the liquid to a simmer. Continue cooking for about 10 minutes, or until most of the excess liquid evaporates.
- Stir the contents of the saucepan frequently to prevent them from burning and sticking to the saucepan.


Store the Relish
-
1Prepare the jars. Sanitize the canning jars and lids in boiling water.[3] Dry well with paper towels.
- If you have a dishwasher, you can clean the jars in the dishwasher instead of using boiling water. You'll still need to boil the lids, however.
- To reduce the amount of wait time, it's best to perform this step while simultaneously soaking or cooking the relish.
-
2Prepare a water bath. Fill a water canner halfway with water. Cover it with its lid, and start heating it over medium-high heat. Allow the water to reach a rolling boil.
- It's best to prepare this water bath while the relish cooks.
- If you don't have a water canner, you can use a large stockpot with a heat-proof rack placed in the bottom.
- Note that a water bath is only necessary if you plan on processing the cans of relish for long-term storage. If you intend to use the relish within one month, you can skip this part.
-
3Pack the relish into the jars. Ladle the finished relish into the sanitized jars, leaving 1/4 to 1/2 inch (0.6 to 1.25 cm) of empty headspace in each jar.
- Briefly and gently stir the sides of each jar to release as many air bubbles as possible.
- Use a damp cloth to wipe excess liquid from the jar rims, then tightly screw the lids on top of the jars.
-
4Process the jars for 10 minutes. Carefully lower the cans of relish into the boiling water. Allow the water to reach a boil again, then cover the canner and process the relish for 10 minutes.
- Do not allow the jars to touch each other or the sides of the canner.
- The hot water should cover the jars by at least 1 or 2 inches (2.5 or 5 cm).
- If you live at higher altitudes, you may need to process the jars longer. For altitudes between 1000 and 6000 feet (0.3 and 1.8 km), process the jars for 15 minutes. For altitudes above 6000 feet (1.8 km), process the jars for 20 minutes.
-
5Remove the jars. After you finish processing the jars, use jar tongs to remove them from the hot water. Cool them on a wire rack or folded towel for an hour, or until they drop to room temperature.
- After the jars cool, press on the center of each lid. If the lids stay down when pressed, the jars processed correctly. If it pops up, the jars are not sealed. Do not re-process unsealed jars; simply store them as you would store opened jars.
-
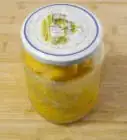
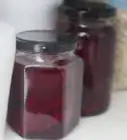
6Store sealed jars up to one year. Place the jars of processed, sealed relish in a cool, dark place. They should remain good for at least 6 months, but most will last for 12 to 18 months.
-
7Store open jars up to one month. Once you open the jars, keep them in your refrigerator and use the relish within one month.[4]
- If you chose not to process the jars at all, you should still be able to store them in your refrigerator for up to one month.


Things You'll Need
- Paper towels
- Sharp knife
- Spoon
- Vegetable peeler (optional)
- Food processor (optional)
- Large mixing bowl
- Fine mesh colander
- 4-qt (4-L) saucepan
- Water canner
- 4 pint-sized (500-ml) glass canning jars with lids
- Jar tongs
- Wire rack


References
About This Article
To make relish, start by dicing cucumbers, red and green bell peppers, and a yellow onion. Then, soak the vegetables in a bowl of water for 6 hours, changing out the water after 5 hours. Next, simmer vinegar, sugar, minced garlic, dill seeds, mustard seeds, celery seeds, and turmeric in a saucepan for 5 minutes before adding the diced vegetables. Finally, bring everything to boil, and reduce the heat to a simmer for 10 more minutes. To learn how to store homemade relish, scroll down!