This article was co-authored by Claire Donovan-Blackwood. Claire Donovan-Blackwood is an Arts & Crafts Specialist and CEO of Heart Handmade UK, a site dedicated to helping people live a happy, creative life. With over 13 years of experience, Claire uses art as a form of therapy and focuses on mindfulness in the making of art. She makes crafting easy and accessible for those she works with. Claire received her B.A. in Photography & Visual Imagery from The University of Huddersfield.
wikiHow marks an article as reader-approved once it receives enough positive feedback. In this case, 80% of readers who voted found the article helpful, earning it our reader-approved status.
This article has been viewed 64,041 times.
Tulle pom poms are an easy and inexpensive craft project, and the finished pom poms have a variety of uses. For instance, you could use tulle pom poms to add a touch of whimsy to the decor for your next party, or you could toss a pom pom to your favorite cat for use as a fun toy.
Steps
Method One: Tube Technique
-
1Cut a rectangular piece of cardstock. The dimensions will vary depending on how small or large you want to make the pom pom. The width of the rectangle should match your desired pom pom diameter, and the length should be 1-1/2 to 2 times as long as the width.[1]
- For a small pom pom, try making a 4-inch (10-cm) by 6-inch (15-cm) rectangle. For a larger pom pom, consider making an 8-inch (20-cm) by 12-inch (30-cm) rectangle.
- Alternatively, you could use a hardback book instead of creating a cardstock rectangle. The width of the book should match the desired diameter for your pom pom.
-
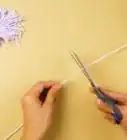
2Cut a length of scrap tulle. This piece of tulle should be about 7 to 10 inches (17.5 to 25 cm) long. Set it aside for later.
- You'll eventually use this piece of tulle to hold the center of the pom pom together. If you don't want to use tulle, you could try cutting and using an equal length of ribbon, twine, or coated wire.
Advertisement -
3Wrap the working tulle around the cardstock. Hold one end of the tulle at the lengthwise edge of the cardstock rectangle. Wrap the tulle completely around the width of the rectangle a total of 30 times, then cut the tulle from its spool after the final pass.
- For most sizes, 30 passes should create an adequately fluffy ball of tulle. Extremely small pom poms may require fewer passes, and extremely large pom poms may require more.
- You can use one to four colors of tulle. If using multiple colors, hold the different tulle strips together and wrap them simultaneously. Shorten the number of passes according to the number of colors.
- One color gets 30 passes.
- Two colors get 15 passes.
- Three colors get 10 passes.
- Four colors get 7 or 8 passes.
-
4Slide the tube off the cardstock. Carefully slide the tube of wrapped tulle off the cardstock rectangle. Pinch the tube together at its center.
- When pinched, the tulle tube should have a bow-like shape. The wrapped, rounded edges should fall to both sides of your hand.
- Work carefully. If the tulle unravels during this step, you'll need to wrap it around the rectangle again to return it to its tube shape.
-
5Tie the center. Carefully tie the piece of scrap tulle around the center of your tulle tube, preserving the bow-like shape first created when you pinched the tube with your fingers.
- Keep the tie centered around the tube. If it appears off-center, carefully slide it along the width of the tube as needed to position it closer to the center.
-
6Cut the folded edges. Insert your scissors through the rounded loop ends and cut them apart. Do this on both sides of the tulle tube.
-
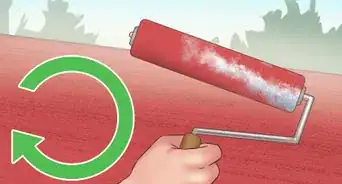
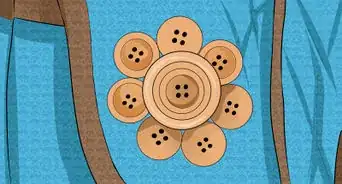
7Fluff the ball. Gently pull the cut tulle ends toward the center of the pom pom, fluffing and shaping them as needed to hide the tied center and give the pom pom a rounded shape.
- Some pieces will likely appear longer than others. If this happens, carefully trim them down using your scissors to give the pom pom a more rounded shape.
- During this time, you can also trim away any excess tulle, ribbon, or coated wire peeking out from the center of the pom pom.
-
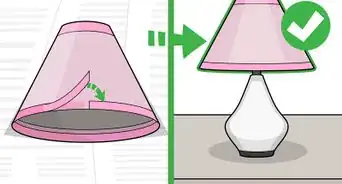
8Use as desired. Once the tulle pom pom is adequately round and fluffy, it's done and ready to use.


Method Two: Cardboard Ring Technique
-
1Cut out a cardboard circle.[2] Draw and cut out a circle from plain cardboard. The diameter of this circle will match the diameter of the pom pom.[3]
- For a small pom pom, you could trace around the mouth of a standard drinking glass, creating a circle with a diameter of about 6 inches (15 cm).
- For a medium pom pom, consider using a diameter of about 12 inches (30 cm).
- For a large pom pom, create a circle with a diameter between 24 and 30 inches (61 and 76 cm).
-
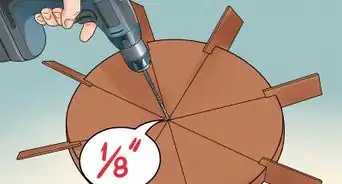
2Cut out the center of the circle. Using a straight razor, cut a second circle out from the center of the larger circle. The diameter of this circle should be no more than one-third the diameter of the larger circle.
- You can discard the small circle. The only piece you need for your pom pom is the large cardboard ring.
-
3Create a second cardboard ring.[4] Follow the previous steps to create a second cardboard ring identical to the first.
- You can make the process easier by tracing the outer and inner edges of the first ring onto the cardboard you'll use for the second ring.
-
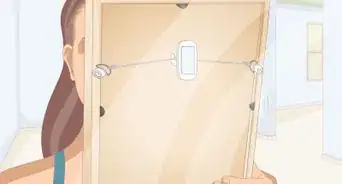
4Place a length of ribbon between the pieces. Cut a piece of skinny ribbon long enough to wrap around the outer circumference of the cardboard rings. Sandwich this piece of ribbon in between the two rings.
- If you don't have ribbon, you could use string, twine, or yarn. To create a more durable pom pom, consider using a more durable material like coated wire.
- Form a U-shaped loop with the ribbon and lay it flat on top of one cardboard ring. It should lie between the two edges of the ring. Place the second ring directly on top, aligning the edges of this ring to the edges of the bottom ring and securing the ribbon in between both.
-
5Trim a length of tulle. Cut 1 to 3 yards (1 to 3 m) of tulle, depending on the size of the ring.
- Small rings need 1 yard (1 m), medium rings need 2 yards (2 m), and large rings need 3 yards (3 m).
- You can use one or two colors of tulle. If using one color, cut the tulle to the full length. If using two colors, halve the lengths; for instance, use 1/2 yard (1/2 m) of one color and 1/2 yard (1/2 m) of the second color to wrap a small ring instead of using a full 1 yard (1 m) of both colors.
-
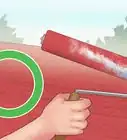
6Wrap the tulle around the cardboard sandwich.[5] Position one end of the tulle along the outer edge of the cardboard, then wrap the tulle over the surface, through the empty center, and back around the other side of the ring.
- Continue wrapping the tulle around the cardboard sandwich in this manner, working until you run out of tulle. Use your fingers to adjust the placement of the tulle as needed so that the entire ring is evenly covered.
- If you use two colors of tulle instead of one, treat the two pieces as one piece. Do not wrap them separately.
-
7Cut around the edges. Slide a pair of scissors over the tulle folds. Cut these folds around the entire outer circumference of the ring.
- Work carefully to avoid accidentally cutting the ends of your center ribbon.
- After cutting the tulle, you should see two distinct sides connected only at the center.
-
8Tie the ribbon around the tulle. Carefully separate the two cardboard rings, opening them just wide enough to reveal the center ribbon. Tie this center ribbon into a tight knot around the center of the tulle.
- It's crucial that you tie the ribbon into a tight knot. If you tie it too loosely, the pom pom will fall apart once you remove the cardboard.
-
9Pull off the cardboard. Carefully pull the cardboard rings off either side of the tulle structure.
- After removing the cardboard, you should be able to see the basic pom pom shape.
-
10Fluff the tulle. Gently pull the edges of the tulle pom pom toward the center, fluffing and positioning the pieces as needed to create a rounded ball.
- During this step, you should use the tulle to cover the center string. If the string is too long to hide, trim off a portion of the ends.
- If the edges of the tulle appear uneven once you fluff the pom pom, use scissors to carefully trim away any excessively long pieces, giving the pom pom a more rounded shape.
-
11Use as desired. Once you're satisfied with the shape and fluffiness of the pom pom, it's done and ready to use.


Things You'll Need
Tube Technique
- Heavy cardstock
- Scissors
- Spool of 6-inch (15-cm) wide tulle, 1 to 4 colors
- Ribbon or coated wire (optional)
Cardboard Ring Technique
- Cardboard
- Scissors
- Straight razor
- Pencil
- Skinny ribbon, twine, string, yarn, or coated wire
- Spool of 6-inch (15-cm) wide tulle, 1 to 2 colors

References
- ↑ http://www.oncewed.com/diy/diy-wedding-pom-poms/
- ↑ Claire Donovan-Blackwood. Arts & Crafts Specialist. Expert Interview. 3 May 2019.
- ↑ http://www.momdot.com/how-to-make-a-tulle-pom-pom-ball-tutorial/
- ↑ Claire Donovan-Blackwood. Arts & Crafts Specialist. Expert Interview. 3 May 2019.
- ↑ Claire Donovan-Blackwood. Arts & Crafts Specialist. Expert Interview. 3 May 2019.
About This Article

To make tulle pom poms, cut a piece of cardstock into a rectangle. Next, wrap the tulle around the center of the cardstock about 30 times and cut the tulle from its spool. Then, carefully slide the tube of wrapped tulle off the cardstock and tie a 10-inch piece of tulle around the center to create a bow-like shape. Finally, insert your scissors through the rounded loop ends on both ends of the tube, cut them apart, and fluff the pom pom to give it a rounded shape. To learn about other techniques, read on!