X
wikiHow is a “wiki,” similar to Wikipedia, which means that many of our articles are co-written by multiple authors. To create this article, 15 people, some anonymous, worked to edit and improve it over time.
This article has been viewed 56,204 times.
Learn more...
Your iPhone is an integral part of your life, but it looks exactly the same as everyone else's phone. Making your own case is a great way to spice up your phone and express your creativity--and if you have the materials on hand, it may be cheaper than buying a standard case. You can decorate a plain iPhone case, you can custom-order a case from a website, or you can craft your own case using household items. Review the ideas below. It's time to get crafty!
Steps
Method 1
Method 1 of 4:
Making an iPhone Case From a Necktie
-
1Consider sewing an old necktie into an iPhone pouch. This method is perfect if you're looking for a stylish way to carry your iPhone, but you aren't concerned with using the phone while it's inside the case. This is a great opportunity to "upcycle" and re-purpose something that you might otherwise throw away.[1] To make your iPhone pouch, you will need:
- A necktie that matches or exceeds the width of your phone. Pick out a tie that catches your eye. If you don't have any vintage neckties lying around your house, you should be able to find something suitable at a thrift shop or a vintage clothing store.
- Sharp fabric scissors or a rotary cutter.
- A ruler.
- A sharpie.
- A cutting board.
- A needle and thread, or a sewing machine. Pick a thread that complements the color of the tie.
- A decorative snap button or a traditional "buttonhole" button. You may be able to remove a button from an old piece of clothing. Otherwise, you should be able to find a button or a set of buttons at any arts-and-crafts or fabric store.
- A snap fastener or snap fastening pliers. This is only necessary if you want to put a snap-shut button on your iPhone pouch, rather than a traditional "buttonhole" button. You should be able to find these tools at an arts-and-crafts or fabric store.
-
2Measure out the pouch. Fold over the large pointed end of the tie, and use the ruler to measure from the straight edge that this creates. This edge will become the top of your pouch.
- Use a sharpie to mark off a space that will fit your iPhone. This may be anywhere from five to seven inches. Slide your iPhone inside the tie to make sure that you have marked out a large enough pouch.
- Leave an extra half-inch for a seam at the bottom of your pouch.
Advertisement -
3Cut the tie straight across where you marked with the sharpie. You should be left with the large end of the tie. Turn this cut piece inside-out.
- Leave the inner lining of the tie in place if you'd like the extra padding for your phone. If not, feel free to remove it with scissors.
-
4Sew the bottom of the "pouch" shut. Stitch a straight line to close the end of the pouch, leaving about a half-inch of space along the edge that you severed from the rest of the tie. Now you should have an iPhone-shaped pouch.
- Consider folding the corners in and sewing them down to give your pouch rounded edges.
- Trim the excess fabric from the bottom of the pouch, and turn it right-side-out again.
-
5Attach the snap button using a snap fastener. Secure the bottom ("receiving" end) of the snap in place through the fabric in the front of the pouch, about a quarter-inch down from the "V" of the pouch opening.
- Affix the other end of the snap button to the outside of the pouch flap, right at the tip of the tie. Make sure that the two halves of the snap button line up evenly before you attach them.
- Refer to the directions on the snap button package to make sure that you're assembling the pieces correctly.
- If you want to use a traditional "buttonhole" button, simply sew the button where you would fasten the receiving end of the snap: about a quarter-inch down from the "V" of the pouch opening. Use fabric scissors to cut a slit in the pouch slap where the top of the snap button would sit. The slit should be as long as the diameter of the button that you are using.
- Consider using Velcro to the same effect. You should be able to find a strip of Velcro at an arts-and-crafts store. Simply replace the top and the bottom of the snap clasp with the two parts of a Velcro clasp. Cut the Velcro into small squares and carefully glue it to the fabric.
-
6Button your iPhone into its new case. Make sure that the phone fits snugly into the pouch, and make sure that it cannot slip out.
- If you are going out and you don't need to take a large bag, you can slip cash and a photo ID into the pouch along with your iPhone. This case functions as a stylish, compact on-the-go carrier.

Advertisement
Method 2
Method 2 of 4:
Making an iPhone Case From Duct Tape
-
1Consider crafting a custom iPhone case out of duct tape. This particular design includes a sturdy flap to hold your iPhone in place, as well as a plastic "window" that will allow you to use your touchscreen while the phone is inside. This may not look as professional as other cases, but it will protect your phone while preserving its functionality. You will need:
- Duct tape. You will not need much. Feel free to use classic grey duct tape or to spice up your design with more colorful duct tape.
- A plastic CD slip case. Make sure that the case is flimsy, clear plastic; this will cover the screen of your iPhone, and you want to be able to use your screen through it. If you don't have a CD case,you can use a small sandwich bag or any other thick, transparent plastic.
- Scissors or a craft knife.
- A ruler.
- A sharpie.
-
2Measure the width of the plastic screen cover. Put your iPhone into the CD slip case. Push one long side of the phone up to the sealed bottom of the case, and use a sharpie to mark how far the other side extends into the case.
- This will ensure that your screen cover perfectly fits your particular iPhone. You will cover up most of this plastic with duct tape.
-
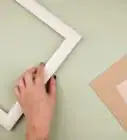
3Take the iPhone out of the slipcover. Use a ruler to draw a straight line through the sharpie mark you made, parallel to the opening of the slip case. Cut along this line, carefully, with a pair of scissors.
- This should cut the slip case roughly in half. Keep the half with the sealed bottom: this will become the screen cover for your iPhone case.
-
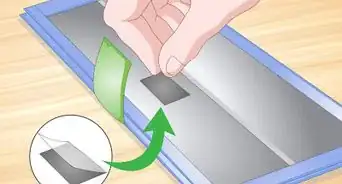
4Put the iPhone back into the case. On the plastic slip case, mark out the edges of the iPhone screen. You will want to cover up everything but the screen with duct tape, so it's important to know where the screen sits.
- Take the iPhone out and draw a rectangle on the slipcover to mark exactly where the screen fits.
- Consider marking the circular "Home" button as a reference for how your iPhone will fit. Don't worry about the marks; you will use the other side of the slipcover for your screen. These marks are only for measuring purposes.
-
5Cut four strips of duct tape, each as long as the height of your phone. Lay them out with the sticky side up. Overlap these pieces to form a rectangular "sheet" of duct tape.
- It is important that your duct tape sheet is no higher than the height of your phone. When you stick your slip case to this duct tape, no duct tape should protrude over the top or bottom of the case.
- Make sure that each side of the sheet is perfectly straight. Use scissors to trim the duct tape where necessary.
-
6Attach the duct tape to the slip case. Turn the slip case over so that the sharpie marks face downward. Carefully stick the sealed edge of the slip case to the edge of the duct tape sheet.
- Align the edge of the duct tape sheet with one of the lines you drew to mark the vertical edge of your iPhone's screen. The duct tape should not cover the screen.
-
7Turn the slip case over so that the duct tape covers the entire sharpie-marked "back" of the case. Trim the duct tape sheet on the long end: the remainder of the sheet should be about 5 millimeters longer than the uncovered edge of the slip case.
- Fold this five-millimeter length of tape over the open edge of the slipcover so that it fits neatly inside. This should give you a neat edge where the duct tape ends.
-
8Make another duct tape sheet for the front of the case. This sheet should be roughly 110 mm (4.33 inches) long on one side, and only a couple of millimeters shorter than the height of the slip case on the other side.
- Neatly trim this sheet so that each side is perfectly straight.
-
9Stick the duct tape sheet to the front of the slip case. Align the edge of the duct tape sheet with the other line that you drew to mark the vertical edge of the screen--this should be the side that's closest to the open end of the slip case.
- Make sure that the duct tape sheet doesn't overhang on either the top or the bottom of the plastic slip case.
- Turn the entire case over so that the sticky side of the duct tape sheet is facing upward. The "window" for the iPhone screen--the front of the case--should be facing down into your work surface.
-
10Make a flap for your case. It's time to fold the duct tape sheet together. Take the right-hand edge of the duct tape sheet and stick it just inside the slip case, aligning it with the line you drew to mark the iPhone's screen.
- This flap will hold your iPhone in place inside the case. Make sure that the flap is long enough.
- Use the iPhone screen marking as a reference only. Stick the edge of the duct tape sheet to the opposite side of the slip case opening--the bottom edge of the opening, if the marks are on the top.
- Be methodical. Before you press the sticky insides of the folded duct tape sheet together, make sure that the end of the sheet is tucked securely into the case. Make sure that the end of the sheet is perfectly lined up with the opening of the slip case.
- Try to make the fold as neat as possible. A few wrinkles and creases will not impair the function.
-
11Neaten up the top of the case. Stick a piece of duct tape along the line that you drew to mark the top of the iPhone screen.
- Half of the tape strip should stick up above the slip case.
- Align the left-hand side of the duct tape strip with the "sealed" left-hand side of the plastic slip case. Trim the duct tape strip to match the right-hand edge of the flap.
- Flip the case over. Cut the duct tape strip into two parts, along the line created by the opening of the case, and then fold each side of the strip down against the back of the case. If you do not make this cut, then the duct tape strip will block the opening of your case.
-
12Neaten up the bottom of the case. Stick a piece of duct tape along the line that you drew to mark the bottom of the iPhone screen.
- Half of the tape strip should stick out below the slip case.
- Align the left-hand side of the duct tape strip with the "sealed" left-hand side of the plastic slip case. Trim the duct tape strip to match the right-hand edge of the flap.
- Again, flip the case over. Cut the duct tape strip into two parts, along the line created by the opening of the case, and then fold each side of the strip down against the back of the case.
-
13Consider thickening the flap of your case. If you creased and wrinkled the flap of your case while you were folding it, an extra layer of duct tape will cover up the creases. Extra duct tape will make the flap more substantial.
- Simply wrap another strip of duct tape along the length of the flap. Trim any overhanging tape away from the strip so that the flap still tucks neatly.
- Do not make your flap too thick--make sure that you can easily fold it into the case!
-
14Mark where the microphone and the headphone jack of your iPhone will fit when the phone is in the case. You will punch small holes into the case to allow the use of these functions. Turn the case so that the plastic "window" is facing up, and lay your iPhone on top of it.
- Microphone: On the bottom of your iPhone, look for two oblong, mesh-filled holes on either side of the charging connector. The hole on the right is the microphone. Using a sharpie pen, place a small mark on the bottom edge of the case where the microphone will sit.
- Headphone jack: Find the hole for your headphone jack on the top of your iPhone, and place a small mark along the top edge of the case where the jack will sit.
-
15Punch holes for the microphone and the headphone jack. Use a hole punch for a clean cut; in a pinch, consider simply poking a hole through the duct tape with a sharp object. Punch out each marking that you made--one for the microphone and one for the headphone jack.
- Try to punch the holes such that you only bite a semi-circle out of the edge of the case. This way, you'll punch out the back and the front of the case at once, creating a clean, round hole.
- The essential thing is that the microphone is not muffled, and that you are able to fit a headphone plug into the headphone jack.
-
16Put the iPhone in the case. You should be able to see the screen clearly through the plastic "window", and the flap of the case should extend to the right of the front of the phone.
- Tuck the flap into the back of the iPhone case to secure your phone in place. If you made the flap long enough, it should stay in place on its own.
- Enjoy! You should be able to use the touchscreen of your iPhone while it's inside the case.

Advertisement
Method 3
Method 3 of 4:
Decorating a Plain iPhone Case By Hand
-
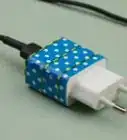
1Buy a plain iPhone case. You should be able to find cases in most stores that sell iPhones, though you may also purchase them online. You can use glue, paint, and other materials to decorate the surface of a plain iPhone case.
- Decide whether you want a soft (plastic/rubber) or hard (plastic or aluminum) case. Hard cases look sharp and sleek, and they may provide a smoother surface for decoration. Soft cases are more flexible, but they may tear more easily. Plastic cases may be more likely to crack under stress than metal cases, although you can find hard polycarbonate plastic cases that are built to absorb the impact of being dropped.[2]
- If you want to experiment, consider buying the cheapest case that you can find. That way, if you don't like the result, you didn't spend too much money. Basic plastic cases are often cheaper than metal cases and "heavy-duty" cases.
- If you are worried about dropping your phone, consider using a heavy-duty, shockproof, or "rugged" case as the base for your creation. These models are usually more expensive than plain cases, but they may protect your phone from the hazards of everyday use.
-
2Plan your design. Consider what you want your custom iPhone case to say about you. Before you begin to decorate the case, sketch out your design on a piece of scratch paper. This will help you perfect your vision, and it will give you a template to work from.
- Consider writing your favorite quote onto the back of the case. You can do this with paint, stickers, permanent marker, or cut-out decoupage letters.
- Consider drawing your favorite animal, your favorite anime character, or the logo of your favorite sports team. Try tracing the image onto a piece of paper before you move it to your iPhone case.
- If planning isn't your style, then choose a medium (e.g. paint, decoupage, stickers, glitter glue) and improvise! Take it slow, and carefully consider each new addition. It may be very difficult to remove certain types of paint and glue.
-
3Choose your decorations. Consider what you'll need in order to make your design come to life. You will need some sort of adhesive--glue, paint, tape, etc.--to make your materials stick to the iPhone case.
- Paint: You can find acrylic paint in a variety of colors at most arts-and-crafts stores. Watercolor and oil paints will not stick well to the surface of an iPhone case. Consider buying a paintbrush or a set of brushes; you may also try painting with Q-tips, sponges, or other absorbent household items.
- Nail polish: Consider using nail polish to cheaply paint your iPhone case. If you don't already own the colors you need, you should be able to find an assortment of polish at a local drugstore. Be sure to have polish remover or rubbing alcohol on hand to clean up any mistakes!
- Glue: If you want to attach any shapes or objects to your iPhone case, you'll need some type of glue. Any standard craft glue should suffice--but if you are committed to your design, consider using superglue or a hot glue gun for a long-lasting attachment. Keep superglue and hot glue away from your skin, and use them only sparingly.
- Decoupage: Arrange paper shapes or pictures on the outside of your iPhone case, then brush a thin layer of decoupage glue over the surface to seal them in place. You can buy pre-mixed decoupage glue (e.g. Mod Podge) from an arts-and-crafts store, or you can make your own decoupage from regular craft glue by mixing 3/4 cup glue with 1/4 cup water.[3]
- Stickers: Consider incorporating stickers into your design. Stickers are easy to apply and relatively easy to remove, but bear in mind that they may wear down more quickly than other decorations as they rub against fingers, fabric, and other surfaces. You make your own stickers using glue, packing tape, or sticker paper.
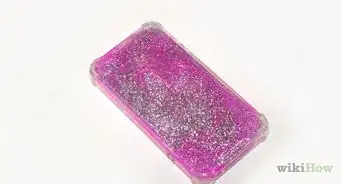
- Glitter: Consider using glitter or glitter glue to jazz up your iPhone case. You will need to use an adhesive (e.g. glue, paint, tape) to make the glitter stick to the case. Consider using glitter with acrylic paint. Be careful: glitter rubs off easily and gets everywhere. You may find glitter in your purse, your pockets, your hair, and beyond.
- Jewels: Consider bedazzling your cell phone with rhinestones, costume jewels, or other fake gems. You can find faux jewels at costume shops and arts-and-crafts stores. Some rhinestones come with peel-away adhesive backing, but otherwise you will need to use superglue to attach your gems.
- Consider mixing media. There is no reason why you can't combine acrylic paint with stickers, decoupage with glitter, or rhinestones with all of the above. Get creative and dream big!
-
4Gather your decoration materials, and customize your iPhone case! Find a clean workspace, and give yourself plenty of time to unleash your creative flow.
- Work carefully and methodically. Work from your sketch. Keep a small towel on hand to quickly wipe away any excess paint or glue before it dries.
- Be sure to put down a layer or two of newspaper before you begin. If you work on top of the newspaper, you won't need to worry about spilling paint or glue onto any household surfaces.
-
5Wait for the paint, glue, or decoupage to dry. Leave the case alone for at least a few hours before you slip it onto your iPhone.
- Do not touch paint until you are absolutely sure that it's dry. Even the slightest touch can leave an imprint that ruins your design.
- Enjoy! Remember that once your decorations dry, you can always paint over your design if you don't like it.


Advertisement
Method 4
Method 4 of 4:
Designing a Custom iPhone Case Online
-
1Consider using a custom iPhone case website to streamline your design. This is a great option if you're willing to spend $30-40 for a professional-looking custom case. Many of these sites allow you to print photos directly onto your case, which can be tricky when crafting by hand.
- Weigh the pros and the cons. It can be much more expensive to design and order a custom iPhone case online, but it may help your case look sharp and professional. This option may be right for you if you want to incorporate precise photographic realism into your design.
-
2Run a web search for "custom iPhone case" and choose a website. There are many such sites; check out the features and the pricing for several websites before you make your decision.
- Select "Create Your Own" or "Design your case" and follow the on-screen instructions.
- Select your phone model (e.g. iPhone 4, iPhone 5S, iPhone 6 Plus) and choose the type of case that you want to customize. You should be able to pick between several "lite" and heavy-duty case options.
- Each site features a different set of design templates. If you don't like the interface, the pricing, or the features offered at one site--try another site.
-
3Use the interface to upload photos, place text, arrange colors, and perfect your design. Use the digital format to your advantage--don't be afraid to incorporate pictures that you took yourself or that you found on the Internet.
- Consider using a photograph that you have taken of your favorite place, your dog or your iguana, your kids or your car. You should be able to upload picture files directly onto the website if they are saved on your computer.
- Consider using a .JPG file of your favorite art piece. Be sure to respect copyright law, and ask the artist's permission to use an image if it is licensed. It is legal to use many copyrighted images for personal projects as long as you aren't reproducing an image for commercial use.
- Consider featuring your favorite meme or your favorite quote. Memes are rarely trademarked, although the source material may be subject to copyright law.[4] If you aren't sure, and you are able to identify the creator of the meme: ask for his or her permission to use the image.
- Consider using a photograph of an inspiring scene: a beautiful sunset, a towering mountain, a lush rainforest or the open sea. Consider using a photo of your favorite animal or your favorite anime character; consider using the logo of your favorite sports team. If you find an image on the Internet, look for a copyright. If the image is copyrighted, ask for the creator's permission to use it.
-
4Review your design and place your order. When you are completely satisfied with your custom iPhone case, place the order and pay. The custom-case company will print your design onto your chosen iPhone case, and you'll receive your case in the mail.
- If your custom case arrives in the mail and it isn't exactly what you wanted, don't be afraid to contact the owners of the website. Find their email on the "Contact" page at the bottom or the top of the home page. Send the owners a polite email explaining exactly what went wrong, and ask them to send you a case with the correct design.


Advertisement
Community Q&A
-
QuestionIs it expensive to design phone cases online?
 Community AnswerIt's completely dependent on what material and design you desire, and the size of your phone.
 -
QuestionShould I leave a hole for the camera?
 Dixie CupCommunity AnswerYes, leave a hole for the camera. If you didn't, you wouldn't be able to take pictures with your phone.
Advertisement


References
- ↑ http://www.care2.com/greenliving/how-to-make-an-iphone-case-from-upcycled-materials.html
- ↑ http://www.ebay.com/gds/Aluminum-vs-Plastic-Cases-for-your-iPhone-/10000000177748072/g.html
- ↑ http://crafts.creativebug.com/make-decoupage-elmers-glue-1649.html
- ↑ http://creativeartsadvocate.com/from-lol-to-lawsuit-implications-of-using-memes-online-and-in-advertising/
About This Article
Advertisement