This article was co-authored by LaTricia Brown and by wikiHow staff writer, Megaera Lorenz, PhD. LaTricia Brown is a Master Tailor and Designer and the Owner of Trish B. Stylin' based in the Savannah, Georgia metro area. LaTricia has over a decade of experience including bridal design, men's and women's clothing design, and fashion show directing. She has a BFA in Fashion with a minor in Accessory Design from the Savannah College of Art and Design (SCAD). LaTricia has worked with W Magazine in New York City and has assisted with the personal styling of P. Diddy. She has also assisted the development of Sean John's 10-Year Anniversary Collection and appeared in the filming of Diddy's "If I Were King" Documentary.
This article has been viewed 38,224 times.
A birdcage veil is a short veil made from wide netting that covers only the top half of your face. This style was popular in the ‘40s and ‘50s, and today you can use it to add a touch of old-school glam to any outfit! It’s also a fun and fashionable alternative to a traditional bridal veil. To make your own simple birdcage veil, you don’t need much more than some veil netting, a pair of scissors, and a hair comb. Once your veil is done, try embellishing it with a little ribbon or some silk flowers.
Steps
Cutting the Veil Shape
-
1Get 1 yard (.9 m) of veil netting. While your veil will probably not need to be that wide, it’s good to have a little extra material to work with. Choose a type of veil material with fairly wide mesh, such as Russian or French netting. You can also find netting that is specifically marketed as birdcage veil netting.[1]
- You can purchase veil netting online or from a craft or fabric store.
- Veil netting comes in a huge variety colors and finishes. You can even get metallic netting!
Tip: Birdcage veils are traditionally made with wide “fishnet” style netting, but you don’t need to feel restricted to that. Consider experimenting with tulle, lace, or even multiple veil materials to create a unique look.
-
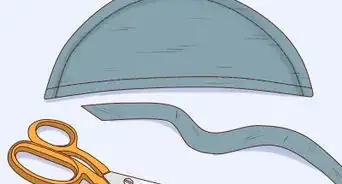
2Make a 12 by 24 in (30 by 61 cm) rectangle of paper and cut off the top corners. Take some brown kraft paper and cut out a large rectangle. Then, measure up about 5 inches (13 cm) along each of the shorter sides and cut off the top corner at a 45° angle.
- You can simplify this process even more by folding the rectangle in half and cutting off both corners at once with a single cut.
Advertisement -
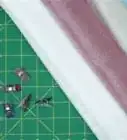
3Lay the netting on top of the paper template. Once you’ve cut out your template, place the netting on top of it and spread it out flat. If possible, position it so that one of the finished edges is parallel to the bottom (widest) edge of the template.
- Positioning the netting with a finished edge along the bottom will leave you with an attractive edge on your veil.[2]
-
4Cut the netting so it follows the shape of the template. When the netting is in position, carefully cut it, following the edges of the template. Make sure to keep the fabric aligned so that you cut along the natural lines of the netting (e.g., through the middle of each diamond-shaped opening).
- If you feel confident enough to do so, you can skip making the template and simply cut a piece of netting in the desired shape and size.[3]


Attaching the Netting to a Comb
-
1Choose a simple wire hair comb. To secure the veil to your hair, you’ll be connecting it to a hair comb. Opt for a metal comb, since these are typically sturdier than the plastic ones.
- Don’t get a comb that has decorative embellishments at the top—these will get in the way of attaching the veil and will end up being at least partially hidden by the netting.
Tip: You can use the comb to position the veil in your hair any way you like. For example, you might wear it to the side like a fascinator or position it so that the veil covers the top of your face.
-
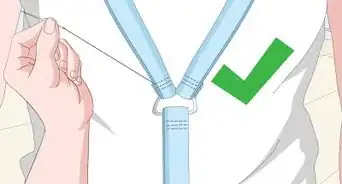
2Wrap a strip of lace or ribbon around the top of the comb. Take a length of the ribbon or lace of your choice and pull it between the teeth on one end of the comb, then tie a knot to hold it in place. Continue to wind the ribbon between each of the comb’s teeth until you reach the other side. Tie another knot and cut off the excess.[4]
- If you like, you can also add a dot of hot glue to each of the knots to make them more secure.[5]
-
3Bunch the top edges of the netting together with a series of stitches. Thread a needle with a sturdy thread that matches the color of your veil. Secure the thread to the netting at one corner of the veil (next to the longest edge) and make stitches through the netting along each of the 3 short sides.[6]
- Your veil will now be gathered into a rounded “cage” shape.
- Don’t cut the thread just yet—you’ll be using it to attach the veil to the comb!
- Use a steamer to soften the fibers. This way it will be easier to shape the veil.
- It may also be helpful to have a mannequin head to pin the veil to while you are working on it.
-
4Sew the netting to the fabric on top of the comb. Take the bunched end of the netting with the needle and thread still attached and line it up with the top edge of your comb. Make a series of simple stitches to attach the netting to the ribbon or lace on the comb.[7]
- To make sure the veil is sewn on securely, stitch all the way across the top of the comb 3 or 4 times.
- When you’re done, tie a knot in the end of the thread close to the edge of the comb and snip off the excess.
- You can also reinforce your knot with a dot of hot glue.


Adding Embellishments
-
1Cover the top edge of the comb with a bow if you like. If you want, you can simply call your veil finished after attaching it to the comb. However, you can also give it a touch of old-fashioned charm by gluing or sewing a bow onto the comb to cover the area where the mesh is sewn on.
- A hot glue gun will work well for this purpose.
-
2Glue on some silk petals if you prefer a floral look. Silk flower petals can give your veil a delicate look that is perfect for a bridal headpiece. You can glue the petals on or sew them in place.[8]
- You could also use sequins, feathers, rhinestones, or beads. Have fun and get creative with your embellishments![9]
-
3Attach your veil to a fascinator base to create a vintage style. Sewing your veil to a comb is a simple and classic approach. Alternatively, you can make a glamorous Old Hollywood-style headpiece by sewing the veil to a fascinator disc base. Cut your own base out of felt or buckram or purchase a pre-made one online or from a craft store.
- Glue the fascinator base to a headband or hair clip to hold it in place.
- You can also embellish the fascinator with feathers, pearls, silk flowers, ribbons, or whatever else strikes your fancy.
Tip: You can also make a classic ‘50s-style headpiece by attaching the veil to a pillbox hat.


Things You’ll Need
- Russian or French veil netting
- Metal hair comb
- Scissors
- Kraft paper
- Ribbon
- Needle and thread
- Hot glue (optional)
- Bow, silk flower petals, or other embellishments (optional)
- Fascinator base (optional)

References
- ↑ https://www.17apart.com/2013/06/how-to-make-diy-birdcage-veil-for-your.html
- ↑ https://www.17apart.com/2013/06/how-to-make-diy-birdcage-veil-for-your.html
- ↑ https://www.17apart.com/2013/06/how-to-make-diy-birdcage-veil-for-your.html
- ↑ https://apracticalwedding.com/how-to-make-birdcage-wedding-veil-diy/
- ↑ https://www.today.com/video/how-to-make-a-diy-bridal-birdcage-veil-491981379724
- ↑ https://www.17apart.com/2013/06/how-to-make-diy-birdcage-veil-for-your.html
- ↑ https://www.17apart.com/2013/06/how-to-make-diy-birdcage-veil-for-your.html
- ↑ https://www.today.com/video/how-to-make-a-diy-bridal-birdcage-veil-491981379724
- ↑ https://apracticalwedding.com/how-to-make-birdcage-wedding-veil-diy/
About This Article