This article was co-authored by wikiHow Staff. Our trained team of editors and researchers validate articles for accuracy and comprehensiveness. wikiHow's Content Management Team carefully monitors the work from our editorial staff to ensure that each article is backed by trusted research and meets our high quality standards.
There are 7 references cited in this article, which can be found at the bottom of the page.
The wikiHow Video Team also followed the article's instructions and verified that they work.
This article has been viewed 68,839 times.
Learn more...
Bouncy balls are a fun toy and a cool science demonstration. The most popular recipe uses borax, but if you don't want to use that, you can make bouncy balls using other materials, such as liquid latex or Rainbow Loom bands.
Steps
Using Borax, Cornstarch, and Glue
-
1Mix 1/2 cup (120 mL) of warm water and 1 tablespoon of borax. Pour 1/2 cup (120 mL) of warm water into a cup. Add 1 tablespoon (25 g) of borax, then stir the 2 ingredients together with a fork or spoon until the borax dissolves. Set the cup aside.[1]
- You can find borax in the laundry aisle of most grocery stores.
- Don't get borax on your skin or you may have an allergic reaction. If you are messy, put on a pair of plastic or rubber gloves.
- If you want to make a multicolor ball, prepare a separate borax solution--one for each color that you will be using.
-
2Stir food coloring into 2 tablespoons (30 mL) of white school glue. Pour 2 tablespoons (30 mL) of white school glue into a different cup. Add 1 drop of food coloring, and give it a stir. If the shade isn't dark enough add another drop of food coloring and see how you like it.[2]
- You can use clear school glue as well. The ball will end up being a little translucent.[3]
- If you want a multicolor ball, simply repeat the process with more glue and different colors.
- Instead of food coloring, you could try a few drops of paint instead. Try glow-in-the-dark paint to make a glow-in-the-dark ball.[4]
Advertisement -
3Add 1 tablespoon (9 g) of cornstarch into the glue. Measure out 1 tablespoon (9 g) of cornstarch and add it to the glue mixture. Stir the 2 together until they combine. The cornstarch will make the glue even thicker.[5]
- If you can't find cornstarch, use cornflour instead. Don't use cornmeal, though.
- If you are making a multicolor ball, you'll need 1 tablespoon (9g) of cornstarch per color.
-
4Pour the glue mixture into the borax solution. Make sure that you get all of the glue mixture into the borax solution. Use a regular spoon or rubber spatula to scrape the excess glue out and into the borax solution. Do not stir the ingredients.[6]
- If you don't get all of the glue into the cup with the borax solution, your ball may not turn out as big.
- If you are making a multicolor ball, pour each glue color into its own borax solution.
-
5Wait 10 seconds, then take the lump out of the borax solution. After about 10 seconds or so, the glue will harden into a lump. Use a fork or slotted spoon to lift the lump out of the borax solution.[7]
- Don't use a spoon; you don't want to take any of the borax solution out.
-
6Roll the lump into a ball until it becomes firm. The borax should be harmless by this point, but if you have sensitive skin, it would be a good idea to put on a pair of gloves first. Roll the glue lump between your palms to make a ball. Try to make it as neat as possible.[8]
-
7Place the ball back into the borax solution for a few seconds. Take the ball and carefully lower it into the borax solution with a spoon. Do not plop it in, or it will splash borax water everywhere. Wait a few seconds, then take it out and pat it dry with a towel.[11]
- This will help solidify the ball and make it less sticky.
- If you are making a big, multicolor ball, pour all of the borax solutions into a single cup first.
- Be aware that if you added glitter to your ball, some of it may come off during this point.
-
8Keep the ball in an airtight container when you aren't playing with it. You can bounce this ball just like any other bouncy ball. Because it is made from glue, however, it will eventually dry out after a couple of days. You can make it last longer by putting it into a zippered baggy or airtight container when you aren't playing with it.[12]
- The ball should be ready to play with as soon as you are done rolling it. If it still feels too wet, let it dry for about 10 to 15 minutes.
- The ball will start to flatten when you don't play with it. If that happens, simply roll it back into shape.

Using Vinegar and Liquid Latex
-
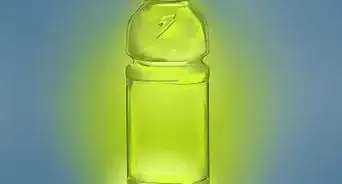
1Pour 1 tablespoon (15 mL) of liquid latex into a plastic cup. You can buy liquid latex online or in costume stores. It is used to help blend latex prosthetics into your skin. The most common color is peach, but you can get it in white too.
- For best results, use white liquid latex. This way, you can change the color. If you use peach, the food coloring will make it turn muddy.
- Do not use clear liquid latex. It does not have the same ingredients.
-
2Stir some food coloring into the liquid latex. Start with 1 drop of food coloring. Stir it in until no streaks remain. If the color is too light for you, add more food coloring. Because you are working with such a small amount, however, 1 to 2 drops should be plenty.
-
3Add 1 tablespoon (15 mL) of white vinegar into the liquid latex. This is where the magic starts to happen. Liquid latex contains polymer micro-particles. A preservative, such as ammonia, helps keep them in liquid form. When you add vinegar, however, you neutralize the ammonia. This allows you to shape the liquid latex.
-
4Stir the ingredients together to form a blob, then roll it into a ball. Use a spoon or craft stick to stir the ingredients together. As you stir them, the liquid latex will clump together to form a lump. Once the lump forms, take it out and roll it into a ball with your hands.
- The ball may end up looking wrinkled, but this won't stop it from bouncing!
-
5Poke the ball with a needle to drain the liquid. There is still going to be some vinegar trapped inside the ball, so you need to get rid of it. Stick a needle or pin into the ball, then pull it out. Carefully squeeze the ball to drain the vinegar out.
- Point the hole away from your eyes so that the vinegar doesn't accidentally squirt into your face.
-
6Set the ball on a paper towel to dry. This should only take a few minutes, but if you can't wait, you can gently pat the ball dry with a towel. Once the ball is dry, you can bounce it around!
-
7Store the ball in an airtight container when you aren't playing with it. The ball will eventually shrink and harden as time goes by, but you can make it last longer by keeping it in a plastic zippered baggie or an airtight container when you aren't using it. After a week or so, the ball will eventually start to dry out and harden. Once it stops bouncing, you should discard it.

Using Rainbow Loom Bands
-
1Scrunch up a broken Rainbow Loom bracelet. If you don't have any, you can make a simple Rainbow Loom bracelet, then scrunch it up into a ball.[13] You can also take several regular rubber bands (like the kind used for newspapers) and roll them into a ball.
- The color of the bracelet or rubber bands does not matter.
- Use the entire bracelet. Don't take it apart. This will up create the "center" of the ball.
-
2Slip 2 Rainbow Loom bands over the scrunched up bracelet. Keep your finger hooked over both bands; don't let go of them just yet! The color of the bands does not matter because you will be adding more layers.[14]
- You are using 2 bands because it will make things faster.
- You don't have to use the actual Rainbow Loom brand; you can use an off-brand or a generic brand. As long as the bands look like the Rainbow Loom bands, you're good.
-
3Twist the bands, then loop them back over the scrunched up bracelet. Hold the bracelet between your fingers in 1 hand. Twist your other hand in order to twist the bands. Loop the bands back over onto the scrunched up bracelet, then let go.[15]
-
4Continue to add bands until the ball is half the size you want it to be. Always work 2 bands at a time. Twist each set of bands as you wrap them around the ball. Alternate the directions you wrap the bands in so that the entire ball gets covered. Again, the color does not matter at this point.[16]
- If your first set of bands was horizontal, make the next set vertical, and the next 2 sets diagonal.
- The finished ball will be about 2 inches (5.1 cm) in diameter. Your ball should be about 1 inch (2.5 cm) at this point.
-
5Wrap more bands around your ball, but use the colors you want. Again, take 2 bands, then wrap and twist them around your ball. This time, start using the colors you want your ball to be. When your ball is about two-thirds of its final size, stop.[17]
- You can use all 1 color, or you can use multiple colors.
- Your ball should be about 1 2⁄3 inches (4.2 cm) at this point.
-
6Add more bands without twisting until the ball reaches its final size. Continue to use bands in the color you want your ball to be. This time, just wrap them around the ball, but without twisting them. This will help make your ball bouncier.[18]
- You should still be using 2 bands at the same time.
- Your ball will be about 2 inches (5.1 cm) at this point.
-
7Add 2 to 3 more sets of bands with a twist. Take 2 bands and stretch them around your ball. Give them a twist, and slip them back over the ball. Do this 1 or 2 more times, alternating directions. This will help hold everything together.[19]
- You should still use the colors you want your ball to be for this step.
-
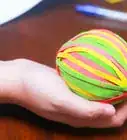
8Play with the ball! This type of ball is very bouncy. Keep in mind that the bands may come off if you play too rough with it. If that happens, simply put the band on. Twist the bands as you put them on.[20]
Warnings
- Borax is toxic and shouldn't be handled by small children. Adult supervision is required.⧼thumbs_response⧽
Things You'll Need
Using Borax, Cornstarch, and Glue
- ½ cup (120 mL) warm water
- 1 tablespoon (25 g) borax
- 1 tablespoon (9 g) cornstarch
- 2 tablespoon (30 mL) white school glue
- Food coloring
- 2 plastic cups
- Spoon
- Fork
- Disposable rubber gloves (optional)
Using Vinegar and Liquid Latex
- 1 tablespoon (15 mL) liquid latex
- 1 tablespoon (15 mL) vinegar
- Food coloring
- Disposable cups
- Spoon
- Pin or needle
- Paper towel
Using Rainbow Loom Bands
- Broken Rainbow Loom bracelet
- Rainbow Loom bands

References
- ↑ http://www.the36thavenue.com/how-to-make-a-bouncy-ball/
- ↑ http://www.the36thavenue.com/how-to-make-a-bouncy-ball/
- ↑ https://www.youtube.com/watch?v=oMkyL3s9RGI&feature=youtu.be&t=43s
- ↑ http://www.growingajeweledrose.com/2013/05/play-recipes-homemade-bounce-balls.html
- ↑ http://www.the36thavenue.com/how-to-make-a-bouncy-ball/
- ↑ http://www.the36thavenue.com/how-to-make-a-bouncy-ball/
- ↑ http://www.the36thavenue.com/how-to-make-a-bouncy-ball/
- ↑ http://www.the36thavenue.com/how-to-make-a-bouncy-ball/
- ↑ https://www.youtube.com/watch?v=oMkyL3s9RGI&feature=youtu.be&t=7m15s
- ↑ http://myfrugaladventures.com/2013/06/how-to-make-homemade-bouncy-balls-for-kids-that-really-bounce/
- ↑ https://www.youtube.com/watch?v=oMkyL3s9RGI&feature=youtu.be&t=8m11s
- ↑ http://www.the36thavenue.com/how-to-make-a-bouncy-ball/
- ↑ https://www.redtedart.com/diy-bouncy-balls-a-great-way-to-use-up-rainbow-loom-bands/
- ↑ https://www.redtedart.com/diy-bouncy-balls-a-great-way-to-use-up-rainbow-loom-bands/
- ↑ https://www.redtedart.com/diy-bouncy-balls-a-great-way-to-use-up-rainbow-loom-bands/
- ↑ https://www.redtedart.com/diy-bouncy-balls-a-great-way-to-use-up-rainbow-loom-bands/
- ↑ https://www.redtedart.com/diy-bouncy-balls-a-great-way-to-use-up-rainbow-loom-bands/
- ↑ https://www.redtedart.com/diy-bouncy-balls-a-great-way-to-use-up-rainbow-loom-bands/
- ↑ https://www.redtedart.com/diy-bouncy-balls-a-great-way-to-use-up-rainbow-loom-bands/
- ↑ https://www.redtedart.com/diy-bouncy-balls-a-great-way-to-use-up-rainbow-loom-bands/
About This Article

To make a bouncy ball, mix warm water and borax. In a separate container, add a drop of food coloring to white school glue. Then, add cornstarch to the glue mixture and combine it with the borax solution. After waiting 10 seconds for the glue to harden, you can remove the lump of glue from the remaining solution and roll it into a ball. Once formed, place the ball back in the solution for a few seconds to solidify. Finally, remove the ball, pat it dry and bounce away! If you don't have borax, read on for instructions on how to use vinegar and liquid latex for your ball!