This article was co-authored by Amy Guerrero. Amy Guerrero is an Arts and Crafts Specialist and the Owner of Sunshine Craft Co., a crafting studio based in Phoenix, Arizona. Amy specializes in macrame, DIY crafting, and teaching fiber arts. She offers monthly in-person and online workshops along with having developed a range of DIY craft kits for at-home projects. Amy holds a BS in Industrial Design from Philadelphia University. She worked as a graphic designer before starting her own business. Sunshine Craft Co. is a creative hub that offers a wide range of workshops, tools, and resources for any craft project to inspire creativity and community engagement.
This article has been viewed 58,241 times.
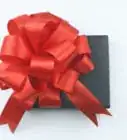
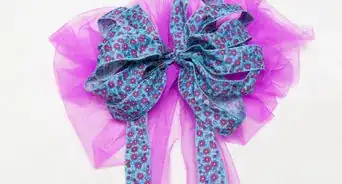
Looking to add a little something special to a present, bag, or skirt? Bows can make the perfect embellishment to almost any project. Most bows can be easily made using almost any type of ribbon. But, use wire-edged ribbon if you're looking for an elaborate bow that really holds it shape. Whether you're using ribbon made from plastic, cloth, satin, or silk, try making a decorative bow.
If you're looking for information on how to Make a Bow and Arrow, check out this article: https://www.wikihow.com/Make-a-Bow-and-Arrow.
Steps
Making a Big Bow
-
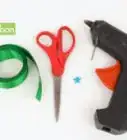
1Gather your supplies. You'll need floral stem wire to hold the bow together at its center. Make sure to bend it in half so it looks like a U. You'll also need wire-edged ribbon.[1]
- Get a spool and that way you can make the bow as big as you like.
-
2Measure your ribbon. Pull about 18 inches (46 cm) of ribbon away from the spool. Hold onto the ribbon with the fingers of your left hand.[2]Advertisement
-
3Pull out more ribbon. Pull out another 12 inches (30.5 cm) of ribbon off the spool, using your right hand. Your left hand should still be holding and marking the ribbon you first pulled off.[3]
-
4Bring the ribbon together. Your right hand should be holding and marking the ribbon that you just pulled off the spool. Bring your right hand and left hand together to make a loop in the ribbon.[4]
-
5Hold the loop. Now that you've made a loop, transfer it to your left hand and hold it firmly in between your fingers.[5]
-
6Pull out more ribbon. Pull out another 12 inches (30.5 cm) of ribbon off the spool, using your right hand. Your left hand should still be holding the loop you just made.
-
7Add the extra ribbon to your loop. Fold this extra ribbon over your loop and hold it together with your left hand.[6]
- You should see a loop on either side of your hand holding the ribbon. The loops will look like a figure 8 or infinity symbol.
-
8Make another loop. Pull out another 12 inches (30.5 cm) of ribbon off the spool, using your right hand. Fold it over an existing loop.[7]
-
9Keep making loops. Continue pulling out ribbon and folding it into alternating loops, so that your bow will be even.[8]
- Make at least 4 loops on each side of your hand.
-
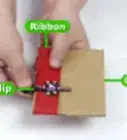
10Make your center loop. Measure out 6 more inches of ribbon and cut the end. Make the loop wrap over the top of your finger that's holding the center of the bow. Bring the ribbon under your finger so it's secure.[9]
-
11Tighten the knot. Use your bent floral stem wire to bring it through and underneath this top center loop. Bend the stem wire into a knot and pull it to tighten. Twist the wire around several times to keep it in place.[10]
-
12


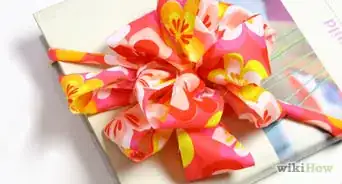
Making a Classic Bow
-
1Cut your ribbon. Using scissors, cut the ribbon to your desired length.
- When starting out, leave your ribbon a little longer. It will be easier to practice with.
-
2Form two loops in the ribbon. Hold the ends of the ribbon, one end in each hand. Keep the ribbon from twisting, and fold the ribbon back to front.[13]
- You should end up holding the ribbon with two loops towards the top and one larger loop at the bottom's center.
-
3Cross the loops. Cross the top right loop over the top left loop.
- If you're making a bow to wrap a box, cross the top left loop over the right and do a half-knot. This will keep it in place on the box.[14]
-
4Knot the loops. Fold the right loop behind and underneath the left loop. Pull it up through the hole.[15]
- Don't let the ribbon get twisted or bunched as you knot the loops.
-
5Pull the knot. Hold the ends or tails of the bow and pull to tighten. This should make a smooth knot.[16]
- Make sure both your loops are the same size. If not, pull to adjust them. You can also trim the bow's tails by cutting a little chevron out of the ends.
Making a Winged Bow
-
1Cut your ribbon. Using scissors, cut the ribbon to your desired length.
- Use caution when cutting with scissors.
-
2Cross the tails. Fold the left tail over the right tail. Make sure your ribbon isn't twisted or bunched.[17]
-
3Knot the tails. Fold the left tail completely behind and underneath the right tail.
-
4Pull the knot. Bring the left tail up through the hole and pull the tails. You should have a smooth even knot.[18]
-
5Trim the tails. At this point, your ribbon simply looks like tails and a knot in the center. Trim the tails close to the knot.[19] Cut a chevron at each end or tail. The top of the chevron should be pointing towards the knot.
Expert Q&A
Did you know you can get expert answers for this article?
Unlock expert answers by supporting wikiHow
-
QuestionWhat ribbon should I use for bows?
 Amy GuerreroAmy Guerrero is an Arts and Crafts Specialist and the Owner of Sunshine Craft Co., a crafting studio based in Phoenix, Arizona. Amy specializes in macrame, DIY crafting, and teaching fiber arts. She offers monthly in-person and online workshops along with having developed a range of DIY craft kits for at-home projects. Amy holds a BS in Industrial Design from Philadelphia University. She worked as a graphic designer before starting her own business. Sunshine Craft Co. is a creative hub that offers a wide range of workshops, tools, and resources for any craft project to inspire creativity and community engagement.
Arts & Crafts SpecialistWired ribbons have a metal wire running through them so they'll hold the shape of your bow a lot easier.
Support wikiHow by unlocking this expert answer.

References
- ↑ http://www.save-on-crafts.com/how-to-make-a-floral-bow.html
- ↑ http://www.save-on-crafts.com/how-to-make-a-floral-bow.html
- ↑ http://www.save-on-crafts.com/how-to-make-a-floral-bow.html
- ↑ http://www.save-on-crafts.com/how-to-make-a-floral-bow.html
- ↑ http://www.save-on-crafts.com/how-to-make-a-floral-bow.html
- ↑ http://www.save-on-crafts.com/how-to-make-a-floral-bow.html
- ↑ http://www.save-on-crafts.com/how-to-make-a-floral-bow.html
- ↑ http://www.save-on-crafts.com/how-to-make-a-floral-bow.html
- ↑ http://www.save-on-crafts.com/how-to-make-a-floral-bow.html
- ↑ http://www.save-on-crafts.com/how-to-make-a-floral-bow.html
- ↑ Amy Guerrero. Arts & Crafts Specialist. Expert Interview. 9 October 2020.
- ↑ http://www.save-on-crafts.com/how-to-make-a-floral-bow.html
- ↑ http://www.bhg.com/christmas/gift-wrapping/make-a-classic-bow-in-4-easy-steps/
- ↑ http://www.marthastewartweddings.com/226403/three-perfect-bows
- ↑ http://www.marthastewartweddings.com/226403/three-perfect-bows
- ↑ http://www.bhg.com/christmas/gift-wrapping/make-a-classic-bow-in-4-easy-steps/
- ↑ http://www.marthastewartweddings.com/226403/three-perfect-bows
- ↑ http://www.marthastewartweddings.com/226403/three-perfect-bows
- ↑ http://www.marthastewartweddings.com/226403/three-perfect-bows
About This Article

To make a classic bow, cut a ribbon with scissors, then take an end in each hand. Fold the ribbon back to front so you end up with two loops towards the top and one larger loop at the bottom’s center. Then, cross the top right loop over the top left loop. Fold the top right loop behind and underneath the left loop before pulling it up through the hole. To finish, pull the ends of the bow to tighten. To learn how to make other types of bows, like a florist or winged bow, keep reading the article!