This article was co-authored by wikiHow Staff. Our trained team of editors and researchers validate articles for accuracy and comprehensiveness. wikiHow's Content Management Team carefully monitors the work from our editorial staff to ensure that each article is backed by trusted research and meets our high quality standards.
The wikiHow Video Team also followed the article's instructions and verified that they work.
This article has been viewed 179,145 times.
Learn more...
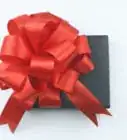
Bows can add that final touch to a wrapped present. If you are out of pre-made bows, or can't find the right one, making your own is a great solution. Paper bows are surprisingly easy to make, and they can save you a last-minute trip to the store. You can also use paper bows to decorate other items too, such as garlands, cards, or scrapbook pages.
Steps
Single Sheet
-
1Find some paper to create your bow with. Construction paper works great for this, but you can also use origami paper or even scrapbooking paper. Another option is to decorate printer paper with markers and use that instead.
- Avoid using thick paper, such as cardstock.
-
2Cut the paper down to the right size. Cut the paper to the same width as your desired bow. The same height as your desired bow, or a little taller. Remember, you can always trim the paper down later.Advertisement
-
3Fold the paper like a fan, keeping the folds 1⁄2 inch (1.3 cm) apart. Turn your paper so that the back is facing you. Fold the bottom edge up by 1⁄2 inch (1.3 cm). Turn the paper over, and fold it by another 1⁄2 inch (1.3 cm). Keep flipping and folding the paper until you reach the other end.
- Finish folding the paper in the back. This will make the bow symmetrical. If you finished folding in the front, cut the paper shorter until the last fold is in the back.
- The back of the paper is the blank or white side. If you are using construction paper, there is no blank or white side.
-
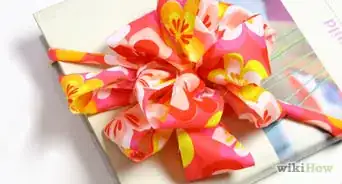
4Wrap and tie some string around the middle of the fan. Fold the fan in half first to find the center and make a crease. Wrap a piece of string a few times around the crease, then tie it into a knot. Cut the rest of the string off.
-
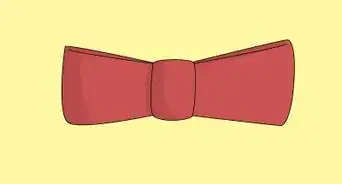
5Open up both sides of the bow like a fan. Use your fingers to spread open the sides of the bow, like a fan. If the bow is too narrow for you, make a second bow, then glue the 2 bows together along the top and bottom long edges.
-
6Wrap a thin strip of paper around the middle of the bow, if desired. Cut a thin strip out of matching paper, about 1⁄2 inch (1.3 cm) wide. Wrap the strip of paper around the middle of your bow, then glue down the end in the back of the bow.
- Alternatively, roll and glue the strip into a small ring. Close 1 side of your bow, slide the ring onto it, then open it back up again.

Bow Template
-
1Find a paper bow template online and print it out. Search the internet for a "paper bow template." The template will have 3 parts: a mustache shape, a bow tie shape, and a skinny rectangle.[1]
- The mustache shape will eventually make the bow loops. The bow tie shape will actually make the bow tails!
-
2Transfer the template to colorful paper, then cut it out. Print the template out on cardstock or thick paper. Cut the template out, then trace it onto colorful paper. Cut the shapes out of the colorful paper, then put the template away.[2]
- Construction paper, colored cardstock, or patterned scrapbooking paper will all work great for this.
-
3Glue the pointy ends of the mustache shape to the middle. Place a drop of hot glue in the middle of your mustache shape. Take the left pointy end of the mustache, and press it into the glue. Repeat this step with the right pointy end to get something that looks like a looped bow.[3]
- Scrapbooking paper has a blank side and a patterned side. Make sure that you are gluing to the blank side of the paper.
- If you don't have hot glue, use a glue dot instead. It's a double-sided adhesive circle that comes on a roll or sheet. You can find it in the scrapbooking section of a craft store.
-
4Glue the looped bow to the middle of the bow tie shape. Place a drop of hot glue in the middle of the bow tie shape first. Next, press your looped mustache bow into the glue. Make sure that the bow loops are parallel to the bow tie, not perpendicular.[4]
- If you are using scrapbooking paper, make sure that you are gluing the looped bow to the patterned side of the bow tie shape.
-
5Glue the skinny rectangle to the middle of the bow. Place a drop of glue in the middle of your bow, then press the rectangle into the glue. Make sure that the rectangle is perpendicular to the bow, creating a + shape.[5]
- If you are using patterned paper, make sure that the colored side is facing up.
-
6Wrap and glue the ends of the rectangle to the back of the bow. Flip the bow over so that you can see the back. Place a drop of glue in the middle, then press the top of the rectangle into the glue. Repeat with the bottom end of the rectangle.[6]
- If the paper is too long and sticks out over the edges of the bow, trim it down.
- Don't wrap the paper so tightly that it crinkles.
-
7Flip the bow over and use it as desired. Glue the bow to scrapbooking project, or secure it with glue dots instead. You can also use double-sided tape or foam mounting tape.


Paper Strips
-
1Cut your desired paper into different sized strips. Wrapping paper will work the best for this, but you can also use scrapbooking paper. Cut your paper to the following sizes:[7]
- 3 large strips that are 1 by 11 1⁄2 inches (2.5 by 29.2 cm).
- 3 medium strips that are 1 by 10 1⁄2 inches (2.5 by 26.7 cm).
- 3 small strips that are 1 by 9 1⁄2 inches (2.5 by 24.1 cm).
- 1 tiny strip that is 1 by 3 1⁄2 inches (2.5 by 8.9 cm).
-
2Take your first strip and twist the ends to the center. Take 1 of the large strips and flip it so that the back is facing you. Fold 1 of the narrow ends to the center, then twist it so that the back of the paper is visible. Do the same thing for the other end of the strip.[8]
- If you need to, fold the strip in half first to find the center, then unfold it.
- When you fold the end of the paper to the middle, the front of the paper will be visible. Twist the end so that the back is visible.
-
3Staple the looped strip of paper in the middle. Make sure that the 2 ends of the paper are overlapping and that everything is even. Staple the looped piece in the middle.[9]
-
4Repeat the process for the remaining strips, except for the tiny one. Fold and twist the ends of each strip to the middle, then staple them in place. Keep your looped strips sorted by size: large, medium, and small. Do not do anything to the tiny strip just yet.[10]
- Always work from the back of the paper. If you are using wrapping paper or patterned scrapbooking paper, it will be the side that's white.
-
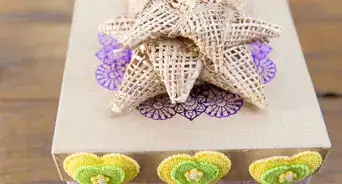
5Stack and staple the grouped looped pieces together. Take 3 large looped pieces. Stack them together so that they form a start or asterisk shape. Staple them in the middle, or secure each piece to the one below it with double-sized tape. Do this for the remaining 2 groups.[11]
-
6Nestle the groups inside each other and secure them. Place a drop of hot glue inside the largest looped star. Set the medium star into the glue, then repeat the process for the small star. The bow will start to look like one of those star-shaped bows you put on presents.[12]
- If you don't have hot glue, use a glue dot instead.
-
7Roll the final strip of paper into a loop and secure it. Take the remaining tiny strip of paper and roll it into a loop with the patterned side facing out. Overlap the narrow ends and secure them with a staple or glue.[13]
-
8Glue the loop to the center of your bow to finish it. Place a drop of hot glue in the middle of your bow, then press the loop into the glue. Make sure that you are pressing the overlapped ends of the loop into the glue. This way, the seam caused by the overlap won't show.[14]

Community Q&A
-
QuestionCan the tiniest piece have the same decorations as all of the other strips?
 Community AnswerOf course! You can design your paper bow to look however you want it to look.
 -
QuestionIs the bow big or small?
 Amazing_NatalieCommunity AnswerIt depends on the size of the gift. If it is a big gift, it should be big, if it's a small gift, make a small bow.
 -
QuestionCan I use a glue stick if I don't have glue in a bottle?Community AnswerNo, a glue stick will not work well for this craft, you need glue in a bottle.
Things You'll Need
Making a Folded Bow Tie
- Paper
- String, wire, tape or hair clip to secure
Using a Template
- Thick paper or cardstock
- Colored paper
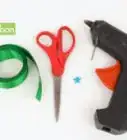
- Scissors
- Paper bow template
- Hot glue
Making a Gift Bow
- Patterned paper
- Ruler
- Pencil
- Scissors
- Stapler
- Hot glue

References
- ↑ http://www.bhg.com/christmas/gift-wrapping/make-a-paper-bow-/
- ↑ http://www.bhg.com/christmas/gift-wrapping/make-a-paper-bow-/
- ↑ http://www.bhg.com/christmas/gift-wrapping/make-a-paper-bow-/
- ↑ http://www.bhg.com/christmas/gift-wrapping/make-a-paper-bow-/
- ↑ http://www.bhg.com/christmas/gift-wrapping/make-a-paper-bow-/
- ↑ http://www.bhg.com/christmas/gift-wrapping/make-a-paper-bow-/
- ↑ https://momspark.net/diy-paper-gift-bows/
- ↑ https://momspark.net/diy-paper-gift-bows/
- ↑ https://momspark.net/diy-paper-gift-bows/
About This Article

To make a paper bow tie, grab some construction, origami, or scrapbooking paper and cut it down to the width you want your bow tie to be. Next, fold the paper like a fan, keeping the folds 1⁄2 inch apart. Keep flipping and folding the paper until you reach the other end. Then, fold the fan in half to find the center and make a crease. Finally, wrap a piece of string around the crease a few times and tie the string into a knot before opening up both sides of the bow like a fan. For tips on making a paper bow for gift-wrapping, read on!


-Step-10-Version-2.webp)