wikiHow is a “wiki,” similar to Wikipedia, which means that many of our articles are co-written by multiple authors. To create this article, volunteer authors worked to edit and improve it over time.
This article has been viewed 53,600 times.
Learn more...
A gift bow turns an ordinary gift into something extra special. There are many ways to make a gift bow, but it's best to start with simple ones and learn more complicated ones as you gain in confidence.
Steps
Classic gift bow
This is a very basic bow for attaching to the gift; although simple, it's elegant when placed on a gift.
-
1Cut a length of ribbon.
- For a large ribbon, use a long length of wide ribbon.
- For a small ribbon, use a shorter length or narrow ribbon.
-
2Spread the length of ribbon on a flat work surface.Advertisement
-
3Fold the ribbon. Fold it to form two loops at each side. Bring these two loops together to form one loop in between the two side loops.
-
4Cross the top left loop over the top right loop.
-
5Fold the left loop behind the right loop. Then pull it through the bottom loop.
-
6Pull the top two loops together tightly. This will form a knot at the center of the bow.
-
7Trim the ends of the ribbon to neaten. Cut either a diagonal or a V-shape to prevent fraying.
-
8Attach to the gift. Either loop it through ribbon attached to the gift or tape in place using doubled-up or double-sided tape.


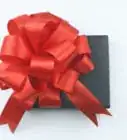
Top bow for a gift box (square or rectangle)
This method has a ribbon going all the way around the box, topping the box with a bow.
-
1Cut a long length of wide ribbon. To get the desired ribbon length, wrap the ribbon loosely around the length of the box, then its width. This is the basic length, then add another 60cm (24 inches) to the length, for making the bow with. (This additional measurement may need adjusting for a much larger box.)
- Choose a color of ribbon to suit the gift box.
-
2Lay the ribbon across the top of the box, facing vertically. Wrap the ribbon around the length of the box first, and hold it at the base of the box.
-
3Check that the wrong side of the ribbon is facing the box. Twist the ribbons around each other by 90 degrees to pull each end of the ribbon horizontally.
-
4Fix the ribbon if needed. Twist the ends to keep the wrong side of the ribbon facing the box, then pull the ends up and over the center of the box. Pull tightly to keep the ribbon firm.
-
5Make loops from each of the ribbon ends. Tie a bow by folding the right loop over the left and folding it underneath the left loop. Pull towards you, then pull tightly.
-
6Bring the left loop over the right loop, then slide the left loop through the hole under the right loop. This forms the knot. Pull tightly.
-
7Trim the ends of the ribbon to neaten. Cut either a diagonal or a V-shape to prevent fraying.
-
8Done. the gift now has a complete gift bow made from ribbon.


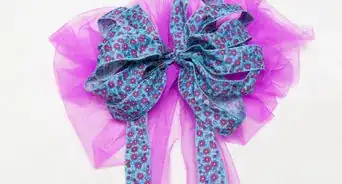
Side bow for a rectangular gift box
This is a lovely bow that is relatively easy to make but looks amazing.
-
1Purchase a suitable rectangular gift box with a lid. Place the gift inside, wrapped as appropriate. Place the lid on.
-
2Cut a long length of wide ribbon. See the measurement approach in Method 2 above.
- Choose a color of ribbon that suits the gift box.
-
3Fold the ribbon so that one side of the ribbon is 25 percent shorter than the other side.
-
4Lay the fold on the center of the gift box. Hold in place.
-
5Wrap the two ends of the ribbon around the gift box and back up to the top. Keep them apart from each other.
-
6After bringing the lengths back up to the top of the box, thread them through the fold made earlier. Pull tight.
-
7Pick up the two ends. Take the longer end and bring it right around the side of the box, underneath and back up to meet the shorter end.
-
8Tie the two ends together in a box on the short side of the box. Done.


Flat bow
-
1Cut the ribbon. Cut it twice the length of the desired finished bow length.
-
2Lay the ribbon out on a flat surface.
-
3Fold the ribbon into a loop. Glue the join of both ends together.
-
4Flatten the ribbon in the center. Flatten it over the join, then glue the flattened section in place.
-
5Cut a small piece of ribbon from the same ribbon. Wrap it around the center of the ribbon over the flattened section. Glue the join of this fold at the back.
-
6Done. The flat bow is neat and professional looking. It looks ideal attached on its own to a gift or added to a length of already wrapped ribbon.


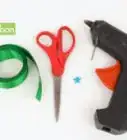
Things You'll Need
- Ribbon
- Tape for attaching
- Scissors (suitable for fabric)
- Glue (where appropriate)
- Gift box (if relevant)

About This Article
To make a classic gift bow, start by cutting a piece of ribbon that's long enough to wrap around your gift. Next, fold the ribbon so it forms 2 loops on each side. Then, bring these 2 loops together to form 1 loop in between the 2 side loops. After you cross the top left loop over the top right loop, fold the left loop behind the right loop. Finally, pull the top 2 loops together tightly to form a knot at the center of the bow. To learn how to make a top bow for a gift box, keep reading!