This article was co-authored by wikiHow Staff. Our trained team of editors and researchers validate articles for accuracy and comprehensiveness. wikiHow's Content Management Team carefully monitors the work from our editorial staff to ensure that each article is backed by trusted research and meets our high quality standards.
The wikiHow Video Team also followed the article's instructions and verified that they work.
This article has been viewed 252,146 times.
Learn more...
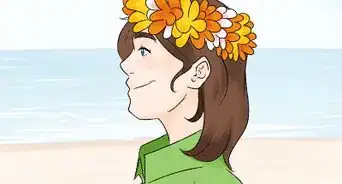
Braided headbands are trendy and chic. They can cost a pretty penny at the store, but they are surprisingly easy and cheap to make. There are countless ways to make them, from using t-shirts to using scraps of fabric and elastic. If your hair is long enough, you can even braid it to look like a headband. Whichever method you choose, you are bound to end up with something fashionable.
Steps
Making a 5-Strand Braided Headband
-
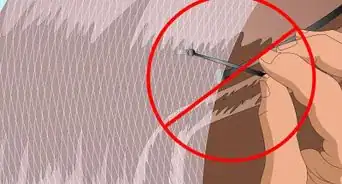
1Cut five, narrow strips from the bottom of a t-shirt. Cut off the bottom hem first, then cut the shirt into five, 1-inch (2.54-centimeter) wide horizontal bands. Cut the bands apart apart at one of the side seams to make five strips.[1]
-
2Stretch the fabric strips. Grab a fabric strip by both of the narrow ends. Give them a gentle tug, then move on to the next strip. Do this for all of the fabric strips. This will cause the strips to curl and become long tubes instead.[4]Advertisement
-
3Tape the strands to a table. Align the strands vertically and parallel to one other. You want to have two strands on the left, one strand in the middle, and two strands on the right. Place a long piece of tape across the top ends so that they don't slide off the table.
-
4Do a 5-strand braid. Cross the outer left strand over one strand, moving towards the right. Bring the middle strand over one towards the left. Cross the outer right strand over one strand, moving towards the left. Cross the middle strand over one to the right. Repeat these steps to complete the braid.[5]
-
5Trim the headband to fit your head. Measure your head first, then add 2 inches (5.08 centimeters). Cut your braid down to this new measurement. You need this extra length so that you can knot the ends together.[6]
-
6Knot the ends of the strands together. Take the first strand at one end of the braid, and the first strand on the other end. Tie them together in a tight, double-knot. Repeat the process for the second, third, fourth, and fifth sets of strands.[7]
-
7Trim off the ends from the knots. Alternatively, you can weave the ends back into the braid to hide them from view. For a cleaner finish, rotate the headband so that the knots are on the inside for the headband.[8]


Creating a Multi-Textured Headband
-
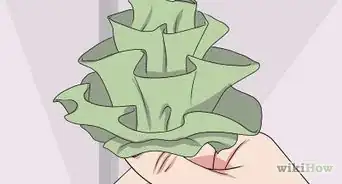
1Choose your fabric and ball chain. Patterned, cotton fabric with a floral print works well for a boho-chic look.[9] For an edgier look, try a colored cording and leather instead.[10] Ball chains come in both silver and gold, so pick the one that goes the best with your color scheme.
- You can find ball chains in the beading section of an arts and crafts store. You can also use an old ball chain necklace instead.
-
2Cut your fabric and ball chain. Cut two long strips out of your fabric/cording/leather that are ½ inch (1.27 centimeters) wide and about 2½ to 3 feet (0.91 m) (76.2 to 91.44 centimeters) long. Next, cut the ball chain down to 2½ to 3 feet (0.91 m) long.[11]
- You may not be able to cut your cording narrower; just focus on the length instead.
-
3Tape the three strands to a table. Set the ball chain down onto the table. Make sure that it is oriented vertically, then place the fabric strands to either side of it. Cover the ends with a piece of tape so that they don't move.[12]
- For an edgier look, place the cord on one side of the ball chain, and the leather on the other.
-
4Braid the three strands together. Cross the left strand over the middle one, then cross the right strand over the middle one. Keep braiding until the strands are long enough to wrap around your head, minus 2 inches (5.08 centimeters).
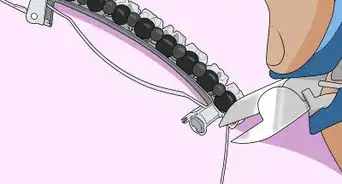
- If the strands are too long, cut the excess off. Remember to use wire cutters for the ball chain.
-
5Glue the end of the braid to a hair tie. Thread the end of the braid through the hair tie by about 1 inch (2.54 centimeters). Glue the end down to the rest of the braid with hot glue or fabric glue. The hair tie should be caught inside the looped fabric.[13]
- You can also sew the braid instead.
-
6Remove the tape from the top of the braid, and glue it to the other end. Peel off the tape from the top of the braid. Thread it through the hair tie by 1 inch (2.54 centimeters), then glue it down, just as before.
- Don't let the braid twist, otherwise it won't be comfortable on your head.
-
7Wrap and glue a piece of ribbon around the ends of the braid. Cut a short piece of 1-inch (2.54-centimeter) wide ribbon. Draw a line of glue along one of the narrow edges, then place it against the end of the braid, just above the elastic. Wrap the ribbon around the base of the braid tightly, then glue down the other end. This will cover the end of the braid and give you a nicer finish.[14]
- Repeat this step for the other side of the headband.
- A black ribbon will look the best, but if you can also match the ribbon color to the hair tie instead.

Braiding Your Hair into a Headband
-
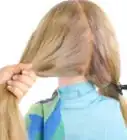
1Gather a 1-inch (2.54-centimeter) wide section of hair from behind your ear. It does not matter which side of your ear you are grabbing the section on. You will be making another one just like it.[15]
- This style works best on long hair that falls past the shoulders.
- If your hair is straight or fine, consider adding some texture with a texturizing mousse or spray. You can also use a curling iron.
-
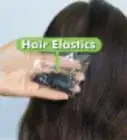
2Braid the section upward. Split the section into three, equal strands. Hold the strands up towards the ceiling as you braid them. Secure the end of the braid with a clear hair elastic.[16]
-
3Repeat the process on the other side of your head. You will now have two braids dangling down from behind your ears.[17]
-
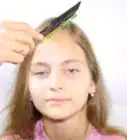
4Comb the rest of your hair back, away from your hairline. This will help further create the illusion of wearing a headband. Simply run a brush through your hair from you front hairline towards the back.[18]
- Be careful not to snag the braids.
-
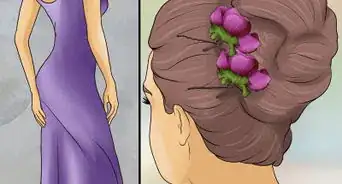
5Wrap the braids across the top of your head. Take the left braid, and wrap it over the top of your head, towards the right ear. Take the right braid, and wrap it over your head as well. This time, keep it just behind the first braid.[19]
-
6Secure the braids behind your ears with bobby pins. They should look like a double-strand, braided headband. If you need to, adjust your loose hair so that it is covering the bobby pins.[20]
-
7Unravel the excess braid, if desired. At this point, you can leave the braids as the are. For a neater finish, however, pull off the clear elastics, and unravel the braids until you reach the bobby pins.
Community Q&A
-
QuestionIs this a good braid to make in the morning?
 Community AnswerYes, but if you are running late or don't have a lot of time, you might want to stick with a simpler hairstyle--at least until you get the hang of it. If this is your first time trying this style, it might take a little bit longer; with enough practice, however, you should be able to do it in no time.
 -
QuestionWhich hair spray should I use?
 Community AnswerA full-hold hairspray is best for making a braided headband.
 -
QuestionDo headband braids work with thick, wavy hair?Community AnswerYes, this works great with thick hair.
Things You'll Need
Making a 5-Strand Braided Headband
- T-shirt
- Fabric scissors
- Fabric pen and ruler (optional)
Creating a Multi-Textured Headband
- Patterned cotton fabric
- Ball chain
- Fabric scissors
- Wire cutters
- Hair tie
- Fabric glue or hot glue
- 1-inch (2.54-centimeter) wide ribbon
Braiding Your Hair into a Headband
- Clear hair elastics
- Bobby pins
- Hairbrush
- Texturizing spray or mousse


References
- ↑ https://rabbitfoodformybunnyteeth.com/diy-workout-headband/
- ↑ http://www.makeit-loveit.com/2011/06/repurposing-tshirts-into-5-strand-braided-headbands.html
- ↑ http://www.makeit-loveit.com/2011/06/repurposing-tshirts-into-5-strand-braided-headbands.html
- ↑ https://rabbitfoodformybunnyteeth.com/diy-workout-headband/
- ↑ https://rabbitfoodformybunnyteeth.com/diy-workout-headband
- ↑ https://rabbitfoodformybunnyteeth.com/diy-workout-headband/
- ↑ https://rabbitfoodformybunnyteeth.com/diy-workout-headband/
- ↑ https://rabbitfoodformybunnyteeth.com/diy-workout-headband/
- ↑ http://www.thesassylife.com/diy-braided-headband/
- ↑ http://www.psimadethis.com/diy/fashion/braided-headband
- ↑ http://www.psimadethis.com/diy/fashion/braided-headband
- ↑ http://www.thesassylife.com/diy-braided-headband/
- ↑ http://www.thesassylife.com/diy-braided-headband/
- ↑ http://www.thesassylife.com/diy-braided-headband/
- ↑ https://www.realsimple.com/beauty-fashion/hair/tools-techniques/headband-braid
- ↑ https://www.realsimple.com/beauty-fashion/hair/tools-techniques/headband-braid
- ↑ https://www.realsimple.com/beauty-fashion/hair/tools-techniques/headband-braid
- ↑ https://www.realsimple.com/beauty-fashion/hair/tools-techniques/headband-braid
- ↑ https://www.realsimple.com/beauty-fashion/hair/tools-techniques/headband-braid
- ↑ https://www.realsimple.com/beauty-fashion/hair/tools-techniques/headband-braid
About This Article