This article was co-authored by Nicole Bolin. Nicole Bolin is a Crafting Specialist and the CEO of Stencil, a DIY Craft Studio in Phoenix, Arizona. Nicole specializes in interior design and various craft and DIY projects. Nicole holds a Certificate in Interior Design from the New York Institute of Art and Design. She opened Stencil in 2017 to teach others to create DIY projects that fit their home and lifestyle.
This article has been viewed 180,767 times.
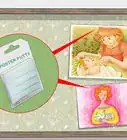
If you have more photos, to-do lists, and random sticky notes than you know what to do with, a bulletin board can be a lifesaver, and you don’t have to go out and buy an expensive premade board to use. You can make your very own beautiful, customized bulletin board right at home using a few basic supplies. We'll walk you through the whole process step-by-step below!
Steps
Building the Bulletin Board
-
1Choose the backing. Corkboard is the traditional material for bulletin boards, but can get pretty expensive. Bristol board, foam board, or sound dampening board are all cheaper alternatives. You can even use thick cardboard, as long as it's sturdy enough not to tear.
Test it before you start building. Pin a few sheets of paper onto the board and see how well it holds.
-
2Fit it into a frame (optional). The frame will not be visible after this project is done. However, a frame makes it easier to attach the batting and fabric we'll be adding. It also provides a little protection, which may be worth it if children will use the board.Advertisement
-
3Cover with batting (optional). Thin batting (padding) adds a softer touch and allows for three-dimensional designs. Attach as follows:[1]
- Lay the board face down over the batting. Cut a rectangle of batting about 2–3 inches (5–7.5cm) larger than the board.
- Pull one corner over the back of the board. Attach with a hot glue gun, fabric glue, or (if a frame is present) a staple gun.
- Repeat with batting around the whole board, pulling taut before attaching. Trim off excess batting.
-
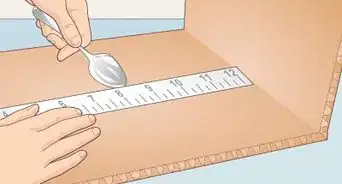
4Iron a piece of fabric. Select a decorative fabric larger than the bulletin board. Cut out a piece about 4–6 inches (10–15cm) larger on each side than your board. Iron this until it is completely flat.[2] [3] Wrapping paper is another cheap option, but tends to tear pretty quickly.
You could use an old piece of clothing or a plastic tablecloth instead.
-
5Cover the board with fabric. Lay the board face-down on the backside of the fabric. Pull the fabric around and attach to the back of the board, just as you did with the batting. Pull taut as you go and check the front frequently to avoid wrinkles.


Decorating the Board
-
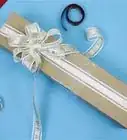
1Decorate with ribbons. A criss-cross ribbon design is a popular look, especially over batting. Wrap ribbons in rows at a 45º angle to the board, gluing or stapling to the back. Repeat with ribbons slanted the opposite direction to make a diamond pattern. Pin the ribbons in place at every point where two ribbons cross.[4]
- Sewing buttons over each intersection makes an extra cute look.[5]
- Of course, you can arrange the ribbons however you like. For instance, vertical ribbons could divide the bulletin board into areas used for different purposes.
-
2Turn it into a tufted bulletin board. If you attached batting to your bulletin board, you can mimic a soft, tufted comforter. Here's how:[6]
- Nail a piece of plywood to the back of the board. (See Tips for alternatives.)
- Nail small, short nails through the fabric and onto the plywood. Place them in a diamond pattern. Make sure they don't penetrate the plywood.
- Cover the nails with upholstery tacks, or glue decorative beads over them.
-
3Add laminated decorations. Laminate a piece of fabric or construction paper. Cut out letters or shapes and pin them along the top of the board.
-
4Tack on writing material. Add index cards or blank paper for writing notes. For aesthetic variety, cut the paper into circles or use paper in several colors.
Mounting the Board
-
1Screw the board to the wall. If you own the house or have permission from the owners, screw in the board for a secure fit. Fit each screw through a washer before screwing it in, to prevent it crushing the soft board.
-
2Hang from wall mounting squares. If you don't want to damage the wall, stick on a wall mounting square, or several if your board is large. Wait for the adhesive to cure, for however long the label suggests. Stick on the board and press firmly.
- Bulletin boards are usually too heavy to hang from adhesive putty.
-
3Hang from a hook or nail. You can purchase strong adhesive hooks if you don't want to puncture the wall. Punch two holes in the bulletin board and thread strong wire, twine, or ribbon through both. Double knot on either side and hang over the hook or nail.

Expert Q&A
Did you know you can get expert answers for this article?
Unlock expert answers by supporting wikiHow
-
QuestionWhat kind of backing should I use for a bulletin board?
 Nicole BolinNicole Bolin is a Crafting Specialist and the CEO of Stencil, a DIY Craft Studio in Phoenix, Arizona. Nicole specializes in interior design and various craft and DIY projects. Nicole holds a Certificate in Interior Design from the New York Institute of Art and Design. She opened Stencil in 2017 to teach others to create DIY projects that fit their home and lifestyle.
Crafts & DIY SpecialistCork board is best, but make sure you choose cork that's thick enough so the thumb tacks don't go through the board and into the wall.
Support wikiHow by unlocking this expert answer.
-
QuestionCan I make a simple bulletin board by decorating cardboard, leaning it against the wall, and tacking objects onto it?
 Community AnswerYes, but be aware of the thickness of the cardboard you use; some won't be thick enough to secure the tacks properly.
 -
QuestionCan I use Styrofoam to make a bulletin board?
 Community AnswerYes you can. However, since Styrofoam breaks very easily, be sure to use a piece of adequate thickness, and glue a piece of cardboard on the back to add durability.
Warnings
- Young children should ask for help with scissors, pins, and hot glue.⧼thumbs_response⧽
- A large bulletin board can be a fire hazard, especially if it includes batting. Keep all candles and heat sources away from the area. Consider spraying the fabric with fireproofing spray.⧼thumbs_response⧽
Things You'll Need
- Cardboard
- Scissors
- Pins or glue
- A shirt or a piece of fabric
- markers (optional)


References
- ↑ https://www.youtube.com/watch?v=-F9tI3Y1VPo
- ↑ http://makinglemonadeblog.com/how-to-make-a-large-bulletin-board/
- ↑ http://bulletinboards.theteacherscorner.net/materials/
- ↑ https://www.youtube.com/watch?v=-F9tI3Y1VPo
- ↑ http://fabulesslyfrugal.com/diy-french-bulletin-board-easy-craft-idea/
- ↑ https://www.hometalk.com/posts/organize/command-centers-boards/tufted-bulletin-board-44326010
- ↑ https://www.youtube.com/watch?v=-F9tI3Y1VPo
About This Article

To make a bulletin board, start by getting some cork or cardboard. Then, cut a piece of fabric that's 4-6 inches longer than the board on each side. After you've cut the fabric, lay the board face down on the back of the fabric and attach the edges of the fabric to the back of the board with tape or glue. When the fabric is in place, turn the board over and pin paper to the board for writing notes. Finally, hang up the board either by screwing it to the wall or attaching it to an adhesive hook. For tips on how to decorate your bulletin board and what other materials you can use to make one, read on!