This article was co-authored by Garrison Hullinger and by wikiHow staff writer, Sophia Latorre. Garrison Hullinger is an Interior Designer and the President of Garrison Hullinger Interior Design (GHID). With more than 15 years of experience, he specializes in client-centered design that balances beauty and warmth with comfort and functionality. Garrison and GHID’s work has been featured in numerous publications such as The New York Times, The Wall Street Journal, and Interior Design Magazine. Garrison attended Oklahoma Christian University.
There are 7 references cited in this article, which can be found at the bottom of the page.
This article has been viewed 41,335 times.
Purchasing chair covers can be expensive, especially if you have an entire set of chairs to cover. Fortunately, you can make your own for very little money. You can use pillowcases to cover dining room chair backs and seats, make fancy chair covers for special events, or create a custom one-piece slipcover for an armchair.
Steps
Using Pillowcases to Cover Dining Room Chairs
-
1Select 2 pillowcases per chair. You’ll use 1 pillowcase to cover the back of the chair and another pillowcase to cover the cushion. Measure the chair back and cushion before choosing pillowcases to ensure you get the right size—a standard pillowcase is 20 by 26 inches (51 by 66 cm).
- Choose a print or color that matches your table and existing dining room decor.
- Opt for an easy-to-clean fabric, like a cotton-polyester blend, if you have children or expect spills or messes.
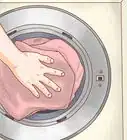
- Feel free to wash and iron the pillowcases before using them.
-
2Remove the seat cushion from the chair. Turn the chair over and use a drill or screwdriver to remove the fasteners that hold the seat cushion to the chair. Be sure to keep the fasteners in a safe place as you will need them later.[1]Advertisement
-
3Cut a pillowcase 4 square inches (26 cm2) larger than the cushion. Refer to the measurements you took for the cushion, then use fabric scissors to cut the pillowcase to size. Be sure to add at least 4 square inches (26 cm2) to the measurements so you can wrap the fabric around the back of the seat.[2]
- If you want to add extra foam or padding to the cushion, make the pillowcase cover larger to account for the foam.
-
4Place the seat cushion on top of the fabric. Lay the fabric so the print or “right” side is face down on your work surface. Add any extra padding or foam now, if desired. Center the cushion in the middle of the fabric (on top of the padding).[3]
-
5Staple the fabric to the back of the seat. Pull the fabric tight to the back of the seat on 1 side, making sure to keep it centered. Use a staple gun to secure the fabric every 2 inches (5.1 cm) or so. Repeat on the opposite side of the seat. Then, fold one of the other sides like you would a package (i.e. tuck the corners in) and staple it to the back of the seat. Repeat with the remaining side.[4]
- Put your first staple in the middle of each side and work out toward the edges. Be sure to keep the fabric taut!
- Use fabric scissors to trim any excess fabric away.
-
6Fasten the seat to the chair. Flip the chair over so the bottom is visible and use the fasteners you set aside to reattach the seat to the chair using a drill or screwdriver. Ensure the seat is on firmly so it won’t shift when you sit down. Then, turn the chair right-side-up.[5]
-
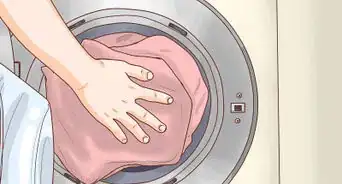
7Slip a pillowcase over the back of the chair. This part is super simple! Just pull the pillowcase down over the chair back so the seam is at the top. If there is excess material at the bottom, tuck it up inside the pillowcase or let it bunch around the seat of the chair.[6]
- To spruce up the chair even more, wrap flat ribbon around the center of the pillowcase and tie it in a knot or bow at the back of the chair. You could even add a decorative pin over the knot, if desired.
-
8Repeat for each remaining chair. To make all of your chairs match, repeat the steps for reupholstering the seats and covering the chair backs for each. With a few basic materials and a little bit of time and effort, you can completely change the look of your dining room chairs.


Creating Fancy Covers for Special Occasions
-
1Take measurements of the chairs. Use a tape measure to determine the width of the chairs you want to cover. Then, measure up the back of the chair from the floor to the top, down the front of the backrest, along the edge of the seat from back to front, and from the seat down to the bottom of the legs. Add these measurements together to determine the length of the fabric.[7]
- Add at least 1 inch (2.5 cm) to each measurement (the width and the total length) to ensure you have enough fabric to cover the entire chair.
- This project works best for dining room chairs, folding chairs, and banquet chairs.
-
2Purchase enough fabric to cover each chair. Multiply the dimensions by the number of chairs you wish to cover, then obtain that amount of fabric. For special occasions like weddings, fabrics such as organza, satin, and damask are popular. However, feel free to choose any fabric you like. Ensure the color and finish of the fabric will complement the decor of the occasion.[8]
- If you don't want to hem the edges, choose a fabric that doesn't fray when cut, like tulle, jersey, or velvet.
- On average, you'll need about 2 yards of fabric per chair.[9]
-
3Drape the fabric over a chair. If necessary, cut the fabric into pieces based on the original dimensions. Position the fabric so it covers the entire chair and lies flat over the seat. Bring the extra material from the front and sides to the back of the chair.[10]
-
4Pin or sew the edges of the fabric at the back of the chair. Hand-stitch the sides of the fabric together using a thread that matches the color of the fabric. Alternatively, use safety pins to secure the edges together if you don’t want to sew them.[11]
- If you chose a fabric that frays when cut, you can hem the raw edges or use a product like Fray Check.
-
5Tie a sash at the back of the chair. Cut strips of ribbon, tulle, or taffeta that are at least twice the width of the chair. Position the center of the sash in the middle of the front of the backrest and wrap the sash around the back. Tie it in a knot or bow and let the excess trail down.[12]
- If the chair has a wider top or base, find where the chair tapers in to tie the sash, so that it does not slide up or down as the person sits in it.
- Attach a flower, herb stalk, or decorative pin in the center of the knot if desired.
- Using a scarf is another option for a sash on a chair. You could use scarves with complementary colors that pick up the color theme of the room or event.
-
6Cover each chair using the same method. Repeat the process for each remaining chair until they are all covered and styled to your liking.[13]


Sewing an Armchair Slipcover
-
1Select a durable fabric that complements your existing decor. For everyday use, opt for a sturdy, washable fabric like a cotton-polyester blend. Canvas, while difficult to sew, will also last a long time.[14] If you’re a sewing novice, choose a solid-colored fabric so you don’t have to worry about matching up the print when you sew the pieces together.
- On average, you’ll need 3-4 yards of fabric to cover an armchair.
-
2Create a paper pattern for the chair. Lay a piece of tracing paper, newspaper, or muslin over the largest section of the chair and trace the shape and size. Repeat for each section, working from the largest to the smallest areas. Feel free to maneuver the chair as needed if you want to lay it flat on the paper to get more precise patterns. Be sure to account for all parts of the chair, including the front, back, seat, and arms.[15]
- Alternatively, you could measure each section of the chair and use the measurements to make your pattern.
- Label each piece of the pattern so you don’t get confused later on.
-
3Add 1⁄2 in (1.3 cm) to each measurement and cut out the pattern pieces. This is to account for the seam allowance and hems. Trace a new line around each piece of the pattern to include these increased measurements. Then, cut out each piece of the pattern.[16]
-
4Pin the pattern to the fabric, then trace each piece. You only need to add a few pins to each piece to ensure the pattern doesn’t move. Use tailor’s chalk to trace the pattern onto the "wrong" side of the fabric. Press down the edges of the pattern with your fingers as you trace around it.[17]
- Use the edge of a ruler as a guide when drawing straight lines.
- If you’re using printed fabric, make sure the pattern matches up in a way you like.
-
5Use fabric scissors to cut along the chalk lines. Stay as close to the lines as you possibly can. If you are having a hard time cutting the fabric, opt to cut outside the lines instead of inside the lines to ensure there’s enough fabric to cover the chair.[18]
- Wipe away the tailor's chalk with a cloth when you are done.
-
6Pin the pieces of the pattern together. Refer to the newspaper templates if you need help determining which piece is which. Insert the pins in the same direction as the edge of the fabric. Join the back pieces first, then add the front pieces and finish with the arms.[19]
-
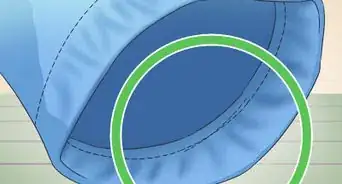
7Check the fit. Before you start sewing, carefully put the slipcover over the chair to ensure it fits. Make any necessary adjustments by removing the pins and realigning (or replacing) the necessary sections.[20]
-
8
-
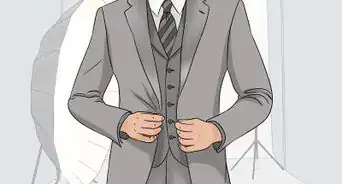
9Put the slipcover on the chair. Once you’re done sewing, all that’s left is to put the slipcover on and enjoy your reupholstered chair.[22]


Things You’ll Need
Using Pillowcases to Cover Dining Room Chairs
- 2 pillowcases per chair
- Measuring tape or ruler
- Drill or screwdriver
- Fabric scissors
- Staple gun
- Ribbon and/or decorative pins (optional)
Creating Fancy Covers for Special Occasions
- ~2 yards of fabric per chair
- Measuring tape or ruler
- Fabric scissors
- Pins or needle and thread
- Ribbon, tulle, or taffeta
- Flowers or decorative pins (optional)
Sewing an Armchair Slipcover
- ~3-4 yards of fabric
- Newspaper or muslin
- Pencil
- Tailor’s chalk
- Sewing pins
- Fabric scissors
- Sewing machine
You Might Also Like

This is a modal window.
This is a modal window.
This is a modal window.
This is a modal window.
This is a modal window.

This is a modal window.
This is a modal window.

This is a modal window.
References
- ↑ https://www.thinkingcloset.com/2016/02/28/how-to-reupholster-a-chair-seat-the-no-mess-method/
- ↑ https://www.thinkingcloset.com/2016/02/28/how-to-reupholster-a-chair-seat-the-no-mess-method/
- ↑ https://www.thinkingcloset.com/2016/02/28/how-to-reupholster-a-chair-seat-the-no-mess-method/
- ↑ https://www.thinkingcloset.com/2016/02/28/how-to-reupholster-a-chair-seat-the-no-mess-method/
- ↑ https://www.thinkingcloset.com/2016/02/28/how-to-reupholster-a-chair-seat-the-no-mess-method/
- ↑ https://www.momtastic.com/diy/168139-no-sew-pillow-case-chair-covers/
- ↑ https://oureverydaylife.com/how-to-make-your-own-wedding-chair-covers-sashes-12610720.html
- ↑ https://oureverydaylife.com/how-to-make-your-own-wedding-chair-covers-sashes-12610720.html
- ↑ https://lifehacker.com/this-chart-shows-you-how-much-fabric-you-need-to-reupho-1686187809
- ↑ https://oureverydaylife.com/how-to-make-your-own-wedding-chair-covers-sashes-12610720.html
- ↑ https://oureverydaylife.com/how-to-make-your-own-wedding-chair-covers-sashes-12610720.html
- ↑ https://oureverydaylife.com/how-to-make-your-own-wedding-chair-covers-sashes-12610720.html
- ↑ https://oureverydaylife.com/how-to-make-your-own-wedding-chair-covers-sashes-12610720.html
- ↑ https://www.confessionsofaserialdiyer.com/sew-easy-outdoor-cushion-covers-part-1/
- ↑ https://www.theguardian.com/lifeandstyle/2010/jan/18/make-a-removable-sofa-cover
- ↑ https://www.theguardian.com/lifeandstyle/2010/jan/18/make-a-removable-sofa-cover
- ↑ https://www.theguardian.com/lifeandstyle/2010/jan/18/make-a-removable-sofa-cover
- ↑ https://www.theguardian.com/lifeandstyle/2010/jan/18/make-a-removable-sofa-cover
- ↑ https://www.theguardian.com/lifeandstyle/2010/jan/18/make-a-removable-sofa-cover
- ↑ http://www.sewcountrychick.com/armchair-slipcover-tutorial-waverize/
- ↑ https://www.theguardian.com/lifeandstyle/2010/jan/18/make-a-removable-sofa-cover
- ↑ http://www.sewcountrychick.com/armchair-slipcover-tutorial-waverize/
About This Article

To make a chair cover, start by selecting 2 matching pillow cases, one for the back of the chair and the other for the cushion. Next, remove the seat cushion, and cut a pillow case 4 inches larger than the cushion on all sides so you can wrap it around the bottom of the chair. Then, place the pillow case over the cushion, and staple it to the chair at 2 inch intervals. Finally, slip the other pillow case over the back of the chair, making sure that the seam is at the top. For tips on how to sew a slipcover for an armchair, read on!