This article was co-authored by wikiHow Staff. Our trained team of editors and researchers validate articles for accuracy and comprehensiveness. wikiHow's Content Management Team carefully monitors the work from our editorial staff to ensure that each article is backed by trusted research and meets our high quality standards.
This article has been viewed 153,382 times.
Learn more...
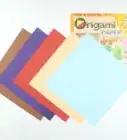
Duct tape crafts are popular, and for good reasons. They are fun to make and durable when completed. You can make them in all sorts of colors and patterns, and end up with something truly unique. Duct tape wallets are a classic, but the most common pattern can be hard, especially for beginners. Luckily, there are two simple duct tape wallet patterns that even a first-timer can make!
Steps
Making a Simple Wallet
-
1Cut eight 10-inch (25.4 centimeters) long strips of duct tape. You can lay them out on your table sticky-side-up, or you can tape them to the edge of your table. This will keep them out of the way while you work.
-
2Lay four strips down on the table, sticky-side up, with the long edges overlapping by ¼-inch (0.64 centimeter). Try to align the side edges as much as possible, but don't worry if they aren't perfect. You will be trimming the wallet down later.Advertisement
-
3Lay down the rest of the four strips on top of the sheet, one at a time. Be sure to overlap the edges by ¼-inch (0.64 centimeter) again. To make your wallet smoother, lay the first strip ¼-inch (0.64 centimeter) down from the top. This will stagger your tape pieces, otherwise, your wallet will be four layers thick in some areas. This can make it hard to fold.[1]
- If you staggered your tape pieces, fold the top and bottom edges down so that the sticky side doesn't show.[2]
-
4Consider making a border for your wallet. Cut a 10-inch (25.4 centimeters) strip of duct tape, then cut it in half length-wise. Fold one of the strips over the top edge of the sheet, and the other strip over the bottom edge of the sheet. This will give you a cleaner edge.[3]
- This border can match your duct tape sheet, or you can use a contrasting color.
- You can also use two 10-inch (25.4 centimeters) strips of narrow or thin duct tape (also called "mini" duct tape). It is already the right width so you don't have to cut it in half.
-
5Trim the narrow ends of the sheet until it is 9 inches (22.86 centimeters) long. Be sure to trim both ends of the sheet. This will get rid of any unevenness.
-
6Fold the sheet in half lengthwise so that you end up with a long, skinny rectangle. Try to fold it so that the back part is a little bit higher than the front. This way, your wallet will look neater when you close it.[4]
-
7Cut a 4-inch (10.16 centimeters) long strip of duct tape, then cut it in half lengthwise. You will be using this to tape the edges of your wallet shut. You can make it the same color as your wallet, or you can use a contrasting color. If you added a border to your wallet earlier, consider using the same color.
- You can also use narrow or thin duct tape for this instead. Simply cut two 4-inch (10.16 centimeters) strips of narrow duct tape.
-
8Tape the sides of the wallet shut. Align the 4-inch (10.16 centimeters) strip along one of the narrow edges of your wallet, then fold the excess over to the back. Repeat this step for the other side of the wallet with the other strip.
-
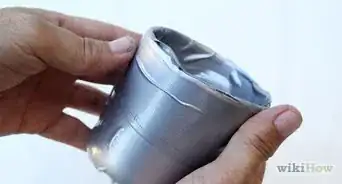
9Fold your wallet in half, widthwise, if desired. You can also leave it unfolded, so that it is a bi-fold wallet. This way, you won't have to worry about your money getting a crease in the middle.
-Step-1-Version-2.jpg)
-Step-2-Version-2.jpg)
-Step-3-Version-2.jpg)
-Step-4-Version-2.jpg)
-Step-5-Version-2.jpg)
-Step-6-Version-2.jpg)
-Step-7-Version-2.jpg)
-Step-8-Version-2.jpg)
-Step-9.jpg)
Making a Pouch Wallet
-
1Cut six 12-inch (30.48 centimeters) long strips of duct tape. You can spread the strips on your work surface, sticky-side-up, or you can place them along the edge of your table.
- This will give you a simple, square-shaped pouch. It is perfect for holding coins. You can also use it to hold paper money if you fold them up first.
-
2Lay three of those strips down, sticky-side-up, with the long edges overlapping by ¼-inch (0.64 centimeter). You should have a sheet of duct tape when you are done. This is part of your duct tape sheet.
-
3Lay the other three strips on top of the duct tape fabric, sticky-side-down. Remember to overlap the edges by ¼-inch (0.64 centimeter). Try to align the side edges as much as you can, but don't worry if they aren't perfect. You'll be trimming the wallet down later.
-
4Trim the sides of the duct tape sheet so that it is 11 inches (27.94 centimeters) long. This will not only get the sheet to the right size, but it will also get rid of any uneven edge.
-
5Cut one of the narrow edges into a point or curve to make the wallet flap. Draw the lines using a pen first, then cut along it using a pair of scissors. If you are having troubles drawing a neat curve, use a cup or plate as a template.[5]
-
6Fold the sheet into thirds, widthwise. When you are done, you should end up with a square shape. This is the body of your wallet.
-
7Cut a strip of duct tape, then cut it in half lengthwise. Each strip needs to be the same height as your wallet. You will be using this to seal the edges. It can be the same color or pattern as your pouch, or it can be a contrasting one.
- You can also use narrow/thin/mini duct tape. It is already the right width, so you don't have to cut it in half lengthwise. Simply cut two equal pieces.
-
8Seal the sides of your wallet with the narrow strips of duct tape. Be careful not to tape down the flap! If you have any excess tape hanging over the top or bottom of your wallet, you can trim it off with a pair of scissors.
-
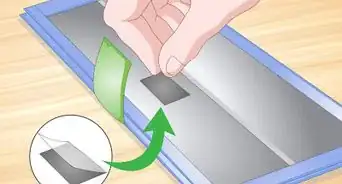
9Use a Velcro dot to close the flap. Open up the wallet, and place a Velcro dot on the point of the triangle (or the top center of the curve). Place the other Velcro dot on the corresponding spot on the body of the wallet.
-Step-10.jpg)
-Step-11.jpg)
-Step-12.jpg)
-Step-13.jpg)
-Step-14.jpg)
-Step-15.jpg)
-Step-16.jpg)
-Step-17.jpg)
-Step-18.jpg)
Community Q&A
-
QuestionHow many simple wallets can you make with one roll of duct tape?
 Community AnswerFour to seven, depending on the slight differences in size, the thickness of the duct 'fabric', and whether you cut off any extra duct tape.
Things You'll Need
Making a Simple Wallet
- Duct tape (1 to 2 colors)
- Mini/thin duct tape (optional)
- Scissors
- Ruler
Making a Pouch Wallet
- Duct tape (1 to 2 colors)
- Mini/thin duct tape (optional)
- Scissors
- Velcro dots
- Ruler
- Pen
References
- ↑ http://www.craftynest.com/2010/07/camp-craft-duct-tape-wallets/
- ↑ http://www.craftynest.com/2010/07/camp-craft-duct-tape-wallets/
- ↑ http://boyslife.org/hobbies-projects/projects/35660/make-a-duct-tape-wallet/
- ↑ http://craftsbyamanda.com/how-to-make-duct-tape-wallet/
- ↑ http://www.thesuburbanmom.com/2015/09/08/how-to-make-a-duct-tape-wallet/
- ↑ http://www.craftynest.com/2010/07/camp-craft-duct-tape-wallets/
About This Article