This article was co-authored by wikiHow Staff. Our trained team of editors and researchers validate articles for accuracy and comprehensiveness. wikiHow's Content Management Team carefully monitors the work from our editorial staff to ensure that each article is backed by trusted research and meets our high quality standards.
This article has been viewed 86,871 times.
Learn more...
Whether you need a simple idea for a science project or a prop for your next Halloween party, you can't go wrong with a fake hand. Teach younger kids how a hand works by constructing one from a paper plate and using straws and string as bones and tendons, or sculpt a hand from clay with older children who can safely handle sharper tools and hot ovens.
Steps
Constructing a Fake Hand From a Paper Plate
-
1Choose material for the hand. Use a paper plate or thick paper that is sturdy enough to support the materials you will be adding. A paper plate works best because they are designed to hold food and be supportive, like a hand! [1]
-
2Trace your hand on a paper plate. Place the paper plate on a flat surface, facing up as if you were about to put some food on it. Put your hand in the center of the plate, palm facing down and fingers spread out. Trace your whole hand with a pencil.
- Make sure you hold your hand steady. Stand up and put pressure on your hand so it is less likely to scoot around on the table. Tape your plate to the table to keep it in place.
- Make sure your fingers are spaced out 1/2 an inch to 1 inch so you have space to trace them and so they can wiggle once you cut out your hand.
- Use a pencil so you can erase mistakes and any visible lines that are left once you cut the hand from your plate.
Advertisement -
3Cut out your fake hand. Follow your outline the best you can. Start at the bottom of your fake hand and work your way up towards the thumb, over the fingers, and then back down along the pinkie side of your hand.
-
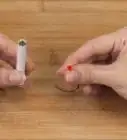
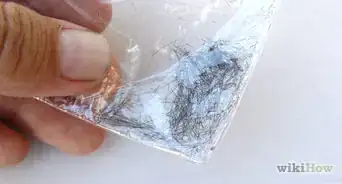
4Cut plastic straws into pieces. For each hand, cut 19 pieces at a length of 1-2 inches. These will help your hand bend and come to life.[2]
- Cut the ends at a slight angle or straight across, according to your preference.
-
5Cut a small "v" in the middle of each straw. Hold the straw between your thumb and index finger. Use your scissors to cut a tiny "v" halfway through the middle so they can bend.[3]
-
6Mark your joints. Use a pencil to mark on each finger of the plate where a joint should be. Study your own hand to judge where to mark. Also mark a line extending about an inch above where your the bottom of your thumb connects with your palm to roughly an inch below where your pinkie connects.
-
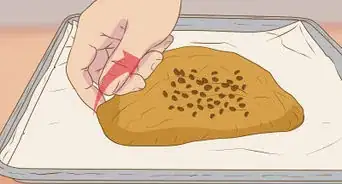
7Glue your straw pieces to the hand. Place three straw pieces on each finger: two between each joint and one between the last joint and your fingertip. Place two on the thumb: one between the two joints and another between the last joint and the thumb's tip. Place five more along the line across the palm.
- Keep the straw pieces separated from each other in the fingers and thumb. If you don't have enough room to do the same with the straw pieces in the palm, allow them to touch end to end.
-
8Pause here. Allow the glue to dry. Let it sit for about thirty minutes.
-
9Thread string through the straw pieces in each finger. Secure the string at the tip of each finger with a piece of tape. Thread it through the straws to the wrist. Go about four inches past the wrist before cutting the string to make sure you have enough.[4]
-
10Test your strings! Pull gently on each one to make sure each finger works. If they do, pull them all at the same time for full effect![5] Put a latex glove on it and stuff it with tissues to make a more lifelike hand.


Sculpting a Fake Hand from Clay
-
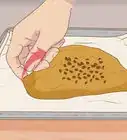
1Roll a lump of clay into a cylinder. Use enough clay to form a cylinder that’s roughly as big as the sized hand you wish to make. Round both ends so there are no sharp edges. Then flatten the clay slightly, using your fingers or a rolling pin. Smooth the clay until it’s the desired thickness for your fake hand.
-
2Form the thumb and wrist. Picture your clay as a hand facing you with its palm up and all of its fingers straight and pressed together, including the thumb. Gently pull enough clay from one side to indicate a thumb without detaching it from the rest of the clay. Next, form the wrist. Indent the clay below the ball of its thumb, along the bottom of its palm.
-
3Indent the palm. Use your fingers or a small cylindrical object (pencil, paintbrush handle, etc.) to indent the clay along its thumb. Lay your tool lengthwise along the top of the clay, angled toward the wrist, with the tip of your tool roughly centered in the middle of the palm. Gently roll or worm it to form an impression.
- Imagine your clay is a clock and your tool as the hour hand. If you’re making a left hand, the hour should read 10:30. If you’re making a right hand, it should read 1:30.
-
4Separate the thumb. Pull more clay from the rest of the hand and then detach the thumb, leaving its base attached, just like a real thumb spreading out from its hand. Round it into the shape of a thumb.
-
5Indent the palm again. This time, lay your tool across the palm where the base of the fingers will join. Also indent along the thumb and wrist as before to redefine the impressions.
-
6Separate the fingers. Use a scalpel to cut between each finger, leaving the base of each attached to the palm. Trim the top of each finger to taper them. Remember: the middle finger is longest, the pinkie is shortest, and the ring and index fingers are roughly the same size.
-
7Separate the fingers further. Pass a needle up and down each cut between the fingers to spread them further apart. Go slowly and gently; this step is delicate.
- Depending on how large your sculpture is, switch to a larger tool once there’s enough room for it to fit between the fingers.
-
8Form the fingers. Gently roll each between your own fingers to round them. Pay attention to the thickness of each so that no one finger is too thin or too thick. If needed, stretch them out to lengthen them. Then trim the excess and round the fingertips.
- Use a thin cylindrical tool (like a needle or the tip of paintbrush handle, depending on the size of your sculpture) to sculpt between the base of the fingers if your own fingers are too big to get in there.
-
9Indent the fingers’ joints. Use a small, thin cylindrical object to form a very light impression for each joint in the fingers. Be careful not to make too sharp of an indent; the smaller your sculpture, the more likely your finger will break here if the indent is too sharp.
-
10Form the knuckles. Flip your fake hand over to work on its back. Add small balls of clay to the base of each finger. Smooth them into place until they’re seamless.
-
11Finish the wrist. Continue the indent for the wrist along the back of the hand to mirror the front. Then slice a thin layer of clay from the back of the hand just above the wrist to create a more contoured effect.
-
12Double-check your work. Trim and smooth the clay where needed. If too much has been trimmed or smoothed, apply a dab of clay to repair the area.
-
13Add details. Refer to your own hand to study the lines in your palm. Use a needle to lightly trace them in the palm of your sculpture. Flip the hand over and do the same for fingernails.
-
14Pose your hand. Flex your own hand to see how your fingers and thumb work together in different poses. Gently bend your sculpture’s fingers to replicate.
-
15Bake your sculpture. Follow the directions and recommendations listed on the clay’s packaging. Different types and/or brands of clay may have special instructions.


Casting a Fake Hand with Plaster
-
1Mix a batch of rubber mold. Make enough to fill a container large enough to fit your entire hand. Choose a container that’s also large enough so that your hand does not come into contact with the container itself.[6]
- Be sure that the brand of rubber mold you use is non-toxic and safe for human contact.
-
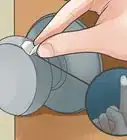
2Soak your hand in warm water. Hold your thumb and fingers in the pose you wish to replicate. Then dip your entire hand into the mold, keeping it well away from the sides and bottom. Leave at least a half-inch of mold between your hand and the container.[7]
-
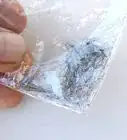
3Allow the mold to set. Keep your hand posed within the mold for however long your mold’s directions say it needs to set. Then, if needed, wiggle your thumb, fingers, and hand very gently to loosen them. Pull your hand out slowly. Avoid any quick, jerky movements that might disturb the cast you’ve just made.[8]
-
4Mix a batch of plaster. Prepare enough to fill the entire mold. Then pour a small amount (not all) of your plaster into the mold. Manipulate the container so that the plaster coats the insides of the finger- and thumb-holes in your mold. Allow the plaster to settle a bit to avoid the formation of air pockets.[9]
-
5Pour the rest of your plaster. Fill the entire mold. Then bang the table a few times to release any air pockets. Quit once you no longer see any bubbles bursting on the surface.[10]
-
6Allow the plaster set. Wait for the time indicated by the directions to your plaster. Then upend the container and empty it onto the table. Make cuts into the rubber mold with a plastic knife and peel it from the plaster cast, piece by piece.[11]
-
7Clean the plaster cast. Look for any imperfections where empty space in the rubber mold may have allowed room for extra plaster. Remove gently with sand paper or a small knife or file. Then either leave your finished cast as is or paint it as you desire.[12]


Community Q&A
-
QuestionWhat would I do with a fake hand?
 Community AnswerYou could make a Halloween decoration, use it for a play/show, or play a trick on someone with it.
 -
QuestionCan I use a glove to make a plaster-filled hand?
 Community AnswerYes, you can but make sure the opening is sealed at the end, and that the glove is made of rubber so that it is durable enough to hold the materials inside.
Warnings
- Be careful with scissors and other sharp tools. If you are too young to use scissors, ask for help from an adult.⧼thumbs_response⧽
- With paper-plate hands, do not yank on the strings hard. If you do this you could tear your fake hand or dislocate one of the straw pieces.⧼thumbs_response⧽
- With clay sculptures, do not bake clay at the same time as food.⧼thumbs_response⧽
Things You'll Need for Method 1
- Pencil/Pen
- Paper plate (or thick, sturdy paper)
- Straw
- Glue
- String
- Coloring materials
- Ruler
Things You'll Need for Method 2
- Clay
- Rolling pin (optional)
- Small, cylindrical object (pencil, paintbrush handle, long screwdriver, etc.)
- Scalpel or other thin blade
- Needle
- Oven
Things You'll Need for Method 3
- non-toxic, skin-safe rubber mold
- large container
- warm water
- plaster
- plastic knife
- sharp knife, file, or sandpaper
- paint (optional)

References
- ↑ http://hypertextbook.com/facts/2001/JuliaSherlis.shtml
- ↑ http://www.instructables.com/id/Animatronic-Hand-out-of-Drinking-Straws/
- ↑ http://www.instructables.com/id/Animatronic-Hand-out-of-Drinking-Straws/
- ↑ http://www.instructables.com/id/Animatronic-Hand-out-of-Drinking-Straws/
- ↑ http://www.instructables.com/id/Animatronic-Hand-out-of-Drinking-Straws/
- ↑ http://www.stormthecastle.com/how-to-make-a/how-to-cast-a-plaster-hand.htm
- ↑ http://www.stormthecastle.com/how-to-make-a/how-to-cast-a-plaster-hand.htm
- ↑ http://www.stormthecastle.com/how-to-make-a/how-to-cast-a-plaster-hand.htm
- ↑ http://www.stormthecastle.com/how-to-make-a/how-to-cast-a-plaster-hand.htm
About This Article

To make a fake hand, start by getting a paper plate, tracing the outline of your hand on it, and cutting the shape out. Next, cut 19 pieces of plastic straws at a length of 1-2 inches each. Additionally, cut a small “v” in the middle of each straw so it can bend. Then, glue the straw pieces onto the plate, placing 3 on each finger between the joints, 2 on the thumb, and 5 along the line crossing the palm. After the glue dries, tape string to the tips of each finger and feed it through the straws to the wrist, so when you pull the strings each finger bends. To learn how to make a fake hand out of sculpting clay, keep reading!