This article was co-authored by wikiHow Staff. Our trained team of editors and researchers validate articles for accuracy and comprehensiveness. wikiHow's Content Management Team carefully monitors the work from our editorial staff to ensure that each article is backed by trusted research and meets our high quality standards.
This article has been viewed 90,373 times.
Learn more...
A friendship book is a journal shared between friends as a way to record their time together. It is a great way to exchange stories between pen pals and close friends alike. You will have to make or buy a journal first, then you can fill it in with stories and pictures about all the fun things you did with your friends. Remember to let your friends write in it too!
Steps
Making the Cover
-
1Choose thick paper for your cover. Double-sided scrapbooking paper is a great choice for this, because it has a design on both sides. It's also thicker than other types of paper.[1] You can also use cardstock or thick poster paper instead. Avoid regular scrapbooking paper that has a design only on one side; it's too thin.
- These books will only last you about a month or so. Consider matching the theme of the paper to the season.
- You can also buy a blank journal instead. Click here for ideas on how to decorate it, and here for ideas on how to use it.
-
2Cut the paper down to 8 by 11 inches (20.32 by 27.94 centimeters). You can do this with a metal-edged ruler and a craft blade or with a paper cutter.[2] You will be folding this in half to make the cover, so you only need one sheet.Advertisement
-
3Round the corners for a fancier touch, if desired. It's best if you do this using a specialized punch; you can find it in the scrapbooking section of an arts and crafts store. You can also use a small jar to trace the curves, then cut the curves out with a pair of scissors.
-
4Fold the paper in half hamburger-style. If you are using double-sided scrapbooking paper, make sure that the side you want for the cover is on the outside. Run your fingernail down the spine to sharpen the fold.[3]
-
5Wrap a transparency sheet over the cover, if desired. You don't have to do this, but it will help protect your book. Use your cover to trace an identical shape onto a sheet of transparency film, then cut it out. Fold the film in half, then place it around the cover.[4]
- Transparency film is a sheet of thin, clear plastic sheeting. You can find it in office-supply stores and in some photocopying shops.
- You can use vellum instead, but it will give your cover an opaque look.


Adding Pages to the Book
-
1Find 4 to 5 sheets of paper to fill your book with. Regular printer paper works just fine for this, but you can also use more scrapbooking paper as well. If you need to, trim the paper down until it is the same size as the paper you used for your cover: 8 by 11 inches (20.32 by 27.94 centimeters).[5]
-
2Fold and stack the pages. Fold each sheet of paper in half hamburger-style. Run your fingernail down the folded edges to sharpen the creases. Once you have all 4 to 5 pages folded, stack them inside one another, just like making a simple book.[6]
-
3Tuck the pages into the cover. Make sure that the pages are aligned. Gently tap the book against a table to help straighten things out further. If you rounded the corners on you cover, you will need to round the corners on your pages as well.
-
4Use an awl to punch three holes into the spine. Open up the book to the center page. Open up a phonebook, then set the book down into it. Use an awl to punch three holes into the crease. You will need a hole in the center of the spine, and a hole 1 to 2 inches (2.54 to 5.08 centimeters) from the top and bottom edge.[7]
- Make sure that you go through all the pages and the cover.
- If you don't have a phonebook, you can use another book you don't mind possibly ruining. You can also use a piece of scrap wood.
- If you don't have an awl, you can use a nail instead.
-
5Thread a yarn needle with waxed thread. Cut a 24-inch (60.96-centimeter) piece of waxed thread. Waxed thread comes in limited colors, but black will work with most designs. Thread it through a yarn needle, or any other needle with a large eye.[8]
- You can find waxed thread in the leather-working section of an arts and crafts store.
- Waxed thread is recommended for its strength and durability. You can use other types of thick thread if you want to, such as baker's twine, embroidery floss, or thin yarn.
-
6Sew the book together. Push the needle down through the top hole, starting from the outside cover; leave about a 4-inch (10.16-centimeter) tail. Sew down towards the bottom hole, then work your way back to the top. When you come out of the middle hole, stop.[9]
-
7Tie the ends of the thread together, then trim off the excess thread. Make the knot as close as possible to the top hole. Use a double-knot for extra-strength. When you are done, trim the tail ends down to about 4 inches (10.16 centimeters). Leave them as they are, or tie them into a bow.[10]


Decorating the Book
-
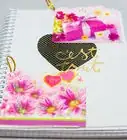
1Decorate the outside cover. Pull aside the transparency, if you added it, then begin decorating the front cover with stickers, doodles, and other things. If your paper already has a theme to it, try to match it. Here are some ideas to get you started:
- Decorate the cover with stickers or simple doodles.
- Add a fancy label to the front, then write the title on the label. (ie: FRIENDSHIP BOOK or OUR TIME TOGETHER).
- Write the month/season and the year in one of the corners (ie: FALL 2012).[11]
- If you plan on making many book, write "Volume 1" on the cover of the first one.[12]
-
2Decorate the inside cover. If the inside cover is plain, you can use a glue stick or double-sided tape to paste down a sheet of pretty scrapbooking paper over it. You can use this section to keep track of important dates.
- Write something like "NOTES," then use it to keep track of your friends' favorite foods, colors, etc.
- Write "BIRTHDAYS" across the top, then write down all of your friends' birthdays below it.
- Use it as an address book. Use a ruler to add lines, then write your friends' names followed by their contact information.
-
3Tie a charm to the waxed thread, if desired. Find one or two small charms, then slip them onto one of the tails of your waxed thread. Push them down as close to the knot as possible, then tie the two tails into another double-knot.
- If you tied the tails into a bow, you'll have to undo the bow first, then re-tie it later.
- You can finds lots of charms in the jewelry and beading section of an arts and crafts shop.
-
4Cover the spine with washi tape, if desired. Trim down the tails on the waxed thread as close to the knot as possible. Next, cut an 8-inch (20.32-centimeter) piece of colored washi tape. Fold it over the edge of the spine to hide the thread. You can also glue down a piece of colorful ribbon instead.
- Washi tape is colorful tape with patterns on it. You can find it in the scrapbooking or sticker section of an arts and crafts store.
- You don't be able to do this if you already added a charm to the thread. Choose one of the other.
-
5Add a strip of washi tape down the seams between the pages. You don't have to do this, but it gives your book extra flair. It also helps reinforce the seams. Open up your book to the first page. Cut a strip of washi tape down to the same height (8 inches/20.32 centimeters), and set it down into the seam between the pages. Turn to the next page, and repeat the process. Do this until you reach the back cover.[13]
-
6Glue mini envelops to the pages to act like pockets. This is not absolutely necessary, but it's a great way to add space to your book. You can also make your own envelops by cutting rectangles out of paper, folding them in half hamburger-style, then taping up the side edges.[14]
- A glue stick will work the best for this. If you don't have one, use double-sided tape.
-
7Add flaps to save space, if desired. Instead of gluing a photo all the way down, tape it to the page by just one edge. Flip the photo over, like opening a door, then write about the event under the photo. Flip the photo back into place to hide the message.[15]


Using the Book
-
1Decide between handwriting or typing the information. If the paper inside the book is mostly solid-colored (like tea-stained paper or printer paper), you can write the stories out by hand. If the paper has lots of patterns on it, however, the designs may be hard to see. Write the stories out on the computer, then print them out.[16]
- If you are printing the stories out, make the paper smaller than the pages of your book. This way, you won't cover up that pretty scrapbooking paper!
- You can also use a combination of the two: writing by hand and typing.
-
2Fill the book with stories about the things you did. Focus on the stories you did with your friend. Did you go to a theme park with your best friend? Write about that! Did you go to the mall or movies with your friends? Write about that too!
-
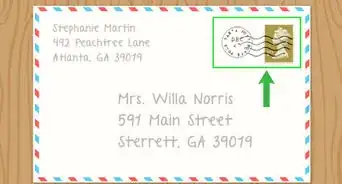
3Mail the book back-and-forth between long-distance friends. Have each friend keep the book for a week, then fill out a page or two. By the time the book comes back to you, it will be filled with lots of exciting memories!
- Because these friends live far away, these stories can be more personal, such as an outing with the family.
- Another option is for you to keep the book, then have everyone else mail or email stuff to you. Glue their stories to the pages of the book.[17]
-
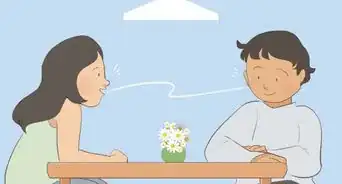
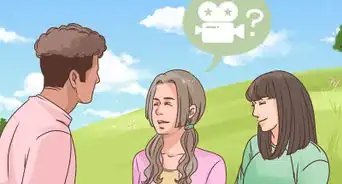
4Let your friends add stuff to the book too. Show your book to your friends, and let them write something in it too, like a yearbook. If you wrote about going to the movies with a certain friend, have him or her comment on the story, or even add to it. They may have noticed things about that day that you didn't.[18]
-
5Add other things besides stories about the things you did together. Fill the pages with gossip (but don't spread mean rumors), comics, or made-up stories. Write down your dreams, goals, and fears, and remember to encourage and support one another.
- Save the tickets from the movie that you went to; glue it right next to the story, or just below it.
-
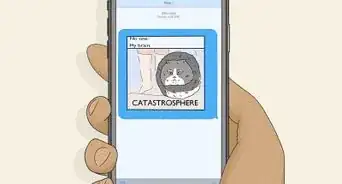
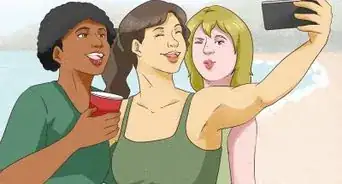
6Add some pictures and photos. Doodle in the margins of your stories, or add a simple illustration. You can also paste photos of your time together. The photos don't have to be recent either. Feel free to include a "Our Favorite Memories" page, and keep all of your favorite pictures there.


Community Q&A
-
QuestionShould I include things like favorite foods in a scrapbook, like making a profile book?
 Community AnswerSure, anything that interests you or reminds you of someone is good to put into a scrapbook.
 -
QuestionWhen making a book, can I make an envelope, download pictures and add them to the envelope?Community AnswerOf course! It's your friendship book, and you can personalize it any way you want.
Things You'll Need
- Double-sided scrapbooking paper
- Transparency sheet (optional)
- Filler paper (ie: scrapbooking, printer, binder, etc.)
- Paper slicer or Craft blade and metal ruler
- Craft punch for rounding corners (optional)
- Awl and phonebook or nail and wood
- Yarn needle
- Waxed thread
- Scissors
- Glue stick or double-sided tape
- Letter stickers, regular stickers, embellishments, etc.


References
- ↑ https://www.youtube.com/watch?v=PUUbuSIbPIc
- ↑ https://www.youtube.com/watch?v=PUUbuSIbPIc
- ↑ https://www.youtube.com/watch?v=PUUbuSIbPIc
- ↑ https://www.youtube.com/watch?v=PUUbuSIbPIc
- ↑ https://www.youtube.com/watch?v=PUUbuSIbPIc
- ↑ https://www.youtube.com/watch?v=-RQ938Dy7bM
- ↑ https://www.youtube.com/watch?v=p_LBHBbcrVM
- ↑ https://www.youtube.com/watch?v=p_LBHBbcrVM
- ↑ https://www.youtube.com/watch?v=p_LBHBbcrVM
- ↑ https://www.youtube.com/watch?v=p_LBHBbcrVM
- ↑ https://www.youtube.com/watch?v=PUUbuSIbPIc
- ↑ https://www.youtube.com/watch?v=-RQ938Dy7bM
- ↑ https://www.youtube.com/watch?v=PUUbuSIbPIc
- ↑ https://www.youtube.com/watch?v=-RQ938Dy7bM
- ↑ https://www.youtube.com/watch?v=-RQ938Dy7bM
- ↑ https://www.youtube.com/watch?v=IWP2SDOepsc
- ↑ https://www.youtube.com/watch?v=IWP2SDOepsc
- ↑ https://www.youtube.com/watch?v=IWP2SDOepsc
About This Article

To make a friendship book, start by cutting an 8 by 11 inch piece of card stock and folding it in half to create the front and back cover of your book. Next, fold several sheets of printer paper in half and slide them into the cover. Once the pages are lined up, punch 3 holes through the spine of the book, then thread twine, yarn, or waxed thread through the holes to bind the book. Finally, decorate the cover and add embellishments, like mini envelopes or washi tape, to the inside pages. For tips on how to use your friendship book with long-distance friends, read on!