X
This article was co-authored by wikiHow Staff. Our trained team of editors and researchers validate articles for accuracy and comprehensiveness. wikiHow's Content Management Team carefully monitors the work from our editorial staff to ensure that each article is backed by trusted research and meets our high quality standards.
This article has been viewed 74,500 times.
Learn more...
Making a frisbee is a fun way to play a game of catch with a friend. Homemade frisbees are lightweight and fairly soft making them ideal for indoor play. Using simple items like paper plates, paper and tape, you can create a fun toy to toss around.
Steps
Method 1
Method 1 of 3:
Making a Frisbee from Paper Plates
-
1Get out supplies. To make a frisbee you will need two paper plates, packing tape, scissors, and markers for decoration.[1]
-
2Decorate your plates. Use markers to draw designs on the bottom of the plates. You don’t need to decorate the side of the plate you put food on because it will become the inside of the frisbee.Advertisement
-
3Tape the tops of the plates. Cover the side of the plate that you would place food on with clear packing or shipping tape. Cover the entire surface of the plate and trim the excess tape from around the edges of the plate.
- You can use decorative duct tape to tape the plates and decorate your frisbee at the same time.
-
4Cut a circle out of the center of the plates. Cut out the center of the flat portion of the plate. Your circle should be about 3 inches in diameter. Trace a circle using a large cup. Stab scissors through the center of the plate and cut out the circle leaving the edges of the plate intact.[2]
-
5Tape the two plates together. Attach the plates together with the packing tape around all the edges. Cover the entire decorated surface of the plate with the tape. Tuck the excess ends of the tape around the hole in the center of the plates.[3]
-
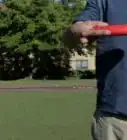
6Toss your frisbee. Hold the frisbee parallel to the ground and throw it by snapping your wrist as you release.

Advertisement
Method 2
Method 2 of 3:
Fold a Frisbee with Post-it Notes
-
1Fold the Post-it note it half. Fold the Post-it so that the sticky end sticks to itself. Position the Post-it so that the sticky end is on the left side. The sticky part will be on the inside of the fold.[4]
-
2Crease the top right corner down. Fold the corner down so the right edge of the Post-it is aligned with the bottom edge. The post it should look like a square on the left half and a folded triangle on the right half.[5]
-
3Unfold and open the Post-it. You will see a vertical crease down the center of the sticky portion and two diagonal creases along the bottom.
-
4Fold the sticky ends to the center. The sticky end will hold the edges down. Fold both edges to the center. The Post-it should be in a “house” shape.
-
5Refold the post it in half. It should now have a point on one end with the diagonal crease visible on the other side.[6]
-
6Push the square end toward the center and flatten to form a parallelogram. Fold the end along the diagonal creases in an inward fold. This is the basic shape that will be used to form the frisbee. If you look at the post it from the open side of the folds, you should see a V shape.
- One side of the parallelogram will be a single point while the other end will have two flaps.
-
7Fold seven more Post-its for a total of eight. You will need eight folded parallelograms to create your frisbee.
-
8Connect the shapes together. Attach the 8 shapes together by inserting the end with the single point between the two flaps of another Post-it.
- Place one Post-it between the flaps of another.
- Fold the ends of the two flaps over the flaps of the Post-it you inserted.
- The flaps of the Post-it that were inserted will receive the next Post-it.
- When all 8 Post-its are connected you will end up with a donut shape.
-
9Throw your frisbee. Flatten the shape to get the best results when attempting to throw your pocket sized frisbee.
- You can push the opposite edges of the donut shape together to transform your frisbee into a star shape.
Advertisement
Method 3
Method 3 of 3:
Making a Frisbee from Paper Claws
-
1Fold eight sheets of paper into paper claws. Use colored paper to make a colorful frisbee. You will need to fold all eight sheets into claws to create your frisbee.
-
2Insert the point of one claw into the opening of another. Use tape to secure each claw together. Continue inserting the claws into one another to create an octagonal shaped donut.
-
3Wrap the frisbee with tape. Use scotch tape or duct tape to give stability and strength to your paper frisbee.
- Use tape to connect each claw together.
- Wrap the entire frisbee using decorative tape to add stability and a design element.
-
4Throw your frisbee. You should be able to get considerable distance with the ring shaped frisbee.
- If you use duct tape to wrap the frisbee it should be used outside because it can be thrown a long way!
Advertisement
Things You'll Need
- Paper plates
- Packing tape or decorative duct tape
- Scissors
- Markers
- Paper
- Post-it notes


References
- ↑ http://www.makeandtakes.com/summer-camp-for-kids-paper-plate-frisbees
- ↑ http://www.kiwicrate.com/projects/Paper-Plate-Frisbee/1143
- ↑ http://krokotak.com/2014/05/cool-diy-frisbee-from-paper-plates/
- ↑ http://www.paperairplanes.co.uk/frisbee.php
- ↑ http://www.origamiway.com/origami-transforming-ninja-star.shtml
- ↑ http://www.origami-fun.com/8pointed-transforming-ninja-star.html
About This Article

wikiHow Staff
wikiHow Staff Writer
This article was co-authored by wikiHow Staff. Our trained team of editors and researchers validate articles for accuracy and comprehensiveness. wikiHow's Content Management Team carefully monitors the work from our editorial staff to ensure that each article is backed by trusted research and meets our high quality standards. This article has been viewed 74,500 times.
Co-authors: 15
Updated: January 31, 2023
Views: 74,500
Categories: Backyard Games
Advertisement