This article was co-authored by wikiHow Staff. Our trained team of editors and researchers validate articles for accuracy and comprehensiveness. wikiHow's Content Management Team carefully monitors the work from our editorial staff to ensure that each article is backed by trusted research and meets our high quality standards.
The wikiHow Video Team also followed the article's instructions and verified that they work.
This article has been viewed 281,715 times.
Learn more...
Grilled cheese sandwiches are easy and very affordable to make. However, if you do not have access to a stovetop or are lacking a frying pan, you may be thinking that you are unable to make one. But if you own an electric iron and have some aluminum foil, then you are in luck. Using an iron to make a grilled cheese sandwich is easy to do and requires less clean up than using the stovetop. Once you have assembled your ideal grilled cheese sandwich, simply wrap it in foil and use the heated iron to press and cook it.
Ingredients
- 1 tbsp (14.2 g) of butter, softened
- 2 slices of bread
- 2 slices of cheese
- 1-2 slices of deli ham (optional)
- 1 tomato, thinly sliced (optional)
- 1 apple, thinly sliced (optional)
Yields 1 sandwich
Steps
Assembling Your Grilled Cheese Sandwich
-
1Turn on your electric iron and set it to a medium heat. Rest your electric iron on a heat resistant surface, like on a baking sheet. Then, set it to a medium heat, and allow it to heat up while you prep your sandwich. Refer to the manufacturer instructions for how to operate your particular iron if needed.[1]
- Do not set your electric iron to the steam setting, as this will not effectively toast your bread.
-
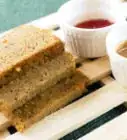
2Place 2 slices of bread onto a plate to begin making your sandwich. Pick 2 slices of your favorite bread to use for your grilled cheese sandwich. Try to use a dense bread that does not have holes in it. Otherwise, the melted cheese won’t stay inside your sandwich.[2]
- For a classic grilled cheese sandwich, use 2 slices of a soft white bread.
- For a sandwich with an extra crunch, choose sliced ciabatta, multigrain, or sourdough bread.
- For a sandwich with a more earthy bite, use rye or pumpernickel bread.
Advertisement -
3Spread 1/2 tbsp (7.1 g) of softened butter onto 1 side of both bread slices. Use a butter knife to help spread the softened butter evenly across the bread. Do not feel pressured to use the entire 1/2 tbsp (7.1 g) of butter, but make sure that the surface is completely coated. Otherwise, the bread will not brown properly under the heat of the iron.[3]
- Instead of butter, consider using margarine or another butter substitute to coat the bread.
- Repeat this process with another 1/2 tbsp (7.1 g) of softened butter for your second slice of bread.
-
4Add 2 slices of cheese in between the unbuttered sides of the bread slices. Flip 1 of the slices of bread over, so the buttered side is against the plate. Layer 2 slices of your favorite cheese onto the bread.[4]
- Refrain from using more than 2-3 slices of cheese, as the melted cheese will leak out of your sandwich and stick to the foil.[5]
- Choose slices of American cheese for a classic grilled cheese sandwich or use slices of a sharp cheddar cheese for a stronger taste.
- Make your grilled cheese creamier by using slices of mozzarella or make it tangier by using Swiss cheese or provolone.
-
5Include sliced cold cuts, fruits, or vegetables to add texture. Transform your plain grilled cheese sandwich by slipping in slices of cold cuts, fruits, and vegetables between the 2 slices of cheese. The heat from the sandwich will warm the additional components and cover them in delicious melted cheese.[6]
- Place 1-2 slices of deli ham between American or Swiss cheese to give the sandwich a saltier taste.
- Add slices of tomato between pieces of mozzarella or provolone to contrast the creaminess of the cheese.
- Pair thin slices of apples with a sharp cheddar cheese to cut its bitterness and add a juicy sweetness to the sandwich.
-
6Place the unbuttered side of your second slice of bread on top of the cheese. Take your second slice of bread and rest the unbuttered side against the layered cheese. Refrain from pressing the sandwich together as this will remove some of the butter coating.[7]
- Repeat this assembling process for any additional sandwiches you would like to make.


Cooking the Sandwich with an Iron
-
1Wrap the sandwich in aluminum foil to create a barrier from the iron. Use your sandwich to size the piece of aluminum foil, and then cut it. Place your sandwich in the center of the foil, and carefully fold the edges of the foil inward to completely encase the sandwich.[8]
- The foil will not only create a protective barrier between the hot iron and the buttered bread, but it will also catch any melted cheese that oozes out while cooking.
-
2Set the wrapped sandwich onto a baking sheet to protect your work surface. Avoid melting or damaging your work surface with the heat from the iron by placing the sandwich onto a baking sheet. Put 1-2 pot holders underneath the baking sheet to keep it from slipping if needed.[9]
- Instead of a baking sheet, use a heat-resistant cutting board. These are typically made out of stone or wood and can be purchased in the kitchen section of your local department store or online with major retailers.
-
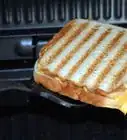
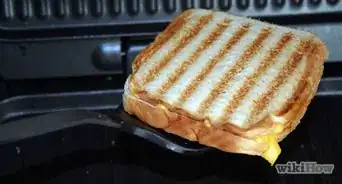
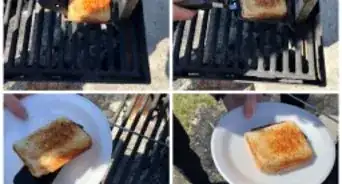
3Place the hot iron on top of your sandwich and leave it to cook for 4 minutes. Position the wide bottom portion of the iron on top of your bread, as the triangular top will not cover the bread fully to cook it evenly. Allow the weight of the iron to press down on your sandwich. Refrain from adding any additional pressure with your hand, as this may cause the cheese to squeeze out of your sandwich.[10]
- Different iron brands can heat up at different temperatures. If you are worried that you may burn the bread, check on the sandwich after letting it cook for 2 minutes. Continue toasting it for the remaining 2 minutes as needed. Make sure to use potholders when handling the sandwich because the foil will be hot.[11]
-
4Use potholders to flip the sandwich and cook the second side for 4 minutes. Carefully flip your sandwich over using potholders. Then, place the wide bottom portion of the iron on top of the sandwich and let the second side cook for 4 minutes. If you needed more or less time to cook the first side of the sandwich, make sure to account for that when cooking the second side.[12]
- Your sandwich will be toasted on both sides and slightly flattened with the cheese completely melted when it is finished cooking.
-
5Remove the iron and turn it off when your sandwich is finished cooking. Make sure to place the hot iron back onto a heat-resistant surface to avoid damaging your work surface. Allow the iron to cool off completely before storing it.[13]
-
6Let the sandwich rest for 1-2 minutes before unwrapping and serving it. Be careful as you unwrap the sandwich, as the steam trapped within the foil will be hot. Place your grilled cheese sandwich onto a serving plate, and enjoy![14]
- Use your butter knife to cut the sandwich in half to make it easier to eat.
- Repeat the cooking process as needed for any additional sandwiches. As long as the foil does not have any holes in it, reuse the same piece of foil to make multiple sandwiches.[15]


Community Q&A
-
QuestionCan I use a paper bag instead of aluminum foil?
 genevieve graceCommunity AnswerNo. You will not only ruin your sandwich, but also potentially burn down your house. Paper is flammable and is dangerous to use in any type of cooking.
 -
QuestionCan't I just use wax paper or another alternative instead of aluminum foil?
 Community AnswerNo, wax paper will melt on your bread and burn up. There really is no suitable disposable alternative to aluminum foil that will withstand the heat.
 -
QuestionWhat can I use if I don't have aluminum?
 Community AnswerThere is really no substitute for aluminum foil in this case.
Warnings
- Be careful not to burn yourself when using the iron, and make sure to rest it on a heat-resistant surface to avoid damaging your working space. Let the iron cool off completely before putting it away.[17]⧼thumbs_response⧽
Things You’ll Need
- Electric iron
- Aluminum foil
- Butter knife
- Baking sheet or a heat-resistant cutting board
- Potholders
- Measuring spoons and cups
- Serving plate


References
- ↑ https://www.geniuskitchen.com/recipe/hot-iron-grilled-cheese-sandwich-514164
- ↑ https://www.foodandwine.com/blogs/best-bread-grilled-cheese
- ↑ https://www.geniuskitchen.com/recipe/hot-iron-grilled-cheese-sandwich-514164
- ↑ https://www.foodandwine.com/blogs/best-bread-grilled-cheese
- ↑ https://www.coach.ca/iron-grilled-cheese-sandwhich-p161519
- ↑ https://www.foodandwine.com/blogs/best-bread-grilled-cheese
- ↑ https://www.handimania.com/cooking/iron-grilled-cheese-sandwich.html
- ↑ https://www.geniuskitchen.com/recipe/hot-iron-grilled-cheese-sandwich-514164
- ↑ https://www.handimania.com/cooking/iron-grilled-cheese-sandwich.html
- ↑ https://www.geniuskitchen.com/recipe/hot-iron-grilled-cheese-sandwich-514164
- ↑ https://www.coach.ca/iron-grilled-cheese-sandwhich-p161519
- ↑ https://www.geniuskitchen.com/recipe/hot-iron-grilled-cheese-sandwich-514164
- ↑ https://www.coach.ca/iron-grilled-cheese-sandwhich-p161519
- ↑ https://www.handimania.com/cooking/iron-grilled-cheese-sandwich.html
- ↑ https://www.coach.ca/iron-grilled-cheese-sandwhich-p161519
- ↑ https://www.coach.ca/iron-grilled-cheese-sandwhich-p161519
- ↑ https://www.coach.ca/iron-grilled-cheese-sandwhich-p161519
About This Article

To make a grilled cheese sandwich with an iron, start by turning your iron on and setting it to medium. Then, get 2 slices of bread, spread butter onto one side of each slice, and sandwich some cheese between the unbuttered sides of the slices. Next, wrap the sandwich in aluminum foil and set it on a baking sheet. Finally, place the hot iron on top of the sandwich and let it cook for 8 minutes, flipping it over halfway through. To learn how to add other toppings to your grilled cheese sandwich, like meat, fruit, and vegetables, scroll down!