This article was co-authored by wikiHow Staff. Our trained team of editors and researchers validate articles for accuracy and comprehensiveness. wikiHow's Content Management Team carefully monitors the work from our editorial staff to ensure that each article is backed by trusted research and meets our high quality standards.
There are 22 references cited in this article, which can be found at the bottom of the page.
The wikiHow Video Team also followed the article's instructions and verified that they work.
This article has been viewed 73,802 times.
Learn more...
Hats are great accessories, and there are many ways to make your own! If you want to make a baseball cap or a simple brimmed hat, then you can sew one in a couple of hours using a pattern and fabric in the color or print of your choice. If you want to make a simple paper hat for a party or just for fun, then you can use some newspaper or construction paper to create one in just a few minutes!
Steps
Sewing a Basic Baseball Cap
-
1Find or purchase a hat pattern. You can find many free baseball cap patterns online, or you can purchase a baseball cap pattern from a craft supply store. Choose a pattern in the style and size that you want, and then cut out the paper pattern pieces.[1]
- Make sure to use a sharp pair of scissors to cut out the pattern pieces.
- Cut along the lines on the pattern pieces for the size you want the hat to be.
-
2Pin the paper pattern pieces onto a piece of interfacing and cut them out. The pattern will likely have 5 different pieces that you will need to sew together: the front, back, 2 side pieces, and brim. You will need to iron interfacing onto the back side of your fabric to help make the hat stiff. Use pins to secure each of the pattern pieces to the interfacing. Then, cut around the edges of the interfacing using a sharp pair of scissors.[2]
- Make sure to cut along the edges of the pattern pieces carefully and follow the lines exactly.
- Interfacing is a type of fabric that helps to provide structure.
- You can purchase interfacing in a craft supply store.
Advertisement -
3Iron the interfacing pieces to the wrong (back) side of the fabric. Place the interfacing pieces that you have just cut out onto the wrong side of your hat fabric. Then, iron them into place. Make sure that none of the pieces are overlapping.[3]
- Check the instructions that came with your interfacing for specific information about how to iron the interfacing.
-
4Cut the fabric around the edges of the interfacing pieces. Once you have attached the interfacing to the fabric, use a sharp pair of scissors to cut around the edges. Follow the shape of these pieces exactly. When you are finished, you will have the parts for assembling the hat.[4]
- Make sure to cut right along the edges of the hat pieces and not too far away from the edges or over the edges.
-
5Pin each of the adjacent hat pieces together. Use your pattern to help you identify which pieces go next to each other. Then, begin pinning the adjacent pieces. Start with just 2 pieces, such as the side and back pieces. Make sure that the right (print) sides are facing each other when you pin 2 pieces together. The interfacing on each piece should be facing out.[5]
- Insert 1 pin about every 2 to 3 in (5.1 to 7.6 cm).
-
6Sew a straight stitch 0.5 in (1.3 cm) from the edges of the hat. Set your sewing machine to the straight stitch setting. Then, sew a straight stitch along the pinned edge of the 2 adjacent hat pieces.[6]
- Make sure that you do not sew over the edge of the pointed part of each piece. Start sewing at the base of the triangle, up along the curved edge, and then stop about 0.5 in (1.3 cm) from the point.
-
7Continue to sew your hat pieces together until the cap is complete. Keep sewing along the edges of adjacent hat pieces until the cap is completely assembled. Turn the hat inside out to attach the final piece and then turn it right side out after you sew it on.
-
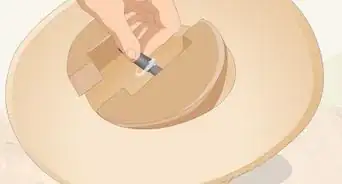
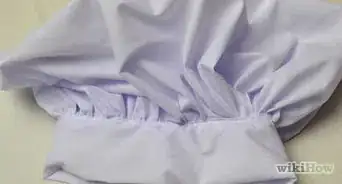
8Sew the brim onto the hat. The brim is 1 of the pattern pieces you cut out. It should look like a crescent. Once the cap is assembled, place the hat brim so that the right sides of the brim and the cap are facing each other. Then, sew along the edges of the brim and cap to connect them.[7]
- Cut any excess thread remaining after you sew, and you are finished!

Making a Simple Brimmed Hat
-
1Cut out the pattern pieces for the hat. Print out a brimmed hat (or sun hat) pattern from the internet. Then, use a sharp pair of scissors to cut out your paper pattern pieces, which will include the hat's top, body, and 2 brim pieces. Make sure to cut along the desired size lines. These should be printed on the pattern.[8]
- There are lots of free hat patterns available online, or you can purchase a pattern from a craft supply store.
-
2Pin the pattern pieces to the fabric and cut them out. Fold the fabric in half first since you may need more than 1 of each piece. Then, place all of the pattern pieces onto the fabric and insert a pin every 2 to 3 in (5.1 to 7.6 cm) around the edges of each pattern piece. Cut the fabric around the outer edges of each pattern piece.
- Make sure you use a sharp pair of scissors.
- Do not cut over the edges of the pattern pieces or you may end up with a hat that is too small.
-
3Sew along the outer edges of the hat brim pieces. Set your sewing machine to the straight stitch setting and then sew about 0.5 in (1.3 cm) from the raw edges of the 2 hat brim pieces. This will connect them together and form a seam.[9]
- Do not use a zigzag stitch for this part since you will need to cut into the edge of the brim after you sew the pieces together.
-
4Snip the fabric around the outer edges of the brim. This will make it easier to press the fabric in around the inside of the hat brim and get a flat seam. Cut notches into the hat brim going all the way around it. Each notch should be about 0.25 in (0.64 cm) and 0.5 in (1.3 cm) apart.[10]
- Make sure that you do not cut into the stitches. The notches should go in about 0.25 in (0.64 cm) in from the raw edges.
-
5Flip the hat brim right side out. After you have cut notches into the edge of the hat brim, turn the entire circle of fabric inside out so that the raw edges are hidden between the 2 pieces. Use your fingers to press the fabric out from the inside of the brim so that the seam lays flat.[11]
- Keep in mind that the brim may look a little lumpy until you sew over the seam.
-
6Sew along the outer edge of the hat brim to secure the seam. Next, place the hat brim under the needle so that the needle is about 0.25 in (0.64 cm) from the seam. Then, sew a straight stitch all the way around the edges of the hat brim. This will flatten out the brim.[12]
- Go slowly to ensure that the stitches will be neat.
-
7Sew a zigzag stitch along the inner edge of the hat brim. After you have flattened out the brim, line up the inner edges of the brim. Set your sewing machine to the zigzag stitch setting, and sew along the outer edges of the 2 pieces to secure them together.[13]
- The zigzag stitch works best since some areas of the 2 pieces may not line up exactly. The zigzag stitch will go over the edges and secure the pieces together anyway.
-
8Sew a zigzag stitch along the outer edges of the hat body and top. Take your hat body and hat top pieces and line up the edges so that the right sides are facing each other. Sew a zigzag stitch around the outer edges of the circular top piece and the long edge of the rectangular body piece. Position the stitching so that you will be sewing right along the edges of the 2 pieces.[14]
- Be careful not to stretch your fabric as you sew. Keep a firm grip, but do not pull on the fabric or you may end up with a hat that is too tight.
-
9Close up the side of the hat with a straight stitch. After you have finished securing the top of the hat to the side piece, sew along the open edges of the rectangle to close up the hat. Line up the edges with the right sides of the fabric facing each other. Select the straight stitch setting on your sewing machine, and sew about 0.5 in (1.3 cm) from the raw edge to secure the opening.[15]
- If you have too much material left over after connecting the top and sides of the hat, you can trim some off. Just make sure that the hat will still fit without the material.
-
10Connect the inner edges of the hat brim and body. Line up the inner edges of the hat brim with the outer edges of the hat body. Make sure that the right sides of the pieces are facing each other. Then, begin sewing over the edges of the 2 pieces with a zigzag stitch.[16]
- Keep sewing until you get back to the beginning of your seam, and then sew over the beginning of the seam by about 0.5 in (1.3 cm) to secure it.
- Snip the excess threads, turn the hat inside out, and you are finished!

Folding a Paper Hat
-
1Open up a piece of newspaper and then fold it in half lengthwise. A regular piece of newspaper works great as material for an adult or kids-sized hat. Pull out the piece you want to use, and open it up completely. Then, fold it in half lengthwise so that it is in the shape of a long rectangle.[17]
- To make a hat for a doll or stuffed animal, use a piece of 8.5 by 11 in (22 by 28 cm) paper and fold it in half lengthwise.[18]
-
2Find the midway point on the folded edge. Use a ruler to locate the center of the long edge on your newspaper. Mark this point with a pen or pencil.[19]
- For example, if the long edge is 11 in (28 cm), then the midway point would be 5.5 in (14 cm) from the short edge.
-
3Fold the top left corner of the paper down along the midpoint. With the paper on a flat surface and the folded part of the paper pointing away from you. Fold the left corner of the paper down towards the center point of the paper.[20]
- Repeat this on the opposite side to fold down the right corner of the paper and form a triangle.
-
4Take the bottom edge of the newspaper, and fold it up. Next, fold the top layer of the bottom edge of the paper up and over the base of the triangle you have just created. Do not fold up both layers of the paper, just the top piece.[21]
- This flap will be the brim of your paper hat, so it should look similar to a hat brim.
-
5Turn the paper over and fold in the sides to make the hat the right size. Take the paper hat and flip it over so that the folded brim is facing down. Then, fold in the side of the hat as needed to make it the desired size.[22]
- You can try the hat on first to see where you want to fold it in.
-
6Fold up the bottom half on the same side to secure the hat. Next, take the bottom half of the hat on this side and fold it up like you did on the other side of the hat. This will secure the hat.[23]
- Try on your paper hat! It is finished!

Things You’ll Need
Sewing a Basic Baseball Cap
- A baseball cap pattern
- Seam ripper
- Fabric for the new hat
- Interfacing
- Iron
- Pins
- Pencil or pen
- Scissors
- Sewing machine
- Thread
Making a Simple Brimmed Hat
- Brimmed hat pattern
- Fabric
- Pins
- Pencil or pen
- Scissors
- Sewing machine
- Thread
Folding a Paper Hat
- Newspaper or paper of your choice


References
- ↑ https://www.youtube.com/watch?v=BhwVSLmerzo&feature=youtu.be&t=93
- ↑ https://www.youtube.com/watch?v=BhwVSLmerzo&feature=youtu.be&t=98
- ↑ https://www.youtube.com/watch?v=BhwVSLmerzo&feature=youtu.be&t=139
- ↑ https://www.youtube.com/watch?v=BhwVSLmerzo&feature=youtu.be&t=149
- ↑ https://www.youtube.com/watch?v=BhwVSLmerzo&feature=youtu.be&t=195
- ↑ https://www.youtube.com/watch?v=BhwVSLmerzo&feature=youtu.be&t=205
- ↑ https://www.youtube.com/watch?v=BhwVSLmerzo&feature=youtu.be&t=205
- ↑ https://www.youtube.com/watch?v=sxcxieV922Y&feature=youtu.be&t=10
- ↑ https://www.youtube.com/watch?v=sxcxieV922Y&feature=youtu.be&t=41
- ↑ https://www.youtube.com/watch?v=sxcxieV922Y&feature=youtu.be&t=90
- ↑ https://www.youtube.com/watch?v=sxcxieV922Y&feature=youtu.be&t=160
- ↑ https://www.youtube.com/watch?v=sxcxieV922Y&feature=youtu.be&t=192
- ↑ https://www.youtube.com/watch?v=sxcxieV922Y&feature=youtu.be&t=279
- ↑ https://www.youtube.com/watch?v=sxcxieV922Y&feature=youtu.be&t=366
- ↑ https://www.youtube.com/watch?v=sxcxieV922Y&feature=youtu.be&t=490
- ↑ https://www.youtube.com/watch?v=sxcxieV922Y&feature=youtu.be&t=535
- ↑ https://www.youtube.com/watch?v=0_tDKdXhv0g&feature=youtu.be&t=20
- ↑ https://www.origamiway.com/origami-hat.shtml
- ↑ https://www.youtube.com/watch?v=0_tDKdXhv0g&feature=youtu.be&t=37
- ↑ https://www.youtube.com/watch?v=0_tDKdXhv0g&feature=youtu.be&t=50
- ↑ https://www.youtube.com/watch?v=0_tDKdXhv0g&feature=youtu.be&t=70
- ↑ https://www.youtube.com/watch?v=0_tDKdXhv0g&feature=youtu.be&t=90
- ↑ https://www.youtube.com/watch?v=0_tDKdXhv0g&feature=youtu.be&t=100
About This Article

To sew a basic baseball cap, start by finding a hat pattern in the size and style you want online or in a craft supply store. Once you have your pattern, cut out the pieces, pin them to a piece of interfacing, and cut out the shapes. Then, iron the interfacing onto the back side of the fabric of your choice and cut around the edges of the interfacing. When you have all your fabric pieces ready, pin them together and sew them in place to create the cap. Finally, sew on the brim. Read on to learn how to make a simple brimmed hat or a folded paper hat!