wikiHow is a “wiki,” similar to Wikipedia, which means that many of our articles are co-written by multiple authors. To create this article, 30 people, some anonymous, worked to edit and improve it over time.
This article has been viewed 247,785 times.
Learn more...
There are a variety of ways to start a fire. This article will how you a couple of creative and unusual ways to make a flame safely on your own. This activity is fun and entertaining in a romantic sort if way, for family and friends. Making a homemade lighter is creative and simple. Get started at step one below.
Steps
Making a Lighter From a Battery and Foil
-
1Take safety precautions. Safety is obviously important when dealing with fire, but you’re also dealing with electrical charges and batteries, which contain dangerous ingredients.
- Wear gloves. Although there aren’t many safety measures available in prison to make the infamous lighter from “Orange Is the New Black,” you’ll want to take safety precautions and protect your hands.
- Keep a fire extinguisher and garbage receptacle ready. If you need to dispose of batteries, be sure to recycle them. Some municipalities and states, like California, require batteries to be recycled, and your community might have battery collection procedures.
- Dispose of the battery immediately if it starts to leak. This could be battery acid, which is dangerous and corrosive.
-
2Use new batteries. You don’t want a leaky battery. Plus, you’ll need a charge to generate the flame. Most batteries will work, but a AA alkaline battery is common for this type of lighter and a good size.[1] Use two batteries if possible, or a single 9 volt, because one AA battery might not provide enough power.[2]Advertisement
-
3Prepare your foil. You need metal foil to make this lighter. If you don’t have kitchen aluminum foil available, you can use a gum wrapper or foil from a cigarette lighter, for example.[3]
- If you’re using a AA battery, try folding over the foil once and making a strip about a centimeter wide and three inches long. This way, it forms a small bridge over the battery when each end is connected.
- Make the metal strip small enough to heat up easily, but not so small that it quickly burns up or breaks apart.[4]
- You might have to play with the size and the shape of the metal strip to see what works best.
-
4Prepare a transfer source. This type of flame will start quickly and burn out quickly. So, have a flammable source on hand to transfer the fire, if you want to keep the flame going.
- Sheets of loose paper, newspaper, or dry leaves will work well here.
- It is important to transfer the fire and not let the battery itself light on fire, since it could explode.
-
5Find the positive and negative ends of the battery. On most batteries, this should be clearly marked. On a AA battery and other cylindrical batteries, the positive (+) end or terminal—known as the cathode—has a small convex bump, while the negative (-) end or terminal—known as the anode—has the inverse: a small concave indent into which the bump can fit.
-
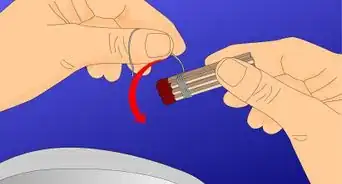
6Attach the foil. When you’re ready to light a flame, attach one end of the foil to the negative side of the battery. Then, carefully attach the other end of the foil to the positive end, and voila! Fire!


Making a Pencil Grip Lighter
-
1Plug up one end of the pencil grip with a tin foil ball. Use a foam pencil grip that’s about an inch and a half long. You don’t need a particularly ergonomic pencil grip that will bend easily. It should be firm and straight. Form a small foil ball. It should be just large enough to cover the hole at one end of the grip and squeeze securely into the end of the hole.
-
2Tear little pieces of cotton and form them into small balls. The pieces should be about as big as peas. Then, put a thin layer of Vaseline or other petroleum jelly between the pieces. As the petroleum jelly is heated to liquid, it’s fumes become combustible.[5]
-
3Place the cotton inside the gripper. Insert the cotton from the open end of the grip down toward the foil ball at the other end. Add cotton until the foam cylinder is full.
-
4Insert the paperclip. Use your hands to straighten a paperclip and place it a quarter of the way down the pencil grip on the tin-foil-ball side. You’ll need to squeeze in the paperclip along the wall of the pencil grip, between the grip and the foil ball.
-
5Take two rubber bands and tighten them around the pencil grip. Use small rubber bands about 3/4 in. or 7/8 in. long (sizes 37 or 8, respectively).[6] Wrap one rubber band about a centimeter below the top and one rubber band about a centimeter below the bottom of the grip. This will secure in place the mechanism you have so far, and get you ready to wrap the grip with foil.
-
6Wrap the pencil grip with aluminum foil. Use a long strip of aluminum foil about the width of your thumb. Wrap the foil around the circumference of the pencil grip from top to bottom.
-
7Secure the foil with rubber bands. Wrap rubber bands over the foil and around the pencil grip. Take two rubber bands, and wrap one around the top and the other around the bottom of the pencil grip. Leave about a centimeter of space from the rubber band and each end of the grip.
-
8Light the top interior of the gripper. Now you have your homemade lighter, and you’ll use the cotton balls as wicks to melt and light the petroleum jelly. Hold the lighter by the bottom of the straight paperclip. Use a match to light the other end at the inside top of the pencil grip.
Community Q&A
-
QuestionWhats a pencil grip?
 max ectCommunity AnswerA pencil grip is a little rubber shape that you put on a pencil.
 -
QuestionI did the battery and foil method, but the only thing it does is heat up the ends. Why is that?
 Community AnswerThe battery trick short circuits the battery, hence the danger of leakage or explosion. It may not catch every time. Also, it rapidly drains the battery, so you may need a stronger or new battery.
Warnings
- Remember not to let the battery catch fire as it may explode.⧼thumbs_response⧽
- Have a parent/guardian assist you.⧼thumbs_response⧽
- You may want to attempt this project in a sink.⧼thumbs_response⧽
- Fire is dangerous. Take care when attempting this project.⧼thumbs_response⧽
Things You’ll Need
- A foam pencil grip
- 4 small rubber bands (3/4 in. or 7/8 in. length)
- A long strip of aluminum foil
- Paperclip
- Vaseline
- Tin foil
- 2 AA batteries or a 9v battery (for the battery/gum wrapper lighter)
- Gum wrapper or aluminum foil (for the battery/gum wrapper lighter)


-Step-11-Version-2.webp)


References
- ↑ http://www.complex.com/pop-culture/2014/06/life-hacks-from-orange-is-the-new-black/lighter
- ↑ http://graywolfsurvival.com/3137/creative-ways-start-fire-without-lighter/
- ↑ http://www.complex.com/pop-culture/2014/06/life-hacks-from-orange-is-the-new-black/lighter
- ↑ http://graywolfsurvival.com/3137/creative-ways-start-fire-without-lighter/
- ↑ http://www.inchem.org/documents/icsc/icsc/eics1440.htm
- ↑ http://www.lee-rubber.com/sizes.htm
- Videos provided by TheBestHobbiesBlog
About This Article
To make a lighter, start by putting on protective gloves so you don't injure yourself. Then, fold a piece of aluminum foil in half and cut a strip that's 1 centimeter wide and 3 inches long. Next, grab some paper or dry leaves so you have something to transfer the flame to once you ignite the lighter. When you're ready, attach one end of the foil strip to the positive terminal of the battery and one end to the negative terminal to light the flame. Make sure you transfer the flame to something quickly and don't let the battery catch on fire. To learn how to make a lighter using a pencil grip and aluminum foil, scroll down!