wikiHow is a “wiki,” similar to Wikipedia, which means that many of our articles are co-written by multiple authors. To create this article, 18 people, some anonymous, worked to edit and improve it over time.
The wikiHow Video Team also followed the article's instructions and verified that they work.
This article has been viewed 125,408 times.
Learn more...
A great craft for kids is to make a model robot. This involves all the things kids love: bright colors, cutting paper, glueing things together, and bending pipe cleaners. Not only is this craft fun to do, but it is also relatively easy. Even if you don't get a "perfect" looking robot the first time, you will have a great experience to build on with future paper robot crafts. In no time, you can have fun making a paper robot!
Steps
Creating the Body of Your Paper Robot
-
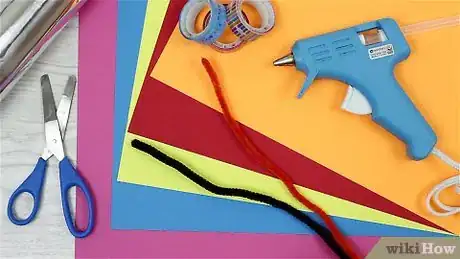
1Collect your supplies. You will need plain white card stock, 5-6 sheets of different colored construction paper, and some acrylic silver spray paint. Super glue, tape, a ruler, and scissors are all necessary to help build your robot. You may also want to add different colored pipe cleaners, buttons, and beads onto your robot.
-
2Draw four connected squares. First, you will want to find paper which is thick, like card stock. The dimensions of your cube will be 2X2X2 inches. Using a ruler, draw a 2X2 square on the paper. You can use a protractor to check whether each of the angles are 90 degrees. After you have drawn the first square, you will now have to draw three more of equal size.[1] [2] [3]
- The next three will go directly next to the first square. Each new square will use a line from the previous square. Continue this until you have four squares, all connected together in one large rectangle.
- You will now have a rectangle of four connected squares, with a total dimension of 2X8 inches, and three visible pencil lines.
Advertisement -
3Connect two more squares to the rectangle. The last two squares are placed apart from another, at square number two on the rectangle. Place a square on each side of that rectangle at the same position. You should now have what looks like a cross.
-
4
-
5Join the edges of the cube together. For this step you can use either glue or tape. Fold up the three squares at the top of the cross. Lift up the long end of the cross and fold the top over. You should now have what looks roughly like a cube. Use small pieces of tape, or dabs of glue, to join together the edges. If you use glue, hold the edges together for at least 30 seconds so that the glue can dry.[6] [7]
-
6Make a cuboid out of heavy paper. This follows the same steps as the normal cube. The only difference is the dimensions. Draw a 2X4 inch rectangle. On top of that rectangle, on the long side, draw a 4X8 rectangle. Make sure that the lines of both rectangles connect with one another. On top of that rectangle, draw another 2X4 rectangle. Then, on top of that one, draw another 4X8 rectangle. At the end, you should have a rectangle that is 4X20 inch rectangle, with three pencil marks.[8] [9]
- Remember, 4 inch sides need to match up with 4 inch sides. 8 inch sides need to match up with 8 inch sides. For example, when drawing the 4X8 rectangle above the 2X4 rectangle, the 4 inch sides need to match up.
- On both sides of one of the 4X8 rectangles, draw a 8X2 rectangle. At the end, you should have what looks like a cross.
-
7Cut out the cross. Use a pair of scissors and cut out the cross. Fold up the two 8X2 rectangles, and one 2X4 rectangle. Then fold up the other section, so that you end up with a rectangular cube. Use dabs or glue, or small tabs of tape to secure the edges. If you use glue, hold the edges down for 30 seconds to ensure that the glue dries.[10]
-
8Paint your boxes or wrap them in tin foil. If you decide to paint your boxes, you will need to buy acrylic silver spray paint. Take them outside so that fumes don't build up indoors. Spray from about 1-2 feet away. Make sure that you get all the sides and edges. You can let one side dry before you spray paint the other sides.[11] [12]
- If you decide to wrap your boxes in tin foil, simply peel off large sheets of tin foil. Cut two long strips which will wrap around both boxes. You also want to cut out four smaller pieces to wrap around the smaller areas and edges.
- You can either wrap the tin foil tightly around the cubes, or glue them down with dabs of super glue.
-
9
Making the Arms and Legs of Your Robot
-
1Cut out two strips of construction paper. Choose any color you would like, but darker colors work best. You want to cut out two strips, each that are 1X7 inches long.
-
2Accordion fold the two strips. This means that the first 1/2 inch you will fold up, the next 1/2 inch you will fold down, the next 1/2 inch up, etc. Do this to both strips until they have been completely accordion folded.[15]
-
3Glue the accordion folds to the body. Place a dab of super glue about one inch below the head of the robot, on both sides of the body. Take the ends of your accordion folds and press them against the super glue. Hold them there for fifteen seconds so that the glue can dry.
-
4Cut out two squares out of construction paper. Each of these squares should be 4X4 inches. After you have cut them out, feel free to dispose of any excess construction paper. The color of this construction paper should match what you chose for the arm accordion folds.[16]
-
5Roll the squares. Take each of the squares in your hands and roll them like a cigar. You want to make sure you leave at least an inch or two in diameter. Then take a small piece of tape and place it on the overlapping edge so that the roll stays in place.[17]
-
6Secure the legs to the body. Spread super glue around one of the ends of your roll. Do this to both of the legs. Then press and hold them on the underside of the body (large rectangular cube). The legs should be the same distance from one another, and about a 1/2 inch inwards from the edges. Hold the legs there for 15 seconds to allow the glue to harden and dry.[18]
Adding the Details to Your Robot
-
1Glue on eyes to your robot's head. Choose from a vast array of buttons or small items you might want to use as eyes. You might want something shiny, so that it matches the essence of a robot. After you have chosen the buttons you wish to use as eyes, super glue them onto the head. Make sure that they are placed on the front of the head, each about an inch inwards from the sides.[19] [20]
-
2Poke holes into the robot's head. You can do this with a sharp knife, or a pair of scissors. You want to do this on the top part of the head. Each hole should be about an inch inwards from the edges. Make sure the holes are tiny, otherwise the antennas won't hold. Take a pipe cleaner and cut it in half. Stick one piece in one of the holes and one in the other. Bend them slightly as if they are receiving signals.[21] [22] [23]
-
3Cut out small paper squares. These can range from 1/4 inch squares to 1/2 inch squares. Cut these out of construction paper using scissors. Make sure you are using a multitude of different colors. Glue them on the front of the main body. You can do these in any order you wish. Press each of the pieces down for 15 seconds to allow the glue to dry. These squares will represent blinking lights/electronics on the robot.[24] [25]
-
4Create feet for your robot. Cut out two circles, each the same size, about 2 inches in diameter. If you have a hard time drawing a perfect circle, try to find a small circular object, like a compass or the end of a paper towel roll, and trace the edge of it. You should use a different color than the color you used for the legs and arms. Place your robot down on its back. Place glue around the edges of the lower paper legs. Press each of the circles onto the legs, and hold them for 15 seconds. This will allow the glue to dry.[26]
-
5Make ears for your robot. Find two small beads that are the same color. You will want to use gold or silver beads. Take a small amount of super glue on each side of your robot's head. Place a bead on each side, and hold them against the super glue. Make sure to hold them for 15 seconds to allow the glue to dry.[27]
-
6Finished.
Community Q&A
-
QuestionHow can I make paper robots that work?
 Community AnswerTo make it work you need wires and metal, usually.
 -
QuestionCan I use anything other than fuzzy wires?
 Undertale4141Top AnswererYes. This is your robot, so you can use whatever you want. A cool idea to consider is reusing recyclable material. You can do so many cool things out of cardboard, paper, bottle caps, and whatever else is in the bin.
Warnings
- Do not cut yourself when you are handling sharp objects such as knives and scissors. Supervise kids who might be attempting this craft. Always place the scissors/knives in a safe location, away from children, when you are done with them.⧼thumbs_response⧽
- Be careful when you use super glue. The glue can get easily stuck to your fingers and be hard to get off.⧼thumbs_response⧽
Things You'll Need
- Construction paper (many different colors)
- Acrylic silver paint
- Card stock
- Super glue
- Tape
- Knife and/or scissors
- Pipe cleaners
- Ruler
- Beads
- Buttons
References
- ↑ https://www.youtube.com/watch?v=x1Boojqmwyo
- ↑ http://geekdad.com/2015/03/cardboard-robots-rocketships/
- ↑ http://makezine.com/projects/cereal-box-robot/
- ↑ http://practicalmama.com/2007/12/how-to-make-a-robot-with-used-cardboard-boxes/
- ↑ http://makezine.com/projects/cereal-box-robot/
- ↑ https://www.youtube.com/watch?v=x1Boojqmwyo
- ↑ http://makezine.com/projects/cereal-box-robot/
- ↑ http://practicalmama.com/2007/12/how-to-make-a-robot-with-used-cardboard-boxes/
- ↑ http://makezine.com/projects/cereal-box-robot/
- ↑ http://makezine.com/projects/cereal-box-robot/
- ↑ https://www.youtube.com/watch?v=x1Boojqmwyo
- ↑ http://geekdad.com/2015/03/cardboard-robots-rocketships/
- ↑ http://geekdad.com/2015/03/cardboard-robots-rocketships/
- ↑ http://practicalmama.com/2007/12/how-to-make-a-robot-with-used-cardboard-boxes/
- ↑ https://www.youtube.com/watch?v=x1Boojqmwyo
- ↑ http://makezine.com/projects/cereal-box-robot/
- ↑ https://www.youtube.com/watch?v=x1Boojqmwyo
- ↑ http://practicalmama.com/2007/12/how-to-make-a-robot-with-used-cardboard-boxes/
- ↑ http://practicalmama.com/2007/12/how-to-make-a-robot-with-used-cardboard-boxes/
- ↑ http://makezine.com/projects/cereal-box-robot/
- ↑ https://www.youtube.com/watch?v=x1Boojqmwyo
- ↑ http://geekdad.com/2015/03/cardboard-robots-rocketships/
- ↑ http://makezine.com/projects/cereal-box-robot/
- ↑ http://geekdad.com/2015/03/cardboard-robots-rocketships/
- ↑ http://practicalmama.com/2007/12/how-to-make-a-robot-with-used-cardboard-boxes/
- ↑ https://www.youtube.com/watch?v=x1Boojqmwyo
- ↑ https://www.youtube.com/watch?v=x1Boojqmwyo
About This Article
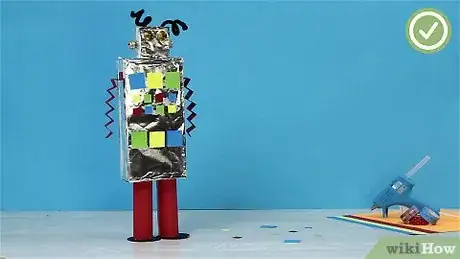
To make a paper robot, first make a small cube and a larger rectangular cube from cardstock. Then, cover the cubes with tin foil and glue them together to make the robot’s head and body. Next, cut colored construction paper into strips, fold them into accordion pleats, and attach them for arms. Also, roll some construction paper into tubes and attach them to your robot to make legs. Finally, glue on button eyes, bead ears, and paper feet before you poke holes in the robot’s head and stick in pipe cleaner antennae. To learn how to measure and cut the cubes for your robot’s head and body, read on!
