This article was co-authored by wikiHow staff writer, Aly Rusciano. Aly Rusciano is a Creative Writer based outside of Nashville, Tennessee. She has over ten years of experience in creative, academic, and professional writing. Aly’s writing has been nationally recognized in the Sigma Tau Delta Rectangle and featured in Blue Marble Review, The Sunshine Review, PopMatters, and Cathartic Literary Magazine. She graduated from The University of Tennessee at Martin with a BA in English, focusing in Creative Writing and minoring in Theatre.
There are 11 references cited in this article, which can be found at the bottom of the page.
The wikiHow Video Team also followed the article's instructions and verified that they work.
This article has been viewed 147,016 times.
Learn more...
Whether you’re going back to school or organizing your office, paper folders are one nifty invention. They let you store all your loose-leaf papers, and they just so happen to be super easy to make! Before you head to the store to buy a folder, consider making one with supplies you have around the house. Keep reading to learn how you can make a folder out of paper and decorate it to be anything but boring. All you need are a few sheets of construction paper and a stapler or roll of tape.
Things You Should Know
- Fold and staple two sheets of construction paper together to make a quick 4-pocket folder.
- Reinforce your folder’s spine and seams with tape to make it more durable.
- Decorate your folder with pictures, scrapbook paper, and/or craft gems.
Steps
Stapling a Simple Pocket Folder
-
1Pick out two sheets of 11 in × 17 in (28 cm × 43 cm) construction paper. Choose your favorite colors, colors that match a loved sports team, or your school colors. One sheet will be the front and back of your folder, while the other will make up the pockets.[1]
- Try using two sheets of the same color for a more classic look.
- Opt for complementary colors like yellow and purple for a pleasing look.
- Consider using scrapbook paper for a designer look.[2]
- The folder will be roughly 8.5 in × 11 in (22 cm × 28 cm) in size (half the size of the original construction paper).
- If you have larger sheets of construction paper, no worries! Cut them down to size with scissors, using a ruler to guide you.
-
2Fold the first sheet of construction in half to make your pockets. Take the first sheet of construction paper and fold it in half lengthwise.[3] This should leave you with a sheet that’s roughly 6 by 17 inches (15 cm × 43 cm).Advertisement
-
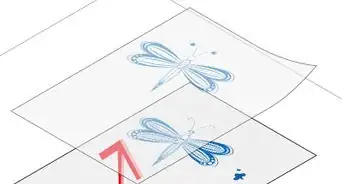
3Place the second sheet inside the fold of the first sheet. Slide the long edge of the second sheet into the first piece’s crease.[4] Make sure the edges of the sheets are lined up. This will be the front and back of your folder.
-
4Fold the two sheets of construction paper in half widthwise. With one sheet inside the other, fold the sheets hamburger style. Bring the left end over to the right until the edges align. Then, press down along the folded edge to hold the fold in place. This creates the spine of the folder.[5]
-
5Staple the sides of the folder’s pockets. Open the folder and place a staple on the top and bottom corners of the pocket on either side with a stapler. Now you have 4 pockets you can use—2 inside the folder, 1 on the back, and 1 in the front.[6]
- For extra stability, place a staple along the bottom edge of each side.

Taping a Thick Pocket Folder
-
1Choose three sheets of 8.5 in × 11 in (22 cm × 28 cm) cardstock. Using multiple sheets of cardstock helps your folder be more durable, making it perfect for work or school. If you don’t have cardstock, use printer or construction paper.[7]
- Consider gluing two sheets of printer paper together to make a sturdier piece of paper for your folder.
-
2Stack two sheets of cardstock on top of each other. Make sure the sheets are flush with each other, so they appear to be one piece of paper. If your cardstock has a design on it, face the design outward as this will be the front and back sides of your folder.[8]
-
3Use clear tape to attach a long edge of the sheets together. The long edge will be the spine of your folder. Fold the tape over the edge to ensure that both sides of the sheet are secure.[9]
- Use your fingers to press and smooth away any bubbles or creases in the tape.
- Keep the sheets aligned while you do this, so the folder is symmetrical.
- Consider using multiple pieces of tape to create a stronger hold.
- Try putting a colorful or patterned tape over the clear tape for extra pizazz.
-
4Place tape along the inside spine. Open the folder and place another long strip of tape on the inside. Line the tape up to the previous tape to reinforce the folder’s spine.[10]
-
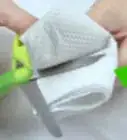
5Cut the third sheet of cardstock in half to make the folder pockets. Trim 1⁄4 in (0.64 cm) of the length off the sheet until you’re left with a 8.25 in × 11 in (21.0 cm × 27.9 cm) sheet of paper. Then, cut the sheet in half, so you have two 5.5 in × 8.25 in (14.0 cm × 21.0 cm) pieces of paper.[11]
- Try folding the sheet in half widthwise before cutting. This way, you’ll have a center crease to cut along, ensuring that the halves are even.
-
6Tape the pockets to the folder. Take one of the smaller pieces of cardstock and line it up with one of the bottom inside corners of the folder (the 8.25 in (21.0 cm) edge running parallel to the 8.5 in (22 cm) edge of the folder). Apply strips of tape to the edges, folding the tape over halfway, to secure the pocket in place. Repeat this process on the other inside side with the other smaller piece of cardstock.[12]
- Try using multiple pieces of tape for a more durable hold.

Decorating a Paper Folder
-
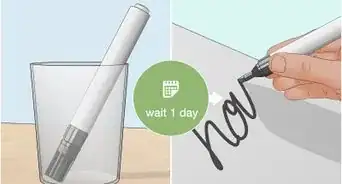
1Draw on your folder with markers, crayons, or colored pencils. Let your creativity flow and doodle all over the folder’s cover and pockets. Stick to a simple design by putting a few flowers or stars in the corners, or go for a bold rainbow pattern across the entire cover.
- Write an inspirational message like “Shine bright!” on the cover with a swirling font.[13]
- Cover your folder with drawings that represent what’s inside your folder. For example, draw cakes and pastries if you plan to store recipes in the folder.
-
2Glue magazine clippings and pictures on your folder’s cover. Cut out pictures of your favorite celebrities, activities, words, or friends. Use a glue stick or tape to place them all over the cover of your folder. Don’t be afraid to overlap the images! That’s what gives collages their haphazardly cool look.
- Spell out your name using letters you find in a magazine.
- Doodle on pictures or your friends and family for an added personal touch.
- Theme the collage around what’s inside the folder. For example, decorate the outside with pictures of famous singers if the folder holds your sheet music.
-
3Stick jewels and stickers to your folder. Give your folder a bit of sparkle or personal touch with craft supplies that reflects your personality. Opt for sequins, gems, or even scratch-and-sniff stickers. Head to the craft store and find what stickable elements speak to you![14]
- Keep in mind where you’ll be storing your folder. 3D gems may not be the best idea if you need to slide the folder inside a binder.
- Spell out your name or the subject of your folder with glitter sticker letters.
- Line the edges of the pockets with star or flower stickers.
-
4Line your folder with washi tape. Keep your decorations simple but cute with a bit of washi tape. Simply pick a pattern or color that matches your folder’s colors, and then stick it wherever you please. Try placing it along the spine, on the edges of the pockets, or across the folder’s cover at a diagonal.
- Try covering most of the folder with a patterned washi tape for an effortless but intricate design.[15]
Community Q&A
-
QuestionCan I make it out of cardboard?
 Community AnswerYes, you can. It will likely be sturdier than paper.
 -
QuestionHow do I make a smaller folder out of paper?Community AnswerYou just follow the same instructions with a smaller piece of paper. I did it and it worked out just fine.
-
QuestionDo we fold the first sheet vertically?
 Community AnswerYes, you do fold it vertically. I was also a little confused at first.
Things You'll Need
Stapling a Simple Pocket Folder
- 2 sheets of 11 by 17 inches (28 by 43 cm) construction paper
- Stapler
- Staples
Taping a Durable Pocket Folder
- 3 sheets of 8.5 by 11 inches (22 by 28 cm) cardstock
- Clear tape
- Scissors
- Ruler (optional)
Decorating a Paper Folder
- Markers, crayons, or colored pencils (optional)
- Magazine clippings or pictures (optional)
- Glue stick (optional)
- Craft jewels (optional)
- Stickers (optional)
- Washi tape (optional)


References
- ↑ https://www.lakeshorelearning.com/media/images/free_resources/teachers_corner/projects/pocketFolderDirections.pdf
- ↑ https://youtu.be/eyMNTCldFlo?t=85
- ↑ https://www.lakeshorelearning.com/media/images/free_resources/teachers_corner/projects/pocketFolderDirections.pdf
- ↑ https://www.lakeshorelearning.com/media/images/free_resources/teachers_corner/projects/pocketFolderDirections.pdf
- ↑ https://www.lakeshorelearning.com/media/images/free_resources/teachers_corner/projects/pocketFolderDirections.pdf
- ↑ https://www.lakeshorelearning.com/media/images/free_resources/teachers_corner/projects/pocketFolderDirections.pdf
- ↑ https://youtu.be/g_KmLo2Wb80?t=7
- ↑ https://youtu.be/g_KmLo2Wb80?t=97
- ↑ https://youtu.be/g_KmLo2Wb80?t=109
About This Article

If you want to keep your schoolwork or projects more organized, you can easily make your own folder out of a few pieces of paper. To make a simple pocket folder, start by getting 2 pieces of 11 by 17-inch construction paper. Fold one piece in half lengthwise, and place the second sheet inside the fold of the first sheet. Make sure the bottom edge of the second sheet rests snugly into the crease you made with the first piece. With the two pieces placed together, fold them widthwise so the smaller sheet forms a small set of pockets around the bottom. Staple the pocket piece to the larger folder piece a the edges of the cover. To learn how to make a durable pocket folder, keep reading!