This article was co-authored by wikiHow Staff. Our trained team of editors and researchers validate articles for accuracy and comprehensiveness. wikiHow's Content Management Team carefully monitors the work from our editorial staff to ensure that each article is backed by trusted research and meets our high quality standards.
There are 18 references cited in this article, which can be found at the bottom of the page.
The wikiHow Video Team also followed the article's instructions and verified that they work.
This article has been viewed 29,795 times.
Learn more...
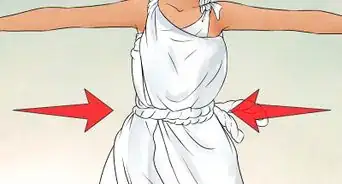
Queen Nefertiti is considered one of the most beautiful faces of Ancient Egypt. Her sculpted bust is instantly recognizable with her elegant features and tapering crown. It is no surprise that many people choose to dress up as her for costume parties, events, and history projects. While her white dress is simple to make, her crown is more complex. The time and effort it takes to make this crown is definitely worth it, and is bound to leave you feeling like a queen.
Steps
Creating the Base
-
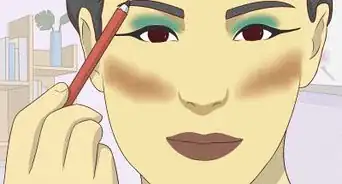
1Choose a piece of black or blue poster paper. Some people see Nefertiti's crown as black, while others see it as dark blue. Look at photos of her crown, and decide for yourself. If you cannot find black or blue poster paper, pick any color, then paint it black or dark blue using spray paint or acrylic paint.
- Poster paper is thicker and sturdier than regular paper. If you can't find poster paper, use another type of heavy paper with similar dimensions: 24 by 36 inches (61 by 91 cm).
-
2Cut the poster paper down to 12 inches (30 cm) tall. Place the paper landscape style on a cutting mat. Make a mark on each side edge, 12 inches (30 cm) from the bottom. Connect the lines using a long straight edge. Cut along the line that you drew using a craft blade and a metal straight edge. Keep the 12 inches (30 cm) tall piece and set the rest aside.[1]
- You will be cutting the crown down so that it is shorter later. It is better to give yourself more material to work with, however.
- You can cut the paper down with a pair of scissors instead, but a craft blade and metal straight edge will give you a cleaner line.
- Keep the piece that you set aside on hand just in case you mess up and need to start over.
Advertisement -
3Wrap the poster paper around your head, then mark the overlap. Keep the paper oriented landscape style as you wrap it around your head like a crown. Find the seam, and make a mark along the bottom edge using a pencil.[2]
- Make sure that you are marking the paper right next to the overlapping corner. If you mark the corner and not the paper, you won't know where to cut.
- The crown needs to wrap around your entire hairline: forehead, above your ears, and at the nape.
-
4Draw an angled line going from the mark to the top corner. Take the paper crown off and spread it out flat again. Measure 1⁄2 inch (1.3 cm) away from the mark along the bottom edge. Next, use a ruler and a pencil to connect that point to the top corner of the paper.[3]
- The corner you connect the point to depends on what side of the paper you drew the mark on. If you drew the mark on the right side, then connect it to the right corner.
- You are measuring 1⁄2 inch (1.3 cm) away from the mark to allow for overlap.
-
5Cut along the angled line that you drew. This will help create the tapering shape of Nefertiti's crown. Once again, use a pair of scissors or a metal straight edge and a craft blade to do this.[4]
-
6Trace your front hairline and temples onto the crown. Roll and tape the crown back into shape. Put the crown on with the seam in the back. Use a pencil to outline your temples and forehead. Try to follow your hairline as much as possible. Finish your tracing about 1⁄2 inch (1.3 cm) in front of each ear.[5]
- For a nicer finish, may the top left and right corners of the rectangle curved or rounded.
-
7Cut along the lines that you traced. Take the crown off, remove the tape, and flatten it first. Next, use a pair of scissors or a craft blade to cut along the lines that you just drew. Erase any pencil marks for a nicer finish.
- You can also measure across your forehead from temple-to-temple, then transfer that measurement to your crown instead.
- The area that you are cutting off shouldn’t be more than 2 inches (5.1 cm) tall.


Decorating the Crown
-
1Draw a gold rectangle the width of your forehead along the bottom edge. Roll the paper back into a crown and secure it with a strip of tape. Put the crown on with the seam in the back. Trace a rectangle onto the bottom edge of the crown using a gold marker. Make the rectangle about 2 inches (5.1 cm) tall and the width of your forehead. It should end at the outer corners of your eyes or eyebrows.
- Make the rectangle as precise as possible, with the bottom edge touching the bottom edge of the paper.
- You can round the top left and right corners if you want a softer look.
-
2Flatten the crown and paint the rectangle gold. Take the crown off and remove the tape. Flatten the crown, then fill the rectangle with gold acrylic paint. Let the paint dry before moving on. It should only take 15 minutes or so.
- You can also use a gold marker or a gold paint pen. Make sure that the gold shows up nice and bright on the paper.
-
3Draw a horizontal gold strip down the length of your crown. Find the center of the black/blue portion of your crown, then use a ruler and a gold marker to draw 2 parallel lines. Make these lines about 1 inch (2.5 cm) apart, going from 1 narrow end of the crown to the other.[6]
- Do not include the gold rectangle when finding the center of your crown. Start measuring just above it.
- Most gold markers will show up against black or blue paper. If yours doesn't, switch to a thick gold paint pen instead.
-
4Divide the gold strip into smaller rectangles. Use a ruler and a gold marker to draw vertical lines inside the gold horizontal strip. Make sure that each vertical line connects to the top and bottom edge of the strip. Space the lines so that you have a pattern that consists of 1⁄2 and 1 1⁄2 in (1.3 and 3.8 cm) rectangles.
- Look at pictures of Nefertiti's crown if you are having trouble copying the design.
-
5Color the rectangles red, green, and blue with acrylic paint. Paint the large, wide rectangles an alternating red-and-green pattern. Paint the skinny rectangles a deep blue. Acrylic craft paint will work the best, but you can also try tempera or poster paint.[7]
- For a fancier crown, cut the rectangles out of red, green, and blue paper, and glue them into the spaces. Use shiny, metallic paper for an even fancier effect.
- If you want a little extra bling, hot glue red and green rhinestones over the red and green rectangles.[8]
- Let the paint dry, then re-trace over any gold lines that got covered up by the paint.
-
6Add dimension with thin gold cording, if desired. Find a skinny, gold rope or cord that is about the same thickness as the gold lines making up your gold strip. Hot glue the gold cording to the top and bottom edges of the strip, as well as to the gold rectangle above the forehead.[9]
- Don't add the cording between the mini rectangles making up your strip.
- If you can't find any gold cording, you can use gold puff paint, gold glitter glue, or even a gold colored hot glue stick.


Creating the Snake
-
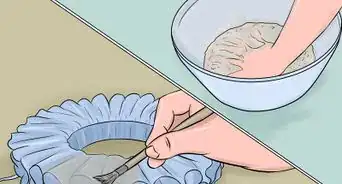
1Buy a pack of light-weight air dry clay. Paper clay is a great choice, but you can also use foam clay instead. Foam clay dries firm, but it still has some “give” to it when you press down on it. It feels like a dried up marshmallow once hardened. Look for words like “feather-light,” “fluffy,” or “Model Magic” on the packaging.
- Do not use play dough, pottery clay, stone clay, or polymer clay. Those kinds of clay are too heavy.
- You can find paper clay in the clay section of a craft store. You can find "fluffy" clay in the kids section of a craft store.
-
2Roll the clay into a rope. The thickest part of the rope needs to be about the same thickness as your thumb. It should taper down to the thickness of a pencil towards the end. The rope needs to be about twice the height of your crown.[10]
- Look at pictures of Nefertiti’s crown to get an idea of the proportions of the snake to the rest of the crown.
-
3Coil the rope into a figure-8 shape. Begin forming the figure-8 from the center, where all lines intersect. Make the loops small enough so the thick and skinny ends of the rope are sticking out of the middle. You’ll have something that looks like an 8 with a — going through the middle of it.[11]
-
4Turn the figure-8 on its side. Make sure that the thicker end of the rope is on top of the figure-8 and pointing down. The thinner end of the rope should be underneath the figure-8 and pointing up. The shape should be about the same height as your crown.
-
5Bend the thick end upwards and flatten the sides to make the head. Bend the thicker end of the rope up towards the middle of the figure-8, where all lines intersect. Flatten the side edges of the thick end of the rope to make the hood on the snake’s head.[12]
-
6Refine the shape of the snake. Take a look at Nefertiti’s crown, and study the cobra on it. Adjust the shape of the hood, if needed, and make the snout more pointy. Use a toothpick or a ball-point pen to make the holes for the nostrils and eyes.[13]
-
7Adjust the height of the snake. Position the snake against the middle of the crown, with the base of its neck touching the top of the gold forehead rectangle. The skinny tip of the tail should be about 1⁄2 inch (1.3 cm) from the top of your crown. Trim the tail down, if needed, then round it back out again so that the cut is not blunt.
-
8Let the snake dry completely. How long this takes depends on the type of clay that you are using as well as how warm, cold, or humid it is in your home. Expect to wait overnight to an entire day.
-
9Paint the snake gold. Use a shade of gold paint that closely matches the gold on the forehead rectangle. You can use acrylic paint or spray paint for this. Let the paint dry completely before moving on. This should only take 15 to 20 minutes.[14]
- Spray your snake with a clear, glossy acrylic sealer to make it look more metallic.
- Glue tiny red rhinestones into its eyes for extra sparkle. Super glue will work the best, but you can use a tiny amount of white school glue or tacky glue as well.


Assembling the Crown
-
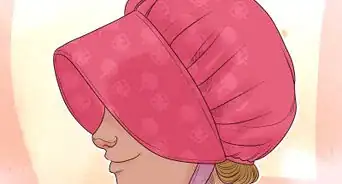
1Roll the crown into a tube and glue the ends down. Coat 1 of the narrow ends of the crown with tacky glue. Roll the crown into a tube, with the narrow ends overlapping by 1 centimeter (0.39 in). Secure the top and bottom edges of the crown with paper clips, binder clips, or clothespins while the glue dries. This may take a few hours, so be patient.
- Make the crown sturdier by laying a strip of masking tape or duct tape down the seam on the inside.
- Hot glue is not recommended for this step because it will create too much bulk in the seam. The seam needs to be flat.
-
2Trim the top edge so that the back is taller than the front. The seam that you just glued is the back of the crown. Use a pair of scissors to cut along the top edge of the crown so that it is taller where the seam is, and shorter in the front.[15]
- The exact difference between the front and the back height does not really matter. About 1 to 2 inches (2.5 to 5.1 cm) should be plenty, however.
- Plan on making the final crown 8 to 12 inches (20 to 30 cm) tall.
-
3Glue the snake to the front of the crown, just above the gold rectangle. Hot glue will work the best here because of how quickly it sets. You can also use tacky glue, but be prepared to hold it for a couple of minutes until the snake holds.[16]
- White school glue is not recommended because it is too thin and runny.
- You can try using super glue. Make a dotted line all along the back of the snake, then press it against the crown.
-
4Glue the top of the crown to matching poster paper, if desired. Run hot glue along the top, inside edge of the crown. Quickly place the crown on top of another sheet of black or blue poster paper (whichever color you used for the crown).[17]
- This will cover the top of the crown and give you a more finished piece. You can skip this step if you want to.
- Tacky glue is not recommended for this step because the surface area you're working with is so thin. Hot glue will create a nice seam on the inside of the crown.
-
5Cut the poster paper around the top edge of the crown, if you added it. Once the glue has set, cut along the top edge of the crown to separate it from the larger sheet of poster paper. Use a small pair of scissors to trim away any crooked edges that are sticking out over the top edge of the crown.
- Skip this step if you are not covering the top of the crown.
- Reinforce the inside seam with more hot glue or strips of tape.


Things You'll Need
- Black or blue poster paper
- Metal straight edge/ruler
- Craft blade or scissors
- Gold marker
- Acrylic paint (gold, red, green, and blue)
- Wide/flat and round-pointed paintbrushes
- Light-weight air-dry clay
- Tacky glue
- Hot glue
- Rhinestones (optional)
- Gold cording (optional)


References
- ↑ https://www.youtube.com/watch?v=Hs9c7LfaFMo&feature=youtu.be&t=1m40s
- ↑ https://www.youtube.com/watch?v=Hs9c7LfaFMo&feature=youtu.be&t=1m50s
- ↑ https://www.youtube.com/watch?v=Hs9c7LfaFMo&feature=youtu.be&t=2m10s
- ↑ https://www.youtube.com/watch?v=Hs9c7LfaFMo&feature=youtu.be&t=2m30s
- ↑ https://www.youtube.com/watch?v=Hs9c7LfaFMo&feature=youtu.be&t=2m35s
- ↑ https://www.youtube.com/watch?v=Hs9c7LfaFMo&feature=youtu.be&t=3m25s
- ↑ https://www.youtube.com/watch?v=Hs9c7LfaFMo&feature=youtu.be&t=4m
- ↑ https://www.youtube.com/watch?v=zwFcE9VX--k&feature=youtu.be&t=4m50s
- ↑ https://www.youtube.com/watch?v=Hs9c7LfaFMo&feature=youtu.be&t=5m30s
- ↑ https://www.youtube.com/watch?v=Hs9c7LfaFMo&feature=youtu.be&t=6m15s
- ↑ https://www.youtube.com/watch?v=Hs9c7LfaFMo&feature=youtu.be&t=6m35s
- ↑ https://www.youtube.com/watch?v=Hs9c7LfaFMo&feature=youtu.be&t=7m
- ↑ https://www.youtube.com/watch?v=Hs9c7LfaFMo&feature=youtu.be&t=7m30s
- ↑ https://www.youtube.com/watch?v=Hs9c7LfaFMo&feature=youtu.be&t=8m25s
- ↑ https://www.youtube.com/watch?v=Hs9c7LfaFMo&feature=youtu.be&t=6m
- ↑ https://www.youtube.com/watch?v=Hs9c7LfaFMo&feature=youtu.be&t=8m50s
- ↑ https://www.youtube.com/watch?v=zwFcE9VX--k&feature=youtu.be&t=4m55s
- ↑ http://takebackhalloween.org/nefertiti/
- ↑ http://takebackhalloween.org/nefertiti/
About This Article