This article was co-authored by Lois Wade. Lois Wade has 45 years of experience in crafts including sewing, crochet, needlepoint, cross-stitch, drawing, and paper crafts. She has been contributing to craft articles on wikiHow since 2007.
wikiHow marks an article as reader-approved once it receives enough positive feedback. In this case, 86% of readers who voted found the article helpful, earning it our reader-approved status.
This article has been viewed 1,016,637 times.
Do you need a tote bag, or know someone who'd love it as a gift? There's no reason to pay twenty bucks for something you could make yourself. All you need is some fabric, thread, and basic sewing skills.
Things You Should Know
- Choose fabric based on how you intend to use the bag. For example, if you plan to carry heavy books, use sturdy fabric like denim or canvas.
- Measure 2 identical rectangles and cut them out of the fabric. These rectangles are the sides of your tote.
- Hem along the edges of both rectangles, then sew the rectangles together. Miter the bottom corners for a clean profile.
Steps
Prepare the Fabric
-
1Choose fabric for your bag. Picking out fabric may be the hardest part, since there are so many choices.[1] Any type of fabric will work, whether you want to use denim from an old pair of jeans or buy expensive satin to make a fancy tote bag. Here are a few things to keep in mind when you're picking out fabric:
- If you're going to use the tote to carry heavy items like books, you'll want to choose a sturdy fabric. Go for heavy cotton, corduroy, or some type of thick polyester fabric. Lighter fabrics will rip if you try to carry something heavy or sharp.
- There are many great patterns to choose from, but if you plan to decorate your tote bag, you might want to go with a solid color to offset the decorations.
- If you'd like to make a lined tote bag, pick out two types of fabric. Liner is usually made from a softer fabric, while the outer fabric is usually something sturdier.
- Note that heavy fabrics will require stronger needles and/or a heavier-duty sewing machine to sew.
- If you're using brand new fabric, you might want to wash and iron it first so that it doesn't shrink after you make the tote.
-
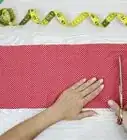
2Cut two fabric rectangles of equal size. You get to choose how large or small the tote bag will be. Measure out a rectangle and use a pencil or a fabric pen to mark where you're going to cut. Use fabric scissors to cut the rectangle out neatly. Repeat with a second piece of fabric so that you have two fabric rectangles.[2]
- Keep in mind that the finished tote bag will be an inch or so smaller than the rectangle, since the fabric will be hemmed.
- If you're making a lined tote bag, cut out two rectangles of the outer fabric and two rectangles of the liner fabric.
- Here are a few size suggestions:
- 12 x 14 inches for a very small tote
- 14 x 16 inches for a medium tote
- 24 x 20 inches for a large beach tote
Advertisement -
3Mark the place where the handles will go. Fold the rectangles in thirds lengthwise and use a fabric pen or pencil mark the two inside creases. These marks will show you where to center the handles later, so be sure to fold across the length of the fabric, and not down it, to position them correctly.
Sew the Body of the Bag
-
1Hem the top edges of the rectangles. It's easiest to hem the top edges of the tote, which will become the two edges at the opening, before you sew the body of the tote. To do this, lay out the rectangles so that the "wrong" side of the fabric - the side on which the pattern is less bright - is facing up. Fold the top edge of the fabric down by one inch. Use straight pins to keep the fold in place, and run an iron along its edge to create a crease. Repeat with the other rectangle so that the hem will be the same on both pieces. Use a sewing machine or work by hand to create a straight stitch 1⁄2 inch (1.3 cm) below the folded edge of the fabric on both rectangles.
- If you're making a lined tote, lay the lining rectangle on top of the rectangle of outer fabric. Fold the edges down together, use straight pins to keep them in place, and sew the pieces together with a straight stitch.
- If you sew an uneven line, use a seam ripper to rip out the stitch and start over.
-
2
-
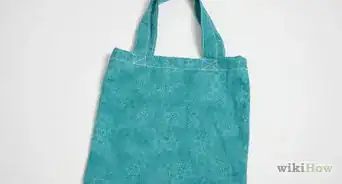
3Miter each bottom corner. Fold the bag so that, instead of coming together at a 90-degree angle, the bottom and side seam are stacked on top of one another. Now sew across the corner, keeping the new seam perpendicular to the existing seams. Repeat this process on the other corner. When you flip the bag right-side-out, the corners will be blunted.
Create Handles
-
1Cut handles from the fabric. Decide how long you want the handles to be (keeping in mind that they will be looped) and cut two 2-inch-wide strips of equal length from the fabric. Fold each strip in half so that the inside of the fabric faces outward. Use an iron to crease the fold.[4]
-
2Sew the long edges together. Use a sewing machine or work by hand to make a straight stitch along the long edges of both handles. Turn the handles right-side-out by feeding a wire from a coat hanger through the tube, attaching it end to the end of the tube (whether by hooking or tying it), and pulling it back through to invert the tube. Flatten the handle with an iron.
- Alternatively, you can fold the raw edges of the handle to the middle and zig-zag-stitch them in place (as seen in the image).
-
3Get the handles ready to sew to the bag. Fold the ends of your handles under by 1⁄2 inch (1.3 cm) and iron them to create a crease. Place the ends over the marks you made to show where the handles should go. Place the ends approximately 1.5 inches (3.8 cm) below the edge of your bag opening and pin or baste them in place.
-
4Stitch the handles to the bag. Top-stitch a square onto the overlapping handle fabric to hold it firmly in place.
Decorate the Tote
-
1Screen print a design on the tote. This is a popular way to decorate tote bags. Create a neat design and make it into a stencil, then use paint or ink to apply the image to your tote bag. Be sure to choose a color that will show up well against the fabric.
-
2Add rhinestone bling. If you want your bag to sparkle, consider adding some rhinestones. You'll need a hot glue gun and a bag of sparkly stones. Glue the rhinestones to your tote bag in a fun shape, such as a star, a heart, or a swirl.
-
3Paint the bag with fabric paint. Get some fabric paint from an art supply or craft store, and use it to decorate your bag in whatever way you choose. You can work with stencils or freehand to make an interesting design.
-
4Sew buttons on the bag. This is a trendy, inexpensive way to decorate your new tote bag. Use old buttons you already have or pick some up at the fabric or craft store.
-
5Add an applique. Create an applique design and sew it to your tote bag in the form of a patch. You can make an applique using your favorite photograph, your initials, or an original drawing - the sky's the limit.[5]
Printable Pattern
Community Q&A
-
QuestionHow can I use a fabric glue to make a tote bag?
 Community AnswerFind all of the necessary pieces for your tote and then simply replace sewing with gluing. Keep in mind that the glue may not hold up as long as sewing, especially if you are using it every day.
 -
QuestionIs it 14" width and 16" length?Community AnswerYes, but you can adjust the measurement according to what you think you will use the bag for.
-
QuestionCan I still make this if I don't own a sewing machine?Community AnswerCertainly! You can easily hand sew the tote. You can also use fabric glue on the seams instead. For more information on hand sewing, check out How to Sew.
Warnings
- Needles and scissors are sharp; be careful when handling these things.⧼thumbs_response⧽
- The seam ripper is sharp, also.⧼thumbs_response⧽
Things You'll Need
- Two rectangles of heavy-duty fabric
- Sewing machine and thread
- 2 two-inch strips of heavy-duty fabric
References
- ↑ https://totebagfactory.com/blogs/news/best-fabric-for-tote-bags
- ↑ https://www.purlsoho.com/create/2015/06/01/easy-easier-and-easiest-totes/
- ↑ http://blog.brothersews.com/upcycling/earth-day-reusable-tote-bag/
- ↑ https://crazylittleprojects.com/easy-tote-bag-tutorial/
- ↑ https://www.prettyhandygirl.com/21-ways-to-make-and-decorate-totebags/
About This Article

To make a tote bag, start by cutting 2 equally-sized rectangular pieces of fabric that are between 12 and 24 inches long and wide. Then, hem the top edge of each rectangle and sew the rectangles together on the sides and bottom. Next, cut two 2-inch wide strips of fabric for the handles, fold them in half, and iron them to crease the fold. After you iron the handles, sew the long edges together and pin them to your bag so the ends are 1.5 inches below the top edge. Finally, sew the handles to your tote bag and you're done! To learn how to choose the best fabric for your tote bag, read on!