This article was co-authored by wikiHow Staff. Our trained team of editors and researchers validate articles for accuracy and comprehensiveness. wikiHow's Content Management Team carefully monitors the work from our editorial staff to ensure that each article is backed by trusted research and meets our high quality standards.
wikiHow marks an article as reader-approved once it receives enough positive feedback. In this case, several readers have written to tell us that this article was helpful to them, earning it our reader-approved status.
This article has been viewed 207,758 times.
Learn more...
The bow and arrow is a classic toy both kids and adults can enjoy either as a toy or as an addition to a costume. But store bought bows and arrows can be expensive, and a trip to the store to buy one for play can be inconvenient. It's a good thing that with a few household items, like a coat hanger or some PVC pipe, you can make your own!
Steps
Making a Bow
Making the base
-
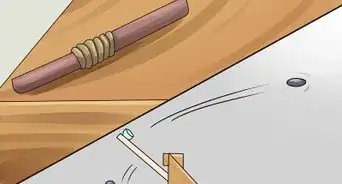
1Choose a sturdy hanger. You'll want to use a hanger that will not easily snap. Test the strength of the hanger with your hands by tugging on it in various directions. If it feels brittle or like it might break, it may not be strong enough to be used for a bow
-
2Cut the hanger. The traditional shape of a bow is a smooth arc. To make this, you'll need to remove the hook with a sturdy pair of scissors or a sharp, durable knife. Then, if any sharp edges remain, use a file to blunt the edges.
- For stubborn hangers that refuse to cut, you may need to notch the attitude with your knife first, and then cut it with your scissors.
- For more authentic bows, you might also remove the plastic connector running between the ends of the arc of your hanger.[1]
-
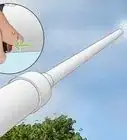
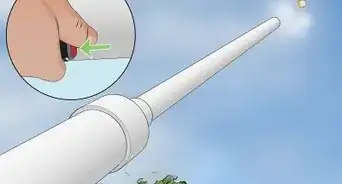
3Wrap your bow in duct tape. Take your duct tape and wrap it smoothly around your coat hanger until all surfaces are covered. Be sure your tape is wrapped thickly enough so that no edges of plastic protrude. Colored duct tape can be used to add a personal touch to your bow.
- Silver, gold, black, and brown duct tape are good duct tape colors to consider for giving your bow some character.
-
4Fashion your bowstring. The string of your bow should be made of thick, sturdy rubber bands. Depending on the length of your bow and the size of your hanger, three to five bands should be enough to make your string. Cut each in half with your scissors and tie the ends together with simple knots.[2]
- You can strengthen your bowstring by doubling or tripling the single string with more bands.
-
5Tie your bowstring to your bow. Now that you have your bowstring made, you can tie it to the end of the arc of your coat hanger to complete the bow. If you find that the bowstring doesn't stay in place, take a knife and cut V shaped notches into the plastic at either end. Then you can re-tie your bowstring so that it's seated securely in the notches.
Making Arrows and a Quiver
-
1Wrap your arrows in duct tape. You'll be using pencils to make your arrows. Wrap these completely in a layer of duct tape to give them a more realistic appearance. You may want to use a different color of duct tape for your arrows than you used for your bow, though this is a matter of preference.
-
2Draw your arrowheads. Draw two triangles on a piece of card stock or rigid cardboard for each arrowhead you plan on making. To make your arrowheads uniform, you can draw an arrowhead stencil, cut it free, and then use this to trace the shapes of the rest of your arrowheads.
- Your arrowheads can be as large or as small as you like, but for more polished looking arrowheads, measure out 2-inch (5 cm) sides for all three sides of your triangular arrowhead.
-
3Glue your arrowheads together. Take the two pieces of card stock that you have cut into the shape of arrowheads and use your glue to attach these to the tip of your arrow. If the card stock you are using is a little on the flimsy side, you might want to reinforce your arrowheads by putting small pieces toothpicks, cake pop sticks, or kebab sticks between pieces, gluing the supports in place as you glue the pieces together.
-
4Attach the arrowhead to your arrow. Use your thumb to hold your arrowhead to one of the ends of your arrow. With your free hand, take your duct tape and wrap it around the arrowhead and arrow, connecting the two together firmly.
-
5Make a quiver to hold arrows. Use your ruler to measure the length of you arrows and then subtract an inch (2½ cm) from that length. Mark your cardboard tube with the shorter length and use your scissors to cut the tube so it is an inch shorter than your arrows. Then, use your duct tape to cover the outside of your tube and close off one of the ends.
-
6Test your bow and arrow. Once your arrows are finished, put them in the quiver and take up your bow. Remove an arrow from the quiver and draw it back with the string of your bow. Release to shoot - you and your bow are now ready for adventure.
Making a PVC Pipe Bow and Arrow
Making Your Bow
-
1Use PVC pipe to make a better bow. A PVC pipe bow will be more authentic than cardboard models or bows made of light plastic. PVC is more ideal for bow-making, as it is rigid enough to provide the tension necessary for firing an arrow, but is not so weak that it will break after a few uses.
- CPVC inserts at either end of your PVC bow will serve to reinforce the ends by adding thickness. This will result in a sturdier construction and will also help prevent cracking.
-
2Insert your CPVC into your four foot PVC piece. Gather your long PVC piece and your two 1½-inch long CPVC pieces to begin making your bow. Insert one 1½-inch CPVC piece into the long PVC piece until it is nested completely inside the long PVC piece. The fit will be tight and might require you to twist the smaller piece back and forth, or you may need to tap the small CPVC piece into place gently with a hammer. Do this for both sides.[3]
- The ends of your short CPVC pieces and your long PVC piece should be even when you finish this.
-
3Cut slots into the ends of your long PVC piece with your saw. You'll also be cutting into the CPVC piece you have nested inside the larger piece. Decide which side of your pipe will be the back of your bow. The back of your bow is the side your string will run along, so your slots will need to be on this side on either end of your long piece.
- Your slots should be about ½-inch (1¼ cm) long.[4]
-
4Cut your ¾-inch (1.9 cm) thick piece along one side. Being careful not to cut yourself while doing so, use your saw to cut a straight line from top to bottom on one side of your ¾-inch (1.9 cm) thick piece. This piece will form the handle for your bow.[5]
-
5Attach your handle to your four foot PVC piece. Now that your ¾-inch thick eight inch long piece has a cut from top to bottom, you should be able to feed your long four foot PVC pipe inside of it. Slide your eight inch long handle to the middle of your four foot piece.
-
6Wrap your handle with duct tape. Arrange your handle so that the cut in it faces the front of your bow, which will be the side opposite the slots you've cut in the ends of your four foot PVC piece. Then use your electrical tape to wrap and reinforce the handle.
-
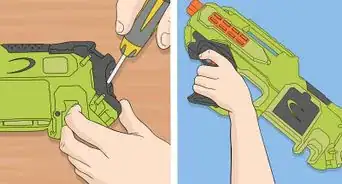
7Add your arrow holder. Take your paper clip and bend it into the shape of a C, with the bottom end about a ¼-inch ( .6 cm) longer than the top. After this is done, bend the top of the C so that it faces you while the bottom points off to the side. Now you can:
- Measure the middle point of the left side of your handle with your tape measure.
- Place the bottom of your paper clip at the midpoint with the bottom of the paper clip facing away from the bow and your offset top piece flat against the bow.
- Use your electrical tape to attach your paperclip to firmly to the bow.
- Note: the top of your paper clip will act as a stopper so your arrow holder does not get pushed back against the bow, but it will allow your holder to move forward and out of the way of arrows when shooting.
Stringing Your Bow and Making Arrows
-
1Measure out your bowstring. Use your tape measure and cut free a length of paracord that is slightly longer than four feet long. Two to four inches (5 - 10 cm) extra should be ample for the purposes of stringing your bowline and tying knots.[6]
- Cutting paracord can leave frayed edges. You can "re-seal" the ends of your cord by holding it in the flame of a match or lighter for a few moments until the ends melt closed. Allow at least a minute to pass for the ends to cool.[7]
-
2String your bow. Place one end of your paracord in the upper slot and knot it so that it cannot slip through the slot. Now you can take the other end and pull it through the bottom slot until the line is taut. Knot the bottom end the same as you did the top to fix the bowline in place.[8]
- If it feels like your knots might come loose, you can add zip-ties around the knot to reinforce it.
-
3Cap your arrows. Your 24-inch long wooden dowels will each become a single arrow. Take your dowels one at a time and put an eraser cap on each to give it the appearance of a pointed arrow head.[9]
- To create a sturdier arrow, you might use glue on the end of your dowel. Do this before putting on the eraser cap to create a seal between the arrowhead and arrow.
- If you use glue, be sure to allow your arrows to dry completely.
-
4Rest an arrow on your sight and check your handiwork. Take your finished bow and hold it in your left hand. With your right hand, take an arrow and rest it on the paperclip holder on your handle. Line up the flat base of your arrow with your bowstring, pull back arrow and string, and release to shoot.
Community Q&A
-
QuestionIs the coat hanger bow and arrow easy to break?
 SirGeorgeCommunity AnswerIt depends on how strong you are. It is much easier to break than the PVC one. If you want a good, long-lasting bow, make the PVC one.
 -
QuestionWhat else can I use for the string?
 Community AnswerElastic works much better than rubber bands. Look for elastic in craft stores.
 -
QuestionDo I have to wrap my bow in duct tape?
 Community AnswerYou should since duct tape is strong and the coat hanger is weak, so the duct tape makes the bow stronger, but it's not entirely necessary.
Warnings
- Shooting even a homemade bow at someone can result in injury. Always exercise caution when using your bow.⧼thumbs_response⧽
Things You'll Need
Making a Coat Hanger Bow and Arrow
- Card stock (or cardboard)
- Cardboard tube
- Coat hanger
- Duct tape
- File
- Glue
- Pencil (for drawing arrowhead)
- Pencils (unsharpened; several)
- Rubber bands (3 - 5 depending on size)
- Scissors
Making a PVC Bow and Arrow
- CPVC pipe (½" (1¼ cm) diameter; 1½" (3.8 cm) long; 2 pieces)
- Cord (paracord recommended)
- Eraser caps (3 - 5)
- Hammer
- Paperclip (plastic coated preferred)
- PVC pipe (½" (1¼ cm) diameter; 4 ft (1.2 m) long)
- PVC pipe (¾" (1.9 cm) diameter; 8 in (20.3 cm) long)
- Saw
- Scissors
- Tape (electrical recommended)
- Tape measure
- Wooden dowels (¼" ( .6 cm) diameter; 24" (61 cm) long; 3 - 5 pieces)

References
- ↑ http://www.planetminecraft.com/blog/how-to-make-a-bow-amp-arrow-from-stuff-in-your-closet/
- ↑ https://groovyglue.wordpress.com/2012/08/14/coat-hanger-bow-and-arrow/
- ↑ http://diyready.com/diy-how-to-make-a-bow-weapons-pvc-fiberglass-bow/
- ↑ http://www.skiptomylou.org/diy-pvc-bow-and-arrow/
- ↑ http://www.yourhomebasedmom.com/pvc-pipe-bow-arrows-activity-day-girls/
- ↑ http://www.yourhomebasedmom.com/pvc-pipe-bow-arrows-activity-day-girls/
- ↑ http://frugalfun4boys.com/2014/10/01/pvc-pipe-bow-arrows/
- ↑ http://www.skiptomylou.org/diy-pvc-bow-and-arrow/
- ↑ http://www.yourhomebasedmom.com/pvc-pipe-bow-arrows-activity-day-girls/
About This Article

Making a toy bow and arrow is a great way to do some target practice in your yard and role play your favorite archers. First, find a sturdy plastic coat hanger and cut the hook off of it with a sharp knife or scissors. Wrap the rest of the hanger in duct tape to make it look more realistic and nicer to grip. Once you’ve wrapped the whole coat hanger, tie string to the corners so the bowstring’s parallel with the straight side of the hanger. To make the arrows, wrap pencils in duct tape, then cut the arrowheads out of cardstock and glue or tape them to the end of each pencil. For more crafts tips, including how to make a quiver for your arrows, read on!