This article was co-authored by wikiHow Staff. Our trained team of editors and researchers validate articles for accuracy and comprehensiveness. wikiHow's Content Management Team carefully monitors the work from our editorial staff to ensure that each article is backed by trusted research and meets our high quality standards.
There are 13 references cited in this article, which can be found at the bottom of the page.
The wikiHow Video Team also followed the article's instructions and verified that they work.
This article has been viewed 221,489 times.
Learn more...
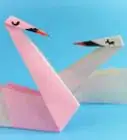
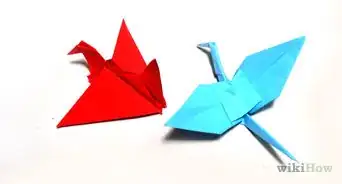
Making an origami owl is a fun paper craft that anyone can do, no matter your level of paper-folding skills. If you're a beginner, start with the simple origami owl that only requires a few basic folds. If you want something more advanced, try the more difficult owl that involves creating a bird base and then twisting the wings. Good luck!
Steps
Folding a Simple Origami Owl
-
1Fold a square piece of paper in half diagonally, then open it back up. Bring one corner over onto the opposite corner, creating a diagonal fold from one corner to the other. Crease the fold before opening the paper to lay flat.[1]
Tip: If you’re using a piece of paper that only has color on one side, start with the paper color-side down so that the white side is facing you.
-
2Bring the left and right corners in about halfway to the center, folding the top. Fold each of the 2 corners on either side of the crease in halfway to the middle to form the wings, which will look like small triangles at the upper half of the paper. Line up the edges of the folds so that they’re parallel with the center crease.[2]
- Try to fold the left and right corners the same amount on both sides so that the wings are even.
Advertisement -
3Fold the top corner down to the middle of the paper. Bring the top corner down to make the head of the owl. Crease it so that the tip of the corner hits the exact center of the paper.[3]
- Line up the corner with the bottom of the wings when you fold it down.
-
4Fold the corner back up to the top, crease it, then fold the tip halfway down. To make the head of the owl, bring the corner in the center up towards you so it lines up with the top edge and crease the fold. Then, fold the corner back down about halfway to create the beak.[4]
- Bring the corner down past the bottom edge of the head when you’re making the beak.
-
5Flip the paper over and fold the bottom corner up to the top edge. Turn the paper so the back is facing you. Bring the bottom corner up, aligning it with the flat edge at the top of the owl before creasing it.[5]
- Make the crease at the base of the owl as straight as possible and parallel to the top edge.
-
6Fold the corner back down so the tip hangs over the bottom edge. Bring the corner down just slightly further than the bottom edge of the owl. Crease it so it stays in place, forming the tail.[6]
- If you don’t fold the corner down past the edge, you won’t be able to see the owl’s tail from the front.
Making an Advanced Origami Owl
-
1Fold a square piece of paper in half along both diagonals, then open it up. Bring 2 opposite corners together and crease the fold along the diagonal. Then repeat with the other 2 corners. After you’ve made both folds, open the paper to lay flat.[7]
Tip: If you’re using origami paper that has color on one side and is blank on the other, start with the color side facing up.
-
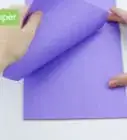
2Flip the paper over and fold it in half vertically and horizontally, then open it up. Once you turn the paper to the other side, fold it in half by bringing one edge over to the opposite edge. Open it back up and then fold the other 2 edges together. Lay it flat after you make both folds.[8]
- Line the edges up as perfectly as possible to keep your fold directly through the center of the paper.
-
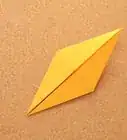
3Bring 2 opposite corners down to the bottom corner, creating a small diamond. Pull the left and right corner down to meet at the bottom corner. As you do so, the paper will automatically collapse onto itself along the creases you made previously. Press down with the palm of your hand to crease the folds so you end up with a flat diamond shape.[9]
- If your paper isn’t collapsing easily, go back and refold along the creases to loosen them up.
-
4Fold the left and right bottom edges of the top layer into the middle of the diamond. Holding the paper so that the open edges are at the bottom, take the 2 bottom edges of the top layer and fold them into the center. Align them so that the edges are flush with each other in the center.[10]
- Don’t overlap the edges in the middle or leave a gap. Try to line them up so they just barely touch.
-
5Fold the top corner down at the straight edge, then open the paper up to the small diamond. Fold down the top of the paper so that you crease it along the straight edge formed by the left and right edges. Then, open your last 3 folds so you’re back to the small diamond shape.[11]
- Run your finger firmly along the fold to create the crease.
-
6Open the top layer of the diamond, pulling it up and then flattening the left and right sides. Take the bottom corner and pull it upwards to open the top flap. Use your hands to flatten the 2 sides down along the folds you made previously.[12]
- Be very careful when pulling the layer open so that you don't rip the paper.
-
7Flip the paper over and repeat the same process of folding and flattening the flap. After you turn the paper over to the other side, do the same steps on the opposite side. Fold the left and right edges into the middle, then fold the top down. Unfold the paper to the small diamond, then open the top flap and flattening the left and right sides.[13]
- Check that the shape formed on this side perfectly matches the shape formed on the other side. If they aren’t aligned on top of each other, adjust your folds on the backside.
-
8Fold the front and back flaps down to create a kite shape. Take the 2 top flaps that you just flattened and fold them down. Keep them lined up directly on top of each other.[14]
- If the edges don't line up after you fold them down, refold them until the 2 flaps are perfectly on top of each other.
-
9Fold the top edges of the kite into the middle of the front, then do the same on the back. Take the left and right corners of the top flap and line up the top edges in the center of the kite. Then, flip the paper over and fold the corners of the back layer in, aligning the top edges.[15]
- Line up the edges so they rest against each other instead of overlapping.
-
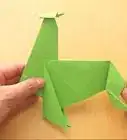
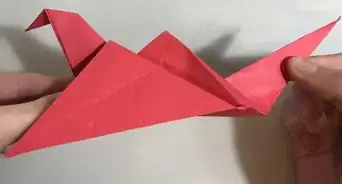
10Pull out the inside flaps on the left and right, and twist them forwards before flattening. To make the wings, lift up the inner flap on both the left and right sides. Twist them about 90 degrees so the flat piece is facing you. Then use your palm to press down on the twist to flatten and crease it.[16]
- Be patient with yourself! This is a tricky step so you may need to try twisting the wings a couple times before you get them to lay flat out to the sides.
- Even out the wings so they both point straight out at 90 degree angles from the middle of the owl.
-
11Fold the top corner down to the center, then fold the tip back up over the edge. Bring the top corner of both layers down together, creasing it once the corner is in the middle of the kite. Then, pull the tip back up past the top edge created by the crease to form the beak.[17]
- If you have trouble creasing the paper since it's so thick at this point, use a pencil or other object to help you press down on the fold to crease it.
-
12Fold the 2 top folds down about half the distance between the top and the wings. Take both the folds you just made and fold them back down to create the head. Make the fold no more than halfway between the top of the owl and the top of the wings.[18]
- You can make the head as large or as small as you'd like by adjusting the size of your fold.
Community Q&A
-
QuestionHow did you get the middle flap (the wings) in there?
 Community AnswerWatch the video for step 4 closely. Notice that two points of the original square are folded toward the inside of the model. Those points become the wings after the rest of the folds are completed.
 -
QuestionStep 7 is hard. How did you do it?
 Kat NordstromCommunity AnswerCarefully lift up the bottom corner. Then, you fold the sides in on the creases that have been previously made. It will end up looking like a thin kite.
 -
QuestionHow do I do step 7?
 CraftsmartTop Answerer(1) Take the corner of the top flap (2)Lift the flap upwards (3) Open completely (4) This one is the hard part, and it takes practice to manipulate the paper correctly. You want to press down and fold the paper so the green edges are centered in the diamond shape. (5) Repeat on the other flap.
References
- ↑ https://www.easypeasyandfun.com/simple-origami-owl/
- ↑ https://www.easypeasyandfun.com/simple-origami-owl/
- ↑ https://www.easypeasyandfun.com/simple-origami-owl/
- ↑ https://www.easypeasyandfun.com/simple-origami-owl/
- ↑ https://www.easypeasyandfun.com/simple-origami-owl/
- ↑ https://www.easypeasyandfun.com/simple-origami-owl/
- ↑ https://youtu.be/NnX8-E1OpGs?t=57
- ↑ https://youtu.be/NnX8-E1OpGs?t=110
- ↑ https://youtu.be/NnX8-E1OpGs?t=161
- ↑ https://youtu.be/NnX8-E1OpGs?t=184
- ↑ https://youtu.be/NnX8-E1OpGs?t=230
- ↑ https://youtu.be/NnX8-E1OpGs?t=249
- ↑ https://youtu.be/NnX8-E1OpGs?t=309
- ↑ https://youtu.be/NnX8-E1OpGs?t=368
- ↑ https://youtu.be/NnX8-E1OpGs?t=391
- ↑ https://youtu.be/NnX8-E1OpGs?t=492
- ↑ https://youtu.be/NnX8-E1OpGs?t=601
- ↑ https://youtu.be/NnX8-E1OpGs?t=626
About This Article

To fold a simple origami owl, fold a square piece of paper in half diagonally, crease the fold, and open the paper back up to lay flat. Next, bring the left and right corners in about halfway to the center to form the wings, which will look like small triangles. Then, fold the top corner down to the middle of the paper to make the head. Finally, flip the paper over, fold the bottom corner up to the top edge, and fold the corner back down so the tip hangs over the bottom edge. For tips on making a slightly more advanced version, read on!