wikiHow is a “wiki,” similar to Wikipedia, which means that many of our articles are co-written by multiple authors. To create this article, 20 people, some anonymous, worked to edit and improve it over time.
This article has been viewed 163,293 times.
Learn more...
An origami wolf is one of the easier animals to create and is a good warm up for more difficult origami animals like a dragon or a lion. Depending on your skill level, you can try your hand at a simple origami wolf, or a more complex origami wolf.
Steps
Creating a Simple Origami Wolf
-
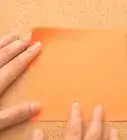
1Get a sheet of origami paper. You can also use A4 paper.
-
2Fold the paper in half from corner to corner. The paper should look like a triangle.Advertisement
-
3Fold the paper in half again from corner to corner. It should now look like an even smaller triangle.
-
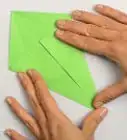
4Unfold the last fold you made. The paper should be in the shape of a triangle and have a nice, even vertical crease.
-
5Turn the paper so the top point of the triangle faces you. Then, fold the top right corner to the bottom point of the triangle. Use the center crease as a guide.
-
6Repeat the same fold on the left side. You should now have a diamond shape.
-
7Flip the paper over. Then, fold the left corner over to the right corner.
- You should now have a half diamond shape.
-
8Turn the paper so the longest angle of the triangle faces away from you. Fold the left corner over to the right side.
- This is going to be the wolf's tail, so fold it farther to the right for a bigger tail or less to the right for a smaller tail.
-
9Fold the right side of the paper so it just overlaps the small triangle you just made. Then, take the top half of the fold and unfold it back to the right.
- There should now be some of the fold on the left side, some of the fold on the right side and a new area in the middle.
-
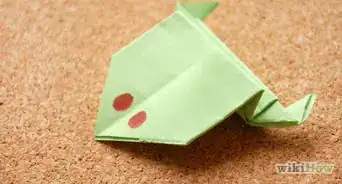
10Fold down the middle piece. This will create a nose for your wolf.
-
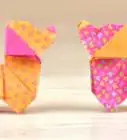
11Stand up the wolf. Admire your handiwork.


Creating a Complex Origami Wolf
-
1Get a piece of origami paper. You can also use A4 paper.[1]
-
2Fold the paper into vertical quarters. There should be four thin panels.
-
3Fold the quarters on top of each other. This will be similar to the pleats in an accordion.
-
4Make four inside reverse folds. Do this by taking the corners of the paper and folding them inside the folds.[2] The paper should look like a triangle with four small triangles inside each corner.
-
5Inside reverse fold the small triangles. They should now appear inside the larger triangles.
-
6Rabbit-ear the top triangle flaps. Make this fold on both sides of the paper. This will make the paper more narrow.
-
7Fold the top of the paper down. Tuck the top of the paper down inside the “body” of the wolf.
-
8Fold back the front two flaps. This will make the head of the wolf.
-
9Crimp the area right before the two flaps. Crimping means pushing the front of the two flaps back at an angle.[3] This will add dimension to the wolf's neck.
-
10Inside reverse fold the top part of the neck. Bend the top part of the neck towards the body of the wolf. This will create wolf ears.
-
11Fold back the back part of the triangle. This will create a tail so adjust it based on how long or short you want the wolf's tail to be.
-
12Crimp the tail. This will raise it up so the wolf doesn't have a limp tail.
-
13Mountain fold the tail. A mountain fold is when the crease sits at the top of the paper like the peak of a mountain.[4] Doing a mountain fold will narrow the tail.
- To give the wolf more detail, mountain-fold the back of the wolf's body. As well, you can crimp the front and hind legs.
-
14Shape the wolf's body. To do this, reverse-fold the tip of the tail.
- Form hooves on the wolf by outside reverse folding the tip of the legs. Then, outside reverse fold the small triangle or tip on the legs.
-
15Shape the wolf's head. Create more detailed ears by squash folding the ears and then valley folding them to create two perky ear flaps.
- A valley fold is when the crease is at the bottom of the paper and the paper folds upward to create a valley shape.[5]
- Crimp the wolf's head and mountain-fold the wolf's neck.
- Outside reverse fold the tip of the wolf's mouth.
-
16Stand your wolf up. Admire your handiwork.


Community Q&A
-
QuestionWhat is a mountain fold?
 Community AnswerA mountain fold is where the paper folds towards you when you are facing the flat side of the paper.
 -
QuestionI don't get it. Do I have to use an origami square paper or an A4 size printer paper?
 Community AnswerThe first one is made with origami paper, and the second one is made out of A4 paper.
 -
QuestionI don't get step 4! What do you mean?
 Community AnswerIn step 3 you have a triangle and then you fold it in half so that it is a smaller triangle, right? In step 4 you just unfold step 3 and then it will look like it did after step 2 again.
References
- ↑ http://www.origami-resource-center.com/origami-animals.html
- ↑ http://www.origami-instructions.com/origami-inside-and-outside-reverse-folds.html
- ↑ http://www.origami-resource-center.com/crimp-fold.html
- ↑ http://www.origami-instructions.com/origami-valley-and-mountain-folds.html
- ↑ http://www.origami-instructions.com/origami-valley-and-mountain-folds.html
About This Article
To make a simple origami wolf, start with a piece of square origami paper. Fold the paper in half from corner to corner to form a triangle. Fold the triangle in half again, then unfold it to leave a crease down the middle. With the top point facing you, fold the right corner to the bottom point of the triangle. Then, fold the left side down in the same way. Flip the paper over and fold the left corner over to the right corner to give you a diamond shape. After that, turn the paper so the longest angle of the triangle faces away from you and fold the left corner over to the right to make the wolf’s tail. Fold the right side of the paper so it overlaps the tail. Finally, fold the top middle triangle down to make the wolf’s nose. For more tips, including how to make a realistic origami wolf, read on!