This article was co-authored by wikiHow staff writer, Eric McClure. Eric McClure is an editing fellow at wikiHow where he has been editing, researching, and creating content since 2019. A former educator and poet, his work has appeared in Carcinogenic Poetry, Shot Glass Journal, Prairie Margins, and The Rusty Nail. His digital chapbook, The Internet, was also published in TL;DR Magazine. He was the winner of the Paul Carroll award for outstanding achievement in creative writing in 2014, and he was a featured reader at the Poetry Foundation’s Open Door Reading Series in 2015. Eric holds a BA in English from the University of Illinois at Chicago, and an MEd in secondary education from DePaul University.
There are 18 references cited in this article, which can be found at the bottom of the page.
This article has been viewed 23,618 times.
Learn more...
The table is a key piece of furniture in any RV or camper. It’s where your friends and family meet to play cards, eat dinner, and socialize while you’re on vacation or travelling. Unfortunately, the RV table is often a fairly weak piece of furniture, and it can easily become wobbly or broken. This is usually because there is only one bracket, called a pedestal mount, supporting the table and holding it in place. Luckily, this piece is fairly easy to level if your table wobbles, and you can replace it with a reinforced version if the bracket isn’t stable. You can also opt to install an additional support beam to take some of the weight off of the pedestal mount and prevent wobbling in the future.
Steps
Fixing a Wobbly RV Table
-
1Loosen the screws on the pedestal mount around the base of the table leg. Loosen the screws holding the pedestal mount in place with a drill or screwdriver. The pedestal mount is the round bracket that sticks out of the floor and wraps around your table leg. If your table isn’t level and it slides around in place, you can fix the table by leveling this mount and reinforcing it with shims.[1]
- If these screws come out easily but they were flush with your floor, get some slightly longer and bigger wood screws. For example, if you have #5 screws, get some #6 screws. If the mount seems secure though, you can reuse your old screws.
- Expect to spend 15-20 minutes fixing your wobbly table.
Tip: This method is your best choice if the pedestal mount and table feel loose but there’s nothing visibly wrong with either piece. Often, the pedestal mount is wobbly because it isn’t flush against the floor or the table is putting pressure on the mount because the floor isn’t even.
-
2Adjust the tabletop until by hand until it’s level. Set a spirit level horizontally on top of the table. Grab the edge of the tabletop by hand and slide it back and forth until the tabletop is even and flat. Once the level reads that the tabletop is even, rotate it 90-degrees to ensure that the table is flat and even on both sides. Continue moving the tabletop by hand until the table is perfectly flat.[2]Advertisement
-
3Slide shims between the pedestal mount and the floor to keep the leg in place. Grab some wood shims. Hold the tabletop steady with your nondominant hand. Use your free hand to slide shims in between the pedestal mount and the floor to brace it and keep it level. Continue adding additional shims to the opposite side that you tilted the table until the pedestal mount is resting firmly in place and doesn’t wobble when you move it.[3]
- For example, if you tilted the table against the wall to the right, slide shims under the left-side of the pedestal mount on the aisle-side of the table.
- You can use a rubber mallet to tap the shims into place if the tabletop is resting against the wall. Do not do this if the wall and table are not touching, though. So long as the shims are wedged between the floor and the mount, you don’t need to worry about forcing them fully under the bracket.
- If your table is still wobbly after inserting the shims, remove the screws entirely and slide shims over the screw slots to fill in the gap where your screws go.
-
4Screw your wood screws back into the pedestal mount. Use the original screws to reinstall the pedestal mount if the screws seemed solid when you first removed them. If they were really easy to remove, use slightly bigger wood screws to secure the mount in place. Drill the screws through the slots around the edge of the pedestal mount to adhere it to the floor. The shims will now brace your table in place and keep it from wobbling or coming loose.[4]
- If there are shims covering the screw slots, drill slowly through each shim to avoid cracking the wood.


Reinforcing a Weak Pedestal Mount
-
1Get a replacement pedestal mount from your RV manufacturer. The pedestal mount is the round bracket that holds your RV table in place. Contact your RV’s manufacturer and order a replacement. This is the best solution if your table is incredibly weak and wobbly but your pedestal mount is firmly installed in the ground.[5]
- If the table is an after-market addition, contact the company that made the table. Their name is usually printed on a sticker underneath the table. If there isn’t a sticker, search online and compare your pedestal mount with random models until you find your specific mount.
- This process takes roughly 30-45 minutes, but you do need at least 24 hours of drying time on top of the work you’ll be doing.
Tip: This is your best option if the pedestal mount appears to be stable and firm but the table leg is wobbling inside of it. This often happens if the pedestal mount is kind of cheap or the inside rim of the pedestal mount gets bent over time.
-
2Sand the inside of the replacement mount with 200-grit sandpaper. Take your replacement pedestal mount and flip it upside down. Grab a sheet of 200- to 300-grit sandpaper and scrape the interior of the mount. Scrape the outer and inner sides hollow mount to ensure that you rough up the metal. If you don’t sand the mount, your cold weld compound may not bind with the metal.[6]
- When the replacement mount is turned upside down, it looks kind of like a hollow donut that has been cut in half. The table leg slides through the middle and the exterior edge connects to the floor. You are going to fill the valley inside of the mount with cold welding compound and nails to reinforce it—kind of like the rebar in a column of concrete!
-
3Mix a cold weld compound together with a mixing stick or straight edge. Put on a thick pair of work gloves. Grab a paper plate and open your first tube of welding compound. Squirt the entire tube into the middle of the plate. Then, take your second tube and squirt it on top of the gel. Use a small mixing stick, piece of plastic, or chunk of cardboard to mix the 2 gels together until they turn into an even shade of gray.[7]
- Cold weld compound will not bind with metal until it’s activated, so you need to mix it thoroughly before you apply it to the pedestal mount.
- Cold weld compound comes with 2 tubes that you mix together to create an epoxy. It is usually used to bond iron, steel, brass, or aluminum. Cold welding is weaker than hot welding, but it’s much easier to do.
- You need roughly 1 ounce (28 g) of compound to do this. You can purchase cold welding compound from any construction store.
-
4Fill the interior of the pedestal mount with loose wood screws. Keep the pedestal mount upside down and grab a pack of wood screws. Pour 15-20 screws into the valley between the exterior edge and interior opening of the pedestal mount. Add the wood screws evenly around the opening in the middle of the pedestal mount until it’s roughly halfway full.[8]
- The screws don’t need to lay perfectly flat for this to work, but you can adjust them by hand to make them even if you want it to look a little cleaner. It doesn’t really matter since your pedestal mount will be installed right-side up and this area will be completely hidden.
-
5Pour your cold weld compound into the pedestal mount. Grab an expired gift card or rip off a piece of cardboard. Scoop the epoxy up and pour it into the valley in your pedestal mount. Scrape the epoxy against the nails to remove any epoxy that’s still sticking to the straight edge or cardboard. Continue pouring your compound around the inside of the pedestal mount until every side has an even amount of epoxy.[9]
- This should look like there’s a small pool of compound filling every side of the pedestal mount. Don’t worry if there are a few screws sticking out.
-
6Let the compound dry for at least 24 hours. Most cold welding compounds take at least 12 hours to dry. Since you’re adding such a thick layer, it’s a good idea to let the compound sit for at least 24 hours. Leave your pedestal mount upside down and let it air dry for at least 24 hours.[10]
- Cold welding epoxy isn’t toxic, but it can smell kind of nasty. Leave your windows open to avoid stinking up your RV or home.
-
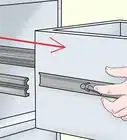
7Remove the old pedestal mount and lift your table out. Grab a drill and unscrew the support screws that are holding your current pedestal mount in place. You can reuse your old screws, so set them aside if you’d like to save them. Once the pedestal mount is unscrewed, lift your table up out of the floor. Set it down away from the area where you’re working and discard your old pedestal mount.[11]
- RV tables are rarely very heavy. You should be able to lift it out on your own.
- Some RV tables have a hinge holding it against the wall. Unscrew this hinge as well if you have one.[12]
-
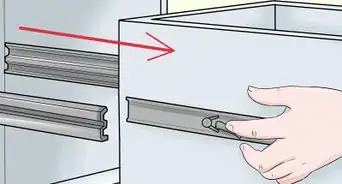
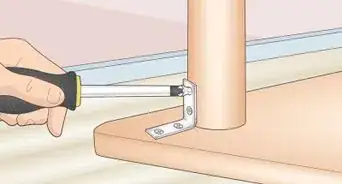
8Drill your new pedestal mount into the floor and reinstall your table. Set your new pedestal mount down on the ground and line up the old screw slots with your new pedestal mount. Use your old screws to install your new piece. Each screw should be flush with the mount and firmly in place. Reinsert your table by sliding the leg on top of the pedestal mount and lowering it into place.[13]
- Your table will now be sturdier than it previously was since the pedestal mount is no longer hollow. It will not bend in the future since the area inside of the mount is filled with a strong set of nails and welding compound.


Adding an Additional Support Beam
-
1Get a length of 2 by 2 in (5.1 by 5.1 cm) hard wood and 4 L-brackets. If you want to reinforce the table with an additional leg, purchase a length of hardwood that is 2 by 2 inches (5.1 by 5.1 cm) and at least 80 inches (200 cm) in length. In addition, pick up 4 L-brackets, which are L-shaped supports designed for reinforcing furniture and shelving.[14]
- This support beam will sit diagonally from the corner of the wall to the center of your table. This will help stabilize the vertical legs and keep them from swaying, kind of like a tripod.
- You can get a smaller piece of wood if you’d like, but 80 inches (200 cm) should be long enough for you to make 2 support beams, since table legs are usually around 25–35 inches (64–89 cm) in height. You aren’t required to install 2 support beams, but it’s good to have an extra piece of wood in case you miscut the first once.
- This will take 2-4 hours depending on how good you are with a saw.
Tip: This is the best option if there’s nothing intrinsically wrong with your table but you want to ensure that it doesn’t break or become loose in the future.
-
2Measure from the center of the table’s underside to the corner of the wall. Grab a measuring tape. Pull it out and measure the distance from the center of your table to the corner of the wall underneath it. Note this measurement by marking this distance on your length of wood with a carpentry pencil.[15]
- You can put your support beam a little past the center on the aisle-side of the table if you prefer.
-
3Cut your wood to size with a 45-degree cut on each end. Put on a dust mask, protective eyewear, and thick gloves. Hold a speed square flat against the edge that you’re cutting. Use a circular saw or handsaw to trim your board based on your measurement. On each end that you marked, cut a single 45-degree notch into the end of the wood on each end to create a flat platform. Use the angular edge of your speed square as a straight edge for each cut.[16]
- The 45-degree cuts should be symmetrical. In other words, if the cut on one end leads away from you, the cut on the other end should lead towards you.
-
4Drill 2 L-brackets into the top piece of your wood. Take an L-bracket and hold it against the end of your wood. Line the top piece of the L-bracket up with the edge that you cut so they’re flush with one another. Drill 1–1.5 in (2.5–3.8 cm) wood screws into the openings on the bracket to attach it to your wood. Flip the wood over and install a symmetrical bracket on the opposite side that matches your first L-bracket.[17]
- You should have more than enough room on the L-bracket to line the top of the bracket up with the cut and secure the bottom half of the bracket to the wood.
- This should look like there are 2 metal tabs sticking out of the top of your support beam.
-
5Add 2 additional brackets at the base of the support beam. Flip your beam around and repeat this process on the other end of the wood. Drill 2 L-brackets into the support beam so that the tabs on the L-brackets are flush with the bottom cut. You should now have a support beam with 2 L-brackets drilled into each end of the beam.[18]
- These brackets should also sit flush with the edge. The top and the bottom of your support beam should now have a metal tab sticking out of each side at the edges where you made your cuts.
-
6Drill wood screws through the top bracket into the bottom of the table. Hold the support beam under your table. Adjust the beam until the top brackets are flush against the bottom of the table and the bottom of the beam is flush against the floor in the corner of the adjacent wall. Use 1 in (2.5 cm) wood screws to attach the brackets at the top of the beam to your table.[19]
- If your table is thinner than 1 in (2.5 cm), use smaller wood screws. You do not want the screws to penetrate the top of the table.
- Your support beam should sit at roughly a 45-degree angle from the middle of your table to the nearby corner on the floor.
-
7Secure the brackets near the wall by drilling them into the floor. Grab a set of 1.5 in (3.8 cm) wood screws and drill them into the screw slots on the L-brackets at the bottom to attach it to your floor. This will secure your support beam and keep it from sliding around on the floor. You now have an additional table leg holding the tabletop in place against the wall.[20]
- You can repeat this process to install a parallel support beam next to your first beam if you want additional support.
- The beam should be perfectly flush with the floor and the table. If it isn’t, remove your screws and reposition the beam so that it sits flush.


Warnings
- Always wear protective eyewear, gloves, and a dust mask when operating a power saw. Keep your hands at least 6 inches (15 cm) away from the blade while you’re making your cuts.⧼thumbs_response⧽
Things You’ll Need
Fixing a Wobbly RV Table
- Drill
- Spirit level
- Wood shims
Reinforcing a Weak Pedestal Mount
- Replacement pedestal mount
- Screws
- Cold welding compound
- Straight edge
- Gloves
- Drill
Adding an Additional Support Beam
- Wood beam
- L-brackets
- Measuring tape
- Carpentry pencil
- Screws
- Protective eyewear
- Dust mask
- Sawhorses
- Gloves
- Circular saw or handsaw
- Drill


References
- ↑ https://youtu.be/82f6Mz7vkc0?t=48
- ↑ https://youtu.be/82f6Mz7vkc0?t=102
- ↑ https://youtu.be/82f6Mz7vkc0?t=90
- ↑ https://youtu.be/82f6Mz7vkc0?t=115
- ↑ https://youtu.be/3ZJIqDLehQ4?t=31
- ↑ http://www.aeroelectric.com/Reference_Docs/Misc_PDF/J-B%20Weld.pdf
- ↑ https://youtu.be/8AlegDlzJfk?t=195
- ↑ https://youtu.be/8AlegDlzJfk?t=352
- ↑ https://youtu.be/8AlegDlzJfk?t=376
- ↑ https://youtu.be/8AlegDlzJfk?t=416
- ↑ https://youtu.be/8AlegDlzJfk?t=494
- ↑ https://youtu.be/vplQ2ldtHEA?t=36
- ↑ https://youtu.be/3Bd5H56GIIg?t=256
- ↑ https://youtu.be/82f6Mz7vkc0?t=160
- ↑ https://youtu.be/82f6Mz7vkc0?t=160
- ↑ https://youtu.be/82f6Mz7vkc0?t=283
- ↑ https://youtu.be/82f6Mz7vkc0?t=348
- ↑ https://youtu.be/82f6Mz7vkc0?t=381
- ↑ https://youtu.be/82f6Mz7vkc0?t=471
- ↑ https://youtu.be/82f6Mz7vkc0?t=471
About This Article