This article was co-authored by wikiHow Staff. Our trained team of editors and researchers validate articles for accuracy and comprehensiveness. wikiHow's Content Management Team carefully monitors the work from our editorial staff to ensure that each article is backed by trusted research and meets our high quality standards.
This article has been viewed 24,811 times.
Learn more...
Painting your surfboard is a fantastic way to make yourself really stand out on the beach or in the water. A painted board is also a great addition to beach-themed room decor. Whether you plan on riding the waves on your painted surfboard, or hanging it up on the wall, you'll want to do it right to ensure the colors really pop and the design doesn't chip or flake off.
Steps
Cleaning Your Surfboard
-
1Scrape off any surf wax from the surface of the board. You'll want to make sure you remove all wax from the painting area in order to have a clean, smooth surface on which to paint. If you don't remove the wax completely, your paint won't be able to stick to the board consistently.[1]
- Put the board out in the sun for about 10 minutes. The hot sunlight will melt any residual wax, making it easier to scrape off.
- Alternatively, if it's not sunny out, you can use a hairdryer to heat the wax and cause it to melt.
- Use a wax comb or the edge of a credit card to scrape off the melted wax.
-
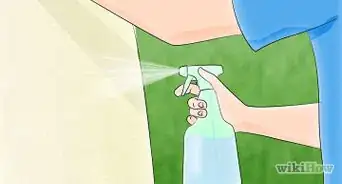
2Use mineral turpentine, then acetone, to fully remove wax residue. Scraping may get the bulk of the wax off, but it still leaves behind a thin, waxy residue that can prevent paint from sticking to the board.[2]
- Wet a clean rag with mineral turpentine and wipe down the surface to remove the last bits of wax.
- Use a clean rag dampened with acetone to wipe away any residual turpentine. Turpentine acts as a paint thinner, so you'll want to make sure you remove any trace of it from the surface of your board before painting.
- Make sure you're not using the same rag for the acetone that you did for the turpentine.
Advertisement -
3Use 240 grit sandpaper to lightly sand the areas you'll be painting. Paint doesn't stick so well to the smooth, glossy finish of a fiberglass surfboard. Sanding the finish off of your board will give you a slightly more textured surface that will accept paint much more easily. And don't worry, you'll restore that shiny top coat at the end of the process![3]
- You can either sand by hand or use an electric sander here if you have one. Either option will work fine, but the electric sander will probably be a little easier and quicker to use.
- When you're finished sanding, the area should look slightly dull. You may have to go over it two or three times in order to fully remove the shiny top coat.


Painting the Base of Your Design
-
1Mark off the areas you don't want to paint using painter's tape. Line the edges of the design, as well as any other areas you don't want to paint, with tape to prevent spillover and to ensure clean, neat border lines. Using long strips of tape instead of several short strips will allow you to create smoother lines.[4]
- You can also tape down newspaper or cardboard to cover larger sections that you don't want to paint.[5]
-
2Spray an even layer of color onto the board for the background. Using the acrylic spray paint, coat the desired area with your chosen background color. You may need to use multiple coats to achieve a smooth, even background color.[6]
- Hold the can about 8 inches away from the board while spraying.
- Be sure the background coat has enough time to dry before moving onto painting the foreground.
-
3Mark out your design on the board using a pencil, chalk, tape or stencils. Before you begin painting, it's useful to plot out your design on the board, and then fill it in with paint. You'll be less likely to make mistakes this way than by directly applying paint freehand.
- If you do prefer to draw freehand, use a pencil or white chalk to lightly sketch your design onto the board. Using pencil or chalk will allow you to correct any last minute mistakes before you begin painting your design. It'll also make it easier to apply colors in precisely the right areas of the board. The pencil or chalk lines will not be visible on the finished product.[7]
- If you prefer geometric patterns, use masking tape to create your desired shapes, stripes, or designs. You can use a ruler and a razor blade to square off any uneven tape ends. Make sure you press your tape down firmly so paint doesn't seep underneath the taped areas. In addition to marking off your design, cover up any background space that you don't want to paint.[8]
- You can also use store-bought or homemade stencils to create your design. Apply your stencils in the desired areas and use masking tape to secure them to the board. Make sure you tape all the way around the stencil to prevent paint from leaking through. Tape off an extra 4 inches (10 cm) or so around the stencil to prevent paint splatter.


Painting Your Design
-
1Fill in your design using paint pens, permanent markers, or spray paint. This is where your design finally comes to life! Depending on what method you used to mark out your design, you'll either hand draw or spray paint your design.
- If you drew a freehand design with pencil or chalk, start filling in the main colors of your image with paint pens and permanent markers. Try to color within the lines you sketched as much as possible to ensure a clean, neat result.[9]
- If you used tape or a stencil to create a design, spray paint the taped or stenciled area with your desired colors. It may take more than one coat to produce an even fill. Make sure you don't remove the tape or stencils until the paint is completely dry.[10]
-
2Use paint pens to add shadows and highlights. Adding dark shadowing will create the illusion of depth in your painting, making for a much more engaging image. Using lighter colors as highlights can help draw the eye to the focal point of your painting. Using these two techniques together can make for an image that really pops![11]
- Lighter colors can help draw the eye to the focal point of your painting, whereas dar
-
3Use black marker or paint pen to add outlines to hand-drawn images. Adding black outlines to your image will allow each individual color to seem brighter and more defined. Be sure to use the same width outlines throughout the image. Using a medium- or thick-tipped marker will make it easier to maintain consistency in your line width.[12]
- If you used tape or stencils, your edges may be sharp enough that you don't need to fill in black outlines.


Drying and Sealing Your Painted Surfboard
-
1Place your board outside in the sun to let it dry. If it isn't sunny outside, it will probably take more time for the paint to dry. Don't rush this step! You'll want to make sure the paint is completely dry before moving on. If necessary, let the board sit overnight to fully dry.
-
2Remove the tape and stencils, carefully. Once you've confirmed that the paint is dry, begin removing any masking tape and stencils. Pull off tape slowly and smoothly. Going too fast could cause it to tear, making it harder to fully remove the tape from the painted board.[13]
-
3Cover your finished painting in a clear, glossy acrylic sealant. Spraying a glossy clear coat will both prevent your painting from wearing away, and restore a nice shine and smoothness to the area you painted. Plan on spraying as many as 4 coats of sealant on top of your painting.[14]
- After spraying on the first coat of sealant, make sure you let it dry completely.
-
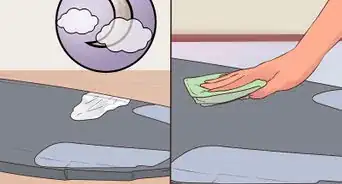
4Use 1200 grit sandpaper to smooth out the surface, then wipe clean. Using a light sandpaper will smooth out the clear-coated surface without disturbing the paint underneath. After lightly sanding, wipe down the area with a clean, wet rag, and then let the board dry.[15]
-
5Reapply the clear coat 3 more times, sanding and wiping between each coat. Each time you apply another coat, you're better protecting your painting from being scratched or flaking off. And by sanding every time, you're ensuring that the painted area will feel as smooth as the rest of your board.[16]
- Applying too much clear coat will prevent it from blending in with the rest of your board's natural shine.


Warnings
- Always use a face mask and eye protection when sanding.⧼thumbs_response⧽
- Only use turpentine, acetone and spray paint in a well-ventilated area or outside.⧼thumbs_response⧽
- Wear gloves to prevent skin irritation from the turpentine and acetone.⧼thumbs_response⧽
Things You'll Need
- 3 clean rags
- A wax comb, credit card, or other-similarly shaped object
- Sandpaper in both 240 grit and 1200 grit
- Electric sander (optional)
- Mineral turpentine
- Acetone
- Water
- Acrylic spray paint in the colors of your choice
- Clear, glossy acrylic sealant spray paint
- Paint pens and/or permanent markers
- Masking or painter's tape
- Stencils (optional)
- Newspaper (optional)
- Gloves
- Face mask
- Eye protection


References
- ↑ https://www.theinertia.com/music-art/how-to-paint-a-surfboard-fieldey-style/2/
- ↑ https://www.theinertia.com/music-art/how-to-paint-a-surfboard-fieldey-style/
- ↑ https://www.theinertia.com/music-art/how-to-paint-a-surfboard-fieldey-style/
- ↑ https://www.surfer.com/blogs/how-to/wrap-rails-color/
- ↑ https://www.surfer.com/blogs/how-to/wrap-rails-color
- ↑ https://www.theinertia.com/music-art/how-to-paint-a-surfboard-fieldey-style/
- ↑ https://www.theinertia.com/music-art/how-to-paint-a-surfboard-fieldey-style/2/
- ↑ https://www.youtube.com/watch?v=weLJu0TnmBM
- ↑ https://www.surfinglife.com.au/surf-school/paint-like-pro-louis-gervais/
- ↑ https://www.youtube.com/watch?v=weLJu0TnmBM
- ↑ https://www.theinertia.com/music-art/how-to-paint-a-surfboard-fieldey-style/2/
- ↑ https://www.theinertia.com/music-art/how-to-paint-a-surfboard-fieldey-style/2/
- ↑ https://www.youtube.com/watch?v=weLJu0TnmBM
- ↑ https://www.theinertia.com/music-art/how-to-paint-a-surfboard-fieldey-style/2/
- ↑ https://www.theinertia.com/music-art/how-to-paint-a-surfboard-fieldey-style/2/
- ↑ https://www.theinertia.com/music-art/how-to-paint-a-surfboard-fieldey-style/2/
- ↑ https://www.theinertia.com/music-art/how-to-paint-a-surfboard-fieldey-style/
- ↑ https://www.surfinglife.com.au/surf-school/paint-like-pro-louis-gervais/
About This Article