This article was co-authored by Jeanine Hattas Wilson and by wikiHow staff writer, Jessica Gibson. Jeanine Hattas Wilson is a Professional Painter and the President of Hattas Public Murals, Inc. With nearly 20 years of experience, Jeanine specializes in creating, overseeing, designing, and painting murals. Jeanine holds a BA in Advertising from Marquette University and a Studio Painting Minor from The Milwaukee Institute of Art & Design. She has studied at The Atelier Artien in Paris, France, Los Angeles Academy of Figurative Art, and under renowned artists such as Robert Liberace, Michael Siegel, and William Cochran. To date, Hattas Public Murals has painted nearly 5,000 commissioned works of art in homes and commercial and public spaces.
There are 17 references cited in this article, which can be found at the bottom of the page.
This article has been viewed 15,633 times.
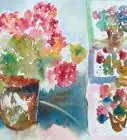
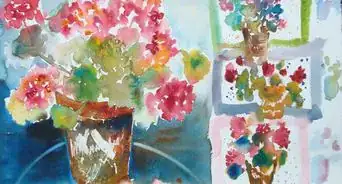
Tulips are a great flower for a beginner to paint. Their basic cup shape makes them quick to paint and easy to recognize. If you don't feel comfortable painting the tulips freehand, sketch a light outline of the tulip, its stem, and its leaves before you begin. Then, fill in the flower with your favorite acrylic paint colors.
Steps
Painting a Base Coat
-
1Brush a coat of acrylic paint over the entire surface of your canvas. Since you'll be loading your paintbrush with a few colors, they'll blend together better if there's already paint on the canvas to work onto. Use a large flat brush to paint your canvas white or medium gray and let it dry.[1]
- Use white if you don't want a noticeable background. Medium gray is a good choice if you want white highlights in the tulips' petals to really stand out.
-
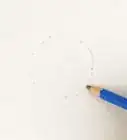
2Sketch the outline of the tulips on the canvas. Take a sharp pencil and lightly draw an oval that's as large as you want a tulip to be. Then, draw the outline of its stem and sketch a few leaves extending from the stem. Sketch as many tulips as you like.[2]
- To make several tulips, draw as many outlines as you want.
- If you feel comfortable painting without an outline, you can skip this step.
Tip: Making an outline on the canvas can make it easier for you to focus on the paint colors instead of the shape of your flowers.
Advertisement -
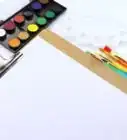
3Fill your palette with your choice of paints. To make the stems and petals, you'll need 2 to 3 shades of green. Consider using a kiwi, olive, and grass green. Squirt a coin-sized amount of each on your palette. You'll also need to decide what color to make the tulip's petals. Squeeze this color on your palette along with a plain white.[3]
- For example, you might choose ultramarine blue, crimson red, or cadmium yellow for the tulip petals.


Making the Petals
-
1Load a flat brush with 2 paint colors. Take a 1⁄2 inch (1.3 cm) flat brush and dip 1 corner of it in 1 of the colors you'd like the petals to be. Dip the other corner in another petal color or use white.[4]
- You'll use the flat brush for the tulip's petals, stems, and leaves.
- If you'd like the tulips to mainly be 1 color, you'd dip the brush in blue and white, for instance. If you'd like tulips with a variety, try loading the brush with yellow and red.
Tip: If you'd like your tulips to have a thick texture that's visible on the canvas, use a palette knife instead of a paintbrush to apply the paint.
-
2
-
3Hold the brush so the bristles are vertical. Since you have 2 distinctive colors on your brush, decide which color you'd like the tips and edges of the petals to be. Hold your paintbrush so the flat bristles are vertical instead of horizontal.[7]
- The color on the tip that's near the top of the brush will be the edges and tips of the flower while the color on the bottom tip will form the center of the petals.[8]
-
4Paint a curved cup shape without twisting the brush. Press your loaded paintbrush on the canvas and move it in a horizontal half-circle so it resembles a cup without a handle.[9]
- This will make a basic tulip shape for you to add petals to.
- You'll see distinctive color on the tips with your other color near the base of the tulip.
-
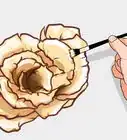
5Make 1 petal on each edge of the tulip. Position your paintbrush on 1 side of the tulip cup that you just made. To make 1 petal, press the brush on the canvas and bring it up as high you'd like the tulip to be with a single stroke. Keep your brush on the canvas without lifting it and curve it back down so it narrows towards the base of the tulip. Repeat this for the other side of the tulip cup so you have a small gap in the middle of the tulip and 2 defined petals on the sides.[10]
- Load your paintbrush with more paint as often as you need.
- Wiggle your brush slightly as you bring it up. This will give the petal a little texture.
-
6Create a large petal in the middle of the tulip. Press your brush in the center near the base of the tulip and make 1 circular stroke that goes up and over so you return the brush to the base. This makes a large petal that will slightly overlap the petals on the sides.[11]
-
7Paint additional petals on the side if you want a fuller tulip. Place your paintbrush next to the top of a petal that's on the edge. Press down and drag your brush at an angle so you create a sliver of a petal, which will make your flower look like it's open.[12]
- If you're painting a tulip that's barely open, you can skip this step.
-
8Repeat the process for each tulip. Try to vary the tulips a little so they look realistic. You can make some of the tulips fuller than others by adding more petals or make tightly closed tulips that are smaller.[13]


Creating the Stems and Leaves
-
1Load the flat paintbrush with 2 green paints for the stem. Take a clean flat paintbrush and dip 1 tip into the grass green paint. Then, dip the other tip into the olive green paint and brush the loaded paintbrush onto your palette a few times to blend the middle of the brush.[14]
- Feel free to play around with different shades of green for your stem.
-
2Press the brush at the base of the petals and pull it down to make the stems. Turn the brush so the bristles are pointed vertically and slowly drag the brush down and away from the petals. This will create a narrow stem. Repeat for each tulip.[15]
- Make your stem any length you like. If you're painting several tulips, you could make them different lengths or paint them so some of them overlap.
-
3Blend a light green with the grass green and load your flat paintbrush. Dip the light green tip of your paintbrush into the kiwi green on your palette and dip the other tip into the grass green paint.[16] Rub the brush horizontally on the palette to work the paint into the brush.[17]
- Feel free to use any colors you like.
-
4Paint slender, tapered leaves on the stems. Hold the brush so the bristles are vertical and place it on a stem. Paint a slender leaf that tapers at the end by moving the brush up and away from the stem. Press firmly when you reach the middle of the leaf. Then, press gently so the leaf tapers. This will give you a slender leaf at the base that widens at the middle before narrowing at the tip.[18]
- Pressing firmly will make your brush fan out, which will make the leaf wider at that point.
- Paint a different number of leaves on each stem to add variety. For example, if you're drawing 4 tulips, 1 tulip might have 2 leaves, while 2 flowers have none, and 1 has 3 leaves.
Tip: Wiggle your paintbrush a little as you're making the edges of the leaves. This will make them look as though they're curling in slightly.
-
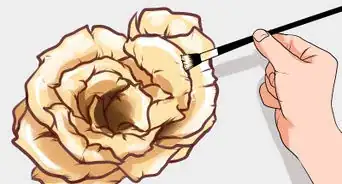
5Add details or highlights with the script liner brush. Once you've painted the tulips and their stems with leaves, go back with a #2 script liner brush. Load it with the olive green and use it to paint detailed veins on the leaves if you like.[19]
- A script liner brush has a fine point.
- You can also use the script liner with a kiwi green to highlight edges of the leaves or make them look textured.


Expert Q&A
-
QuestionHow do you paint realistic flower petals?
 Jeanine Hattas WilsonJeanine Hattas Wilson is a Professional Painter and the President of Hattas Public Murals, Inc. With nearly 20 years of experience, Jeanine specializes in creating, overseeing, designing, and painting murals. Jeanine holds a BA in Advertising from Marquette University and a Studio Painting Minor from The Milwaukee Institute of Art & Design. She has studied at The Atelier Artien in Paris, France, Los Angeles Academy of Figurative Art, and under renowned artists such as Robert Liberace, Michael Siegel, and William Cochran. To date, Hattas Public Murals has painted nearly 5,000 commissioned works of art in homes and commercial and public spaces.
Professional PainterTry to make the petals look fairly translucent. With real flowers, light can usually shine through the petals. -
QuestionHow do you paint a flower shadow?Jeanine Hattas WilsonJeanine Hattas Wilson is a Professional Painter and the President of Hattas Public Murals, Inc. With nearly 20 years of experience, Jeanine specializes in creating, overseeing, designing, and painting murals. Jeanine holds a BA in Advertising from Marquette University and a Studio Painting Minor from The Milwaukee Institute of Art & Design. She has studied at The Atelier Artien in Paris, France, Los Angeles Academy of Figurative Art, and under renowned artists such as Robert Liberace, Michael Siegel, and William Cochran. To date, Hattas Public Murals has painted nearly 5,000 commissioned works of art in homes and commercial and public spaces.
Professional PainterTry to use white instead of black. Black tends to make things look a bit exaggerated or cartoon-like, which isn't ideal. Instead, use the base shade of the flower to paint the shadows. For instance, if you were painting a pink flower, you could use pink to build the shadows.
Things You'll Need
- Paintbrushes
- Canvas
- Container of water
- Cloth for blotting the brush
- Acrylic paint
- Palette knife, optional
References
- ↑ https://youtu.be/lDK9IFxKyrA?t=31
- ↑ https://youtu.be/lDK9IFxKyrA?t=76
- ↑ https://goldenhub.goldenpaints.com/storage/uploads/cool-to-warm-order-for-golden-heavy-body-acrylics.pdf
- ↑ https://youtu.be/lDK9IFxKyrA?t=118
- ↑ Jeanine Hattas Wilson. Professional Painter. Expert Interview. 11 May 2021.
- ↑ https://youtu.be/lDK9IFxKyrA?t=122
- ↑ https://youtu.be/lDK9IFxKyrA?t=155
- ↑ Jeanine Hattas Wilson. Professional Painter. Expert Interview. 11 May 2021.
- ↑ https://youtu.be/w0v_PBEdhH4?t=257
- ↑ https://youtu.be/w0v_PBEdhH4?t=312
- ↑ https://youtu.be/w0v_PBEdhH4?t=386
- ↑ https://youtu.be/w0v_PBEdhH4?t=409
- ↑ https://youtu.be/lDK9IFxKyrA?t=226
- ↑ https://youtu.be/lDK9IFxKyrA?t=168
- ↑ https://youtu.be/lDK9IFxKyrA?t=352
- ↑ Jeanine Hattas Wilson. Professional Painter. Expert Interview. 11 May 2021.
- ↑ https://youtu.be/lDK9IFxKyrA?t=389
- ↑ https://youtu.be/w0v_PBEdhH4?t=548
- ↑ https://youtu.be/lDK9IFxKyrA?t=518
About This Article