This article was co-authored by wikiHow Staff. Our trained team of editors and researchers validate articles for accuracy and comprehensiveness. wikiHow's Content Management Team carefully monitors the work from our editorial staff to ensure that each article is backed by trusted research and meets our high quality standards.
There are 12 references cited in this article, which can be found at the bottom of the page.
wikiHow marks an article as reader-approved once it receives enough positive feedback. In this case, 98% of readers who voted found the article helpful, earning it our reader-approved status.
This article has been viewed 203,984 times.
Learn more...
If your plain white golf cart looks a little dull for your taste, spruce it up with a paint job. Even if you've never painted before, anyone from an amateur to an expert decorator can make a golf cart look sleek and smooth. You can paint your cart any color that you'd like as long as you've got acrylic spray paint and time. Just make sure you paint your cart at least two days before you plan to use it so the paint has time to dry.
Steps
Priming the Cart
-
1Clean your cart. Residual dirt can cause your coats of paint to flake or peel. Remove all dirt and grime from your cart with an oil-based dish soap. Hose off the soap with cold water, and dry off your cart with a towel. Avoid applying the paint until your cart is completely dry.
- Mix dish soap with water in a bucket and apply it to your cart using a rag or sponge.
- Clean out the inside of your cart as well, removing any belongings or trash, so your cart looks like new once you're finished.
-
2Strip the golf cart of its trim. Take off any removable parts of the golf cart that you do not want painted. This will prevent them from getting in the way as you work. In addition to the trim, remove the bumpers, roof, and other parts of the frame you don't want to paint.[1]
- Make a note or take pictures of where each removable piece goes so you know where to reattach them later.
Advertisement -
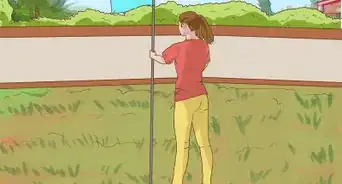
3Apply masking tape to areas you don't want painted. For non-removable parts of the golf cart that you want to protect from paint, use masking tape. Keep an eye out for license plates, logos, or other decals that you want to keep visible. Line the outer edges of the windows to keep from spray painting them.
- Use soft-edged foam tape to avoid damaging your cart.
-
4Sand down the body of the cart with fine-grit sandpaper. Rub down the area in a circular motion with firm pressure. This will help the paint stick to the golf cart's nonporous surface. Make sure to sand away any old paint to avoid it tinting your fresh coats.[2]
- Consult a sandpaper size chart to find fine-grit sandpaper. 120 to 400 grits is ideal.[3]
- After you've finished sanding, use a microfiber cloth to brush off any sanding dust.
-
5Apply a thin coat of paint primer to prevent peeling later on. Primer helps the spray paint adhere smoothly and evenly to the cart. Spray the primer in even amounts over the body of the golf cart and wait approximately twenty minutes before adding on paint. Check the primer's packaging instructions for specifically how long to let it dry.[4]
- Use a paint primer made specifically for plastic surfaces.
- If your golf cart is a darker color, apply two coats of primer. Wait twenty to thirty minutes before applying the second coat.


Applying the Paint
-
1Use an acrylic spray paint. Acrylic paints adhere better to plastics than most types, so avoid vinyl, lacquer, enamel, or chalkboard spray paints. If available, plastic fusion spray paint is also ideal for adhering to smooth surfaces.
- Start with one standard can of spray paint and purchase additional cans as needed. Make a note of where you purchased your first can so you know where to find the right color.
-
2Add a base coat of paint. Your base coat should go on lightly so it sticks well to the primer. Aim your paint can perpendicular to the area you're spraying at about 10–12 inches (25–30 cm) away from the surface. Spray the paint in horizontal sweeps, releasing the tip once you've reached the other side. Slight overlap is okay, but try to apply only one layer at a time.[5]
- Spray in short spurts instead of a constant stream for a more focused coat.
- In most cases, you will need to apply at least two to three coats.
-
3Let the first coat of paint dry. Each coat should be distinct and applied separately. Consult your spray can's instructions for drying times, and wait until that much time has passed to start on a second coat. Usually, between twenty to thirty minutes is sufficient.[6]
-
4Apply more coats of paint to achieve a deeper color. Each coat will make your cart's color look richer and more opaque. Continue applying coats until you reach the desired color. Plan out enough time to apply at least three coats of paint, though you may need more to make the color you want.


Finishing Your Paint Job
-
1Remove the masking tape ten minutes after spraying. Removing the tape before it cures will give the paint lines a nice, crisp finish. Try not to touch the paint, with your gloves or otherwise, to avoid smudging.[7]
-
2Add a coat of clear acrylic sealant. After you've reached the color you want, acrylic sealant can secure the coats and give your cart a glossy finish. Sealant can be applied like spray paint, so choose a spray can if you've never used paint sealants before. After applying the coat, wait thirty minutes before proceeding to finish the cart.[8]
- One coat is necessary, but two coats can create an optional protective layer. Wait thirty minutes in-between applying coats.
-
3Clean up the area. Either after or while your sealant is drying, remove the drop cloths from the ground and store them as desired. Place any remaining spray cans in a room temperature drawer for future use. Dispose of or recycle any newspapers, rubber gloves, or sandpaper squares.
-
4Let your cart dry for at least twenty-four hours. Although the sealant may seem dry after two hours, the cart will need time to cure after painting to fully set. Leave your cart outside or in your garage with the windows and doors open and leave it alone for a full day. Do not touch your cart during this period to avoid fingerprint smudges.
- Reattach any parts you removed before painting after the cart has dried.
- Check the weather report for the next day to make sure your cart will not receive wind or rain exposure. If the weather looks stormy, paint your cart in the garage with the doors open.


Staying Safe
-
1Choose a windless, well-ventilated location. Paint fumes can induce respiratory problems if used indoors. If possible, paint your golf cart outside. Paint in the garage on windy or stormy days. Wind can inhibit your ability to aim directly at the cart and blow dirt on your fresh coat.[9]
- If you begin having breathing troubles or experience nausea, remove yourself from the area to a well-ventilated place. Call Poison Control for further instructions.
- If you are painting in your garage, make sure to open the door to avoid fume inhalation.
-
2Surround the golf cart with drop cloths. Spray paint has a less focused range than some painting methods, and you'll want to avoid painting the floor by accident. If you don't have a drop cloth on hand, cover the area directly below your cart's body with old newspapers.
- Choose canvas over plastic drop cloths, as cloth is less slippery and stays more secure on the floor.[10]
-
3Purchase a pair of disposable gloves. Gloves protect your hands from paint or primer stains while you're working on the cart. Try not to use gardening or mechanic's gloves while you're working to avoid staining your carts with dirt or grease. Disposable rubber gloves are ideal to keep your work area clean.[11]
- Scrub the paint off with soap and warm water immediately if you get paint on your hands.
-
4Put on a pair of work clothes you don't mind staining. Spray paint can be tough to remove from clothes. Avoid wearing anything you care about in case of any mishaps. An old t-shirt and sweatpants are the perfect attire for painting a golf cart.
-
5Wear goggles and a dust mask. Spray paint can emit toxic fumes, and some people may be more vulnerable to breathing troubles than others. Wear a dust mask to protect your breathing, especially if you're painting in your garage. Put on a pair of goggles as well to protect your eyes.[12]


Community Q&A
-
QuestionWhat kind paint and primer do I use on fiberglass golf cart?
 Community AnswerFiberglass surfaces are nonporous, much like plastic, and react best to acrylic spray paint. Make sure you apply at least two coats of acrylic paint primer before painting.
 -
QuestionHow would I paint words onto my cart?
 Community AnswerI would suggest using a vinyl letter cutting machine for a professional look. I would put the letters on after the paint but before using the sealant, which will offer protection from peeling or scratching.
 -
QuestionWhen sanding a golf cart before painting it, what grit should I use?Community Answer1000 grit is better for a fine finish and reduces the risk of sanding into the fiberglass body too deeply.
Warnings
- Keep small children and pets away while painting your golf cart.⧼thumbs_response⧽
- Do not rush through the paint job. Your golf cart will look best if you take your time and wait between coats.⧼thumbs_response⧽
- Spray paint is flammable. Keep your paint cans away from heat sources (like water heaters) and never leave them alone in direct sunlight.⧼thumbs_response⧽
Things You'll Need
- Dish soap
- Water
- Towel
- Newspapers or drop cloths
- Goggles
- Dust mask
- Disposable gloves
- Sealant
- Fine-grit sandpaper
- Microfiber cloth
- Paint primer
- Acrylic spray paint
- Masking tape and/or plastic bags


References
- ↑ https://www.youtube.com/watch?v=SoP6QEukVA8&feature=youtu.be&t=111
- ↑ https://craftsbyamanda.com/tips-for-painting-on-plastic/
- ↑ https://www.bobvila.com/articles/2145-quick-tip-choosing-sandpaper/#.Wb9Z80uGPrc
- ↑ https://rosybluhome.com/8-tips-for-spray-painting-like-a-boss/
- ↑ http://makezine.com/2015/06/24/skill-builder-spray-paint-techniques/
- ↑ https://itstillruns.com/paint-plastic-golf-cart-body-7717017.html
- ↑ https://www.realsimple.com/home-organizing/home-improvement/painting/spray-painting-tips
- ↑ https://www.bobvila.com/articles/how-to-paint-plastic/
- ↑ https://www.bobvila.com/articles/spray-painting-tips/
About This Article

To paint a golf cart, start by washing it thoroughly with an oil-based soap and taking off any removable parts that you don't want painted, such as the trim, bumpers, and roof. Next, sand down the body of the cart with fine-grit sandpaper and apply 1 coat of primer. After the primer dries, apply 2-3 coats of acrylic spray paint in your chosen color, letting each coat dry completely before adding another. Finally, spray on a coat of clear acrylic sealant to lock in the color and give your cart a glossy finish! For tips on masking off areas that can't be removed, read on!