This article was co-authored by Lauren Kurtz. Lauren Kurtz is a Naturalist and Horticultural Specialist. Lauren has worked for Aurora, Colorado managing the Water-Wise Garden at Aurora Municipal Center for the Water Conservation Department. She earned a BA in Environmental and Sustainability Studies from Western Michigan University in 2014.
This article has been viewed 25,740 times.
Planting seedlings or young plants in the soil requires the right mixture of soil, sun, and water. Plants vary greatly in their requirements for temperature, sunlight, and water. Along with following the instructions below, always be sure to read the label on the plant thoroughly to ensure you are supporting it adequately. Anyone can have a green thumb by following just a few simple directions!
Steps
Planting in the Ground
-
1Decide on plant location. When gardening location is everything. Make sure your plot of land receives the correct amount of sun, provides enough space and good soil for growth and the elevation allows proper drainage. [1]
- Face your garden to the east, as morning sun provides the best, cool light perfect for growing plants.
- Soil should be loose and dark in color, not red and clay-like or sandy. Loose soil means there is plenty or aeration, making it easy for roots to grow, while the dark color indicates nutritious soil.
-
2Arrange your plants before transplanting. Do not dig or remove your plants from the pot until you have decided exactly where you want to place each one. Not only will this save time and energy, but it will help lessen transplant shock.
- Since plants are not meant to be removed and replanted, transplant shock is inevitable. The plant may not root well, leading to unsuccessful growing. However, if the root ball, the mass of soil surrounding the plant’s roots, is disturbed as little as possible, the plant is more likely to take to its new environment.
Advertisement -
3Dig a hole. The hole should be the same depth as the root ball, though twice as wide. The extra width gives the plant’s roots space to grow.
- Place the plant in the hole to make sure the plants will rest in the ground at the same level as it was in its original pot.
- Remove any rocks from the hole and break up chunks of soil so the plant has a loose and clean space.
- Keep in mind that some plants may need to be buried in a deeper or shallower hole. If your plant didn't come with planting instructions, look it up online to see which size hole you should plant it in.
-
4Sprinkle compost in the hole. Compost will give the roots nutrients and promote healthy plant growth.
- Add about 1 to 3 inches of compost for planting flowers or vegetables.
- Next, create a 2 to 3 inch barrier of soil between the compost and roots. This layer will keep the compost from stealing nitrogen from the roots, but will still be close enough to filter nutrients into the soil.
-
5Loosen the roots. This will prepare the roots to better integrate with the soil. Hold the plant upside down. Hit the bottom of the plant with a flat hand and slightly massage the root ball, gently squeezing and slightly pulling apart. You are creating small pockets for the roots to spread out and grow. However, it is very important that you do not to damage the roots or remove too much dirt from the cluster.
- If the plant doesn’t come loose, it is root bound. Score the edges of the pot with a dull instrument and loosen with your finger. Spread out the roots of root-bound plants when you plant them in the ground.
-
6Fill in the soil around the plant. Use the soil you have already removed to completely fill the hole.
- Make sure your plant sits in in the ground at the same height as it did in its original pot. Plants too low in the ground will flood, while plants to high may not root properly.
-
7Mulch the area around the plant with leaf mulch or straw. Keep the stem of the plant free of the mulch, so that air can circulate. Water and fertilize as directed by the plant’s instructions.
- Mulch is important for healthy plant growth, reducing the amount of surface evaporation for the soil, moderating the plants temperature and protecting the roots from weeds and other hindrances.


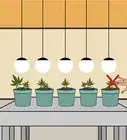
Method 2 of 3: Planting in Pots
-
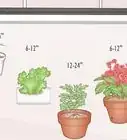
1Find the correct pot size for your plant. The pot should be 2 inches deeper and wider than its original nursery pot, as the plant will need room to grow.
-
2Find the correct material for your pot. Porosity, how much air and moisture can escape from your pot’s material, is key to plant growth. Glazed terra-cotta, plastic and metal hold in moisture while unglazed terra-cotta, wood, and paper pulp allow the plant to breathe. Become familiar with your plant’s specific watering needs in order to decide which pot material is best. [2]
- Material also affects the overall style of your garden. Choose a material that fits with your personal style as well as the location.
-
3Consider pot weight. Accessibility should be taken into account. For example, if you will need to move the pot around, chose a lightweight metal or composite instead of thick ceramic.
-
4Choose a pot with drainage holes. Without holes in the bottom of the pot, water will sit in your plant's soil, flooding the roots and subsequently rotting them.
- If you can’t find a pot with holes, you can drill them yourself, as long as the pot isn’t too fragile.
-
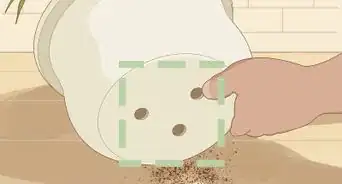
5Cover the bottom inside of the pot with gravel or mesh screen. This barrier will reduce soil leakage through the bottom holes. Buy a saucer in a complementary color to keep the excess water from leaking onto your furniture or deck.
- You can also purchase pot feet or a stand if you want the water to drain directly onto an outdoor surface.
-
6Purchase your plants. If this is your first time potting a plant, try planting small plants or seedlings. Consult your local gardening center about what plants do best in your climate.
- Ask if any of the species you are buying are invasive. Plants like mint should be planted with their original small pot intact to keep them from spreading out and killing other plants over time.
- Non-invasive annuals can be planted 5 or more in a pot.
- Invasive annuals should have their own pot or be contained within a smaller pot.
- Choose plants that don’t have dense root balls. They will become easily parched and they will be more likely to die.
- Choose plants that need the same type of soil and sun.
-
7Gather necessary tools before planting. You will need the plants, the pots, potting mix and a trowel.
- If the site requires you to bend over in order to plant, you might try elevating the pots on a bench or table in order to save yourself from unnecessary back pain.
-
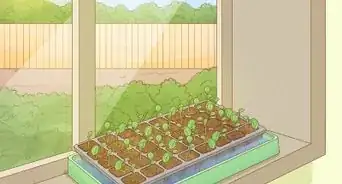
8Sprinkle in several inches of potting mix. Then, do a dry run. Place the plants inside the container and judge where they should sit to keep their soil at the same level as in their original containers.
- Use a potting mix, instead of garden soil. Choose one with slow-release fertilizer granules, so the plant is taken care of over a long period of time, or purchase your own granules to mix in.
- To make your own batch of potting soil, combine five parts compost, two parts vermiculite, one part builder’s sand and one-quarter part dry organic fertilizer.
-
9Plant. Start with the center plant then move on to surrounding plants. Sprinkle more soil with every plant you add to the arrangement. They should be covered to the same level as they were in their original containers.
-
10Water the plants with a gentle watering can or nozzle. Follow watering instructions specific to your plants found on their packaging.
- Right after plants are moved to a new environment they need special care so they take to their new home. Water whenever two to three inches of soil is dry.
-
11Maintain your plants as they grow. Add more soil if the soil compacts in a few months and tend to your plants as indicated on the package.


Method 3 of 3: Planting a Tree
-
1Choose the best location for your tree. As with any plant, trees need homes that will promote healthy growth. Analyze the surroundings of your planting site to make sure it fits all the requirements necessary for your tree to flourish.
- Consider the tree’s future height and canopy spread. Make sure there are no objects in the way that will deter the tree from growing to its full potential.
- Consider the tree’s characteristics. If the tree is deciduous, make sure the location allows for piles of leaves. If the tree will bear fruit make sure this will not create a hindrance for you or your neighbors.
- Consider the proper amounts of soil, sun and moisture. Consult experts either at an arboretum or nursery, even your community’s local tree board, in order to confirm you are planting the correct tree for your environment. [3]
-
2Till the soil lightly with a pick or a shovel. The area should be loose enough that the tree roots can easily penetrate the soil.
-
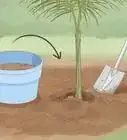
3Dig a hole in the area that is twice as wide as the root ball of your tree. It should be slightly shorter than the height of the root ball. You will form a mound with the soil.
-
4Loosen the roots in preparation for the transplant. Lay the seedling or young tree on its side. Hit the bottom and sides of the container with a flat palm. Do this in gentle but firm strokes until the roots have been loosened.
-
5Pull the container away from the root ball until it is completely exposed. Take caution not to damage the seedling or the roots.
-
6Look for roots that are circling. This is a sign that the tree has overgrown the container. Loosen the circling roots and uncurl them so they are extending away from the trunk.
- Trees with hardened circled roots may need to have them cut. However, this should only be done when there are few circling roots and a fairly large root ball.
-
7Place the root ball of the tree in your hole. The root ball should extend one half to one inch (1.3 to 2.5cm) above the level of the ground to discourage rot. If it does not, lift it from the bottom and introduce more soil.
- Adjust the tree’s position in the hole by lifting from the bottom of the root ball. Never lift using the trunk.
- Ask someone to help you determine if the tree is straight and sitting properly in the soil.
-
8Mix one part compost with three parts soil before you fill the hole around the tree. This will boost the nutrient content of the soil and provide the tree with a healthy environment for growth.
-
9Fill in the area around the root ball with your mixture of compost and soil. Mound some soil above the ground level, but don’t cover any of the trunk. Pack the soil in toward the root ball with the heel of your hand.
- The uppermost portions of the tree’s roots are the most vulnerable to flooding. Make sure you create a mound about 6 to 12 inches above the soil depending on tree size. [4]
-
10Create a circular berm, or small mounded hill. A berm not only adds design interest to your garden, but helps create the drainage necessary for your growing tree.
- Fill the entirety of the existing hole with more soil, continuing to mound, adding a definite ridge around the circumference of the circle.
- A berm should generally be 4 to 5 times as wide as its height.
-
11Cover the area with a layer of mulch. Keep two inches (5cm) of space between the mulch and the base of the trunk.
-
12Use stakes to support the tree. This is not always necessary, but often young trees can be unsteady and need a little help, especially if the weather is bad. Be sure to put the stakes around the perimeter so they don’t go through the root ball.
-
13Water the area. New trees should be watered with approximately 15 gallons (56.8 L) of water once every week for the first month.
-
14Enjoy your gift to the earth! Follow specific care instructions for your new tree and watch it flourish and grow.


Things You'll Need
- Gardening gloves
- Trowel
- Compost
- Potting soil
- Mulch
- Organic fertilizer granules
- Pots
- Gravel
- Fine mesh circle
- Supportive stakes
- Watering can
- Water


References
- ↑ http://www.curbly.com/users/green-couch-design/posts/13695-how-to-choose-the-best-spot-for-your-garden
- ↑ http://www.dummies.com/how-to/content/how-to-pick-pots-for-container-gardens.html
- ↑ http://www.arborday.org/trees/righttreeandplace/
- ↑ http://www.davewilson.com/home-gardens/growing-fruits-and-nuts/planting-your-backyard-orchard
About This Article

If you want to plant a seedling or a young plant, research the variety you’re growing to ensure you know the conditions it prefers. Choose a spot where the plant will get the sunlight, water, and soil type that it needs. Once you’ve selected the location, dig a hole that’s the same depth as the root ball and twice as wide. Sprinkle compost in the hole, then place the roots of the plant in the hole and fill it in with dirt. Mulch around the plant with leaf mulch or straw to help stabilize it, then water the area. To learn tips from our horticulture reviewer on how to plant in a pot, keep reading!