This article was co-authored by wikiHow staff writer, Travis Boylls. Travis Boylls is a Technology Writer and Editor for wikiHow. Travis has experience writing technology-related articles, providing software customer service, and in graphic design. He specializes in Windows, macOS, Android, iOS, and Linux platforms. He studied graphic design at Pikes Peak Community College.
The wikiHow Tech Team also followed the article's instructions and verified that they work.
This article has been viewed 983,705 times.
Learn more...
This wikiHow teaches you how to play a Wii game from a file that's stored on a USB flash drive rather than on a disc. Keep in mind that this works on the classic Wii, but not the Wii U. Playing a game from a USB flash drive requires you to install on your Wii the Homebrew Channel, which voids your Wii's warranty and violates Nintendo's terms of use. After you've installed all of the necessary items, you'll be able to burn a disc's contents onto your USB flash drive, at which point you can play the game from the USB flash drive rather than from the disc.
Steps
Preparing to Install
-
1Make sure that you have the correct equipment. You'll need the following items for this task:[1]
- SDHC card - A large SD card of up to 8 gigabytes is needed to install Homebrew and perform other file-based tasks.
- USB flash drive - This is the drive on which you'll install and store the games.
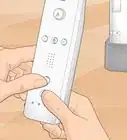
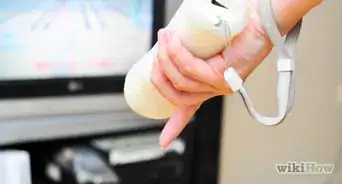
- Wii remote - If you have a newer (non-white) model of Wii, you'll need a generic Wii remote to help with the installation.
-
2Format your USB flash drive as FAT32. To do so, select FAT32 (or MS-DOS (FAT) on a Mac) in the "File System" section of the format menu.
- Keep in mind that formatting a USB flash drive will erase its contents, so back up the contents to your computer or another USB flash drive if necessary.
Advertisement -
3Empty the Wii's disc drive. If there is currently a disc in the Wii, eject it before proceeding.
-
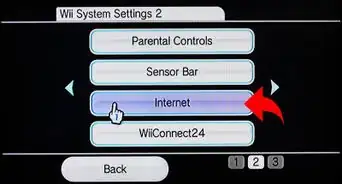
4Connect your Wii to the Internet. Your Wii will need a network connection in order to install the bulk of the USB tool's files.
-
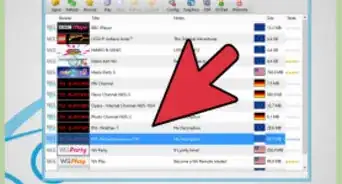
5Install Homebrew on your Wii. If you haven't yet installed the Homebrew Channel for your Wii, you'll need to do so before proceeding. The Homebrew Channel allows you to install custom modifications, one of which will let you play games off of a USB flash drive.
-
6Format your SD card. Once you've installed Homebrew with the SD card, you'll need to wipe it clean so that you can use it for the USB installation files. The easiest way to do so is by formatting the SD card.
- As with the USB flash drive, choose FAT32 (or MS-DOS (FAT) on a Mac) as the file system.


Creating a Wii Flash Drive
-
1Use a Windows computer for this part. Unfortunately, you cannot format correctly your USB flash drive for Wii use on a Mac. If you don't have access to a Windows computer, try using one at a library or borrowing one from a friend.
-
2Determine your Windows bit version. You'll need to know whether your version of Windows is a 64-bit system or a 32-bit system in order to know which file to download in a minute.
-
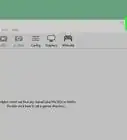
3Go to the WBFS Manager download page. The following links are for the 64-bit and 32-bit versions of WBFS Manager for Windows:
-
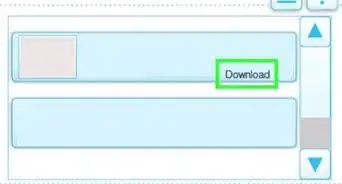
4Click Free Download. It's the green button in the upper-right corner.
- Watch out for any add pop-ups and be careful not to click any download links to software you didn't intend to download.
-
5Click Start Download. It's the green button in the center of the page. Doing so will download a ZIP folder containing the setup file for WBFS Manager.
-
6Open the ZIP folder. Double-click the downloaded ZIP folder to open it.
-
7Double-click setup.exe. It's in the ZIP folder. Doing so will open the setup window.
- Make sure you install Dotnet before you set up the program.
-
8Install the program. Use the following steps to install WBFS Manager:
- Click Next.
- Click Browse to select an install location (optional).
- Click Next.
- Click Next.
- Click Yes.
- Click Close.
-
9Plug your USB flash drive into your computer. The USB flash drive should fit into one of the rectangular USB ports on your computer.
-
10Open WBFS Manager. Double-click the WBFS Manager app icon, which resembles a Wii on a blue background, to do so. You can find it in your Windows Start menu.
- The first time you open WBFS Manager, you will need to click Yes to allow it to access your system.
-
11Select your USB flash drive. Click the "Drive" drop-down box in the upper-left corner of the window, then click your USB flash drive's letter (usually F:).
- If you don't know the USB flash drive's letter, look for it in the "Devices and drives" section of the This PC app.
-
12Click Format. Doing so will format your USB flash drive for use with the Wii.
-
13Eject the USB flash drive. Click on the USB flash drive's icon in the lower-right side of the screen, then click Eject in the pop-up menu and remove the USB flash drive from your computer.
- You may have to click the upward-facing arrow here to see the USB flash drive's icon.


Downloading the Installation Files
-
1Plug your SD card into your computer. The SD card should fit into your computer's SD card slot angled-side-in, logo-side-up.
- If your computer doesn't have an SD card slot, you'll need to use a USB adapter for your SD card as well.
-
2Open the file download site. Go to https://app.box.com/s/ztl5x4vlw56thgk1n4wlx147v8rsz6vt in your browser.
-
3Click Download. It's the button in the upper-right corner of the screen. Doing so downloads the USB Loader GX ZIP folder.
-
4Extract the ZIP folder. This process will vary depending on your computer's operating system.
- Windows - Open the ZIP folder, click the Extract tab, click Extract all, and click Extract at the bottom of the window that appears. The extracted folder will open when the extraction finishes.
- Mac - Just double-click the ZIP folder to extract it. The extracted folder will open when the extraction finishes.
-
5Open the "Files" folder. Double-click the USB Loader GX folder, then double-click the Files folder at the top of the next window.
-
6Copy the all files in the Files folder. Click on one file in the folder, press Ctrl+A (Windows) or ⌘ Command+A (Mac) to select all of the files, and press Ctrl+C (Windows) or ⌘ Command+C (Mac) to copy the files.
-
7Click your SD card's name. It's on the left side of the window in File Explorer on WIndows or Finder on Mac.
-
8Paste in the files. Click a blank space in the SD card's window, then press Ctrl+V (Windows) or ⌘ Command+V (Mac). The files will copy onto the SD card.
-
9Eject the SD card. Once your files finish copying, you can proceed with removing your SD card. To do so:
- Windows - Right-click your SD card's name in the left-hand pane, then click Eject.
- Mac - Click the upward-facing arrow to the right of your SD card's name in the left-hand pane.


Installing the IOS236 Software
-
1Plug your SD card into your Wii. The SD card should fit into the Wii's SD card slot angled in, logo side up.
-
2Turn on your Wii. Press your Wii's power button, or use the power button on the remote to do so.
- The Wii's remote will need to be on and synced as well.
-
3Press A when prompted. Doing so will take you to the Wii's main menu.
-
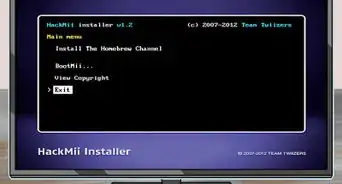
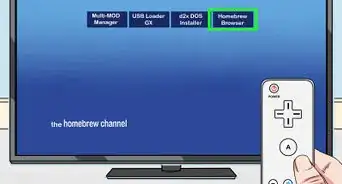
4Start the Homebrew Channel. Select the Homebrew Channel on your Wii's main menu, then select Start when prompted.
-
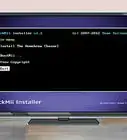
5Select IOS236 Installer. It's on the first page of the Homebrew Channel. A pop-up menu will appear.
-
6Select Load when prompted. You'll find this option in the bottom-middle of the pop-up menu.
-
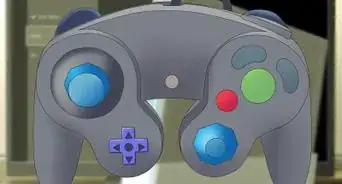
7Press the 1 button. Doing so selects the Install option.
- If you're using a GameCube controller, press the Y button instead.
-
8Select <Download IOS from NUS>. It's at the bottom of the page.
- If you don't see this option, select the text in brackets at the bottom of the screen and press Right until you see it appear.
-
9Press A when prompted. Doing so will install the IOS236 base onto your Wii. This process can take up to 20 minutes, so be patient.
-
10Press any button when prompted. Doing so will exit the setup and return you to the Homebrew Channel.


Installing the cIOSX Rev20b Software
-
1Select cIOSX rev20b Installer. It's in the middle of the first page of the Homebrew Channel.
-
2Select Load when prompted. The installation program will open.
-
3Scroll left to the "IOS236" option. Doing so will select the IOS236 file that you installed earlier.
-
4Press A. Doing so confirms your choice.
-
5Agree to the terms of use. Press A on your controller to do so.
-
6Select an IOS version. Press Left until you see "IOS56 v5661" appear between the brackets, then press A.
-
7Select a custom IOS slot. Press Left until you see "IOS249" appear between the brackets, then press A.
-
8Select an installation mode. Press Left until you see "Network installation" appear between the brackets.
-
9Start the installation. Press A on your controller to do so.
-
10Press any button when prompted. Doing so will move you to the next part of the installation.
-
11Select another IOS version. Press Left until you see "IOS38 v4123" appear between the brackets, then press A.
-
12Select another slot. Press Left until you see "IOS250" appear between the brackets, then press A.
-
13Use the network installer. Select "Network installation" and press A as you did with the last installer, then wait for the installation to complete.
-
14Press any button when prompted, then press the B button. Doing so will restart your Wii. When it finishes restarting, you'll be able to proceed.


Installing the USB Loader GX Channel
-
1Navigate to the next page of the Homebrew Channel. Press the Right arrow on your Wii remote's D-pad to do so.
- You can also press the + button.
-
2Select WAD Manager. It's the second option on this page.
-
3Select Load when prompted. Doing so will start up the WAD Manager.
-
4Agree to the terms of use. Press A on your controller to do so.
-
5Select "IOS249" to load. Press Left until you see "IOS249" appear between the brackets, then press A.
-
6Disable the emulator. Press Left until you see "Disable" appear between the brackets, then press A.
-
7Select your SD card. Press Left until you see "Wii SD Slot" appear between the brackets, then press A. Doing so brings up a list of the files on the SD card that you plugged in earlier.
-
8Scroll down and select WAD. It's near the bottom of the screen.
-
9Select the USB loader. Scroll down to select USB Loader GX-UNEO_Forwarder.wad and press A.
-
10Install the WAD. Press A on your controller to do so.
-
11Press any button when prompted, then press the B button and then the Home ⌂ button. Doing so will restart the Wii. Once the Wii finishes restarting, you'll be back on the second page of the Homebrew Channel.


Running Games from the USB Flash Drive
-
1Press the Home ⌂ button again. Doing so brings up the Home menu.
-
2Select Shutdown. It's at the bottom of the menu. Your Wii will power down.
- It's best to wait until your Wii fully powers down before proceeding.
-
3Plug your USB flash drive into your Wii. The USB flash drive should fit into one of the rectangular USB ports at the back of the Wii.
-
4Turn back on your Wii. Press your Wii's power button to do so.
-
5Press A when prompted. Doing so will take you to the Wii's main menu, where you should now see a USB Loader GX channel to the right of the Homebrew Channel.
-
6Select USB Loader GX. It's next to the Homebrew Channel.
-
7Select Start when prompted. Doing so will load the USB Loader GX program.
- This process will take several minutes, especially the first time you run the program.
- If you see a "Waiting for your slow USB" message, try plugging the USB flash drive into a different port on the back of the Wii.
-
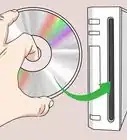
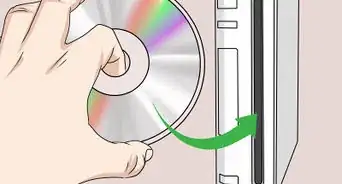
8Insert a game. Place in the Wii the disc for a game that you want to back up to the USB flash drive.
-
9Select Install when prompted. The program will begin reading the contents of the disc.
-
10Select OK when prompted. Doing so will prompt your Wii to begin burning the disc onto the USB flash drive.
- This process will take quite some time, and the burning progress bar may appear to freeze at multiple points. Do not remove your USB flash drive or restart your Wii if this happens.
-
11Select OK when prompted. Doing so will complete the burning process.
- At this point, you can eject the game disc from the Wii.
-
12Play your game. Click the game's name, then click the spinning disc icon in the middle of the window. Doing so will launch the game.


Community Q&A
-
QuestionHow do I play games from my USB drive when the screen goes black?
 Community AnswerIf the Wii is stuck on the black screen, your console may have crashed. If you cannot force a shutdown, the only way is to unplug the Wii's power. If the screen goes black and returns to the Wii menu, you'll need to install a cIOS.
 -
QuestionWhat if I have already 'hacked' my Wii? Do I just skip home-brewing again?
 Community AnswerYes, you should skip that step as you already hacked it and already can install homebrew apps.
 -
QuestionHow do I format my hard drive to play Wii games?Community AnswerUse a tool such as WBFS manager or WiiBackup Manager to format your hard or USB drive to be used for Wii games.
Warnings
- Do not shut down the Wii while installing anything mentioned in this article.⧼thumbs_response⧽
- Pirating games is both against Nintendo's terms of use and against the law in general.⧼thumbs_response⧽


References
About This Article

1. Install the Homebrew channel on your Wii.
2. Create a Wii flash drive.
3. Download the installation files to your SD card and plug it into your Wii.
4. Start Homebrew.
5. Follow the prompts to install IOS263, cIOSX Rev20b, and USB Loader GX.
6. Chutdown your Wii, insert your drive, and turn the Wii back on.
7. Select USB Loader GX.
8. Insert a game to burn it onto your USB drive.
For more help, including how to format your SD card for installation files, read on!