wikiHow is a “wiki,” similar to Wikipedia, which means that many of our articles are co-written by multiple authors. To create this article, 27 people, some anonymous, worked to edit and improve it over time.
This article has been viewed 914,353 times.
Learn more...
Synchronizing a Wii remote with a console allows the remote to be able to communicate with the console, either temporarily or permanently. The controller you get with the system is already synchronized, but if you use any new controllers, you must synchronize them. You can sync a new controller so that it's always associated with your Wii, and you can temporarily sync your controller on your friend's Wii for game nights.
Steps
Standard Mode
-
1Press the Power button on the Wii console. It should turn blue. As soon as it does, it's on and ready to sync.
-
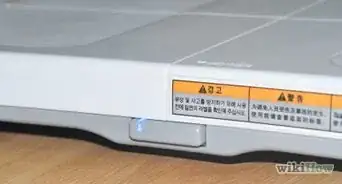
2Open the SD card slot cover on the front of the Wii console. It's the panel on the front next to the eject button. You'll see a red button to the left of the SD slot.Advertisement
-
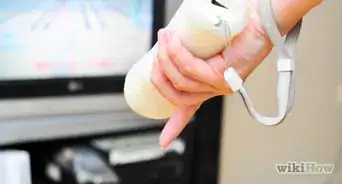
3Remove the battery cover on the back of the to-be-synced Wii remote. If there aren't any batteries in place (or the batteries are dead), place new ones in now.
-
4Press and release the SYNC button just below the batteries on the Wii Remote.
- Use the tip of a pen or paper clip if need be. You do not need to hold the button down; it will activate after a quick push.
-
5Press and release the SYNC button on the console while the Player LED lights are still blinking on the Wii remote.
- If the LED lights on the Wii remote have stopped blinking, just push the SYNC button one more time.
- When the player LED blinking stops, the process is complete. You'll see an LED illuminated on your remote, indicating that remote's player number.
- This procedure must be repeated for each remote you'd like synced up.


One-Time Mode
-
1Know the purpose of one-time mode synchronization. This is much different than syncing in the standard mode and is not permanent.
- One-Time Mode synchronization lets you use your remote on a different Wii console (say a friend's) or a different remote on your console. You can also use it to change the order of players without turning off the Wii and starting over.
- This does not get rid of the settings in Standard Mode. Once you turn the power off, the settings used in One-Time Mode will go away, never to return. If you accidentally turn the power off, you will have to start the process all over again, as your Standard settings have taken effect.[1]
-
2Press the HOME button. Be sure you're using a Wii remote that is synchronized with the Wii console you're currently using.
- Make sure both the console and the remote are on and working.
-
3Select the Wii Remote Settings option from the Home Button menu. Your other options are "Wii Menu," "Operations Guide," "Reset," and "Close."
-
4Select the Reconnect option. This is also where you change the volume and rumble.
- It's only temporary. If you're syncing to someone else's console, your remote will unsync when the power is turned off.
-
5Press the 1 and 2 Buttons at the same time. Important: Use the Wii remote that you want to synchronize with the console. Should be a no-brainer, but you never know.
- The Player LED will blink during the syncing process. When the blinking stops, the connection is complete.
- If you are syncing multiple Wii Remotes, press the 1 and 2 Buttons on the Wii Remote you want to be player 1. Immediately after (without a significant pause), press the 1 and 2 buttons on the remote you want to be player 2. The order in which you push the buttons determines the order of the players in multiplayer games.


Community Q&A
-
QuestionWhat if it doesn't sync?
 Community AnswerReplace the batteries, then try again. If not, try with another controller. If the 2nd controller works, head to support.nintendo.com to find out what is wrong with your remote.
 -
QuestionHow do I do this on a Wii U?
 Community AnswerPress the sync button on the Wii U. You should see a sync screen on the TV. Press sync on the Wii remote. They should now be connected.
 -
QuestionWhat can I do if I am not able to go past the choose language screen?
 Community AnswerUnderneath the battery cover of the remote, there is a red button. On the front of the console, there is a little white flap, and behind that, there is a red square button. Press both the red button on the remote and the red button on the console at the same time.

References
About This Article
To synchronize a Wii remote so it’s always associated with your console, start by pressing the power button on the Wii console. As soon as it turns blue, it’s ready to sync. Open the SD card slot cover on the front of the Wii console, and remove the battery cover on the back of the to-be-synched Wii remote. Press and release the SYNC button just below the batteries on the Wii remote. Then, press and release the SYNC button on the console while the Player LED lights are still blinking on the remote. When the player LED blinking stops, you should be all synched up. While the controller you got with the system will already be synchronized, you’ll have to do this manually whenever you add new controllers. To learn how to perform a one-time mode synchronization, keep reading!