This article was co-authored by Barry Zakar and by wikiHow staff writer, Danielle Blinka, MA, MPA. Barry Zakar is a professional handyman and the founder of Little Red Truck Home Services based in the San Francisco Bay Area. With over ten years of experience, Barry specializes in a variety of carpentry projects. He is skilled at constructing decks, railings, fences, gates, and various pieces of furniture. Barry also holds his MBA from John F. Kennedy University.
There are 20 references cited in this article, which can be found at the bottom of the page.
This article has been viewed 28,519 times.
A garage door opener makes your life so much easier, but first you have to program the remote or keypad. Fortunately, most garage door openers manufactured after 1993 all use the same simple and easy process for programming or resetting garage door openers.[1] Even better, you can have your garage door opener working in less than 10 minutes! We're going to walk you through the process of programming or resetting a garage remote, a garage keypad, and your car's HomeLink garage opener.
Steps
Programming a Handheld Garage Door Remote
-
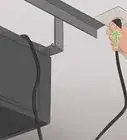
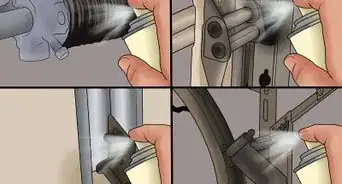
1Use a tall ladder to reach your garage door opener. Position your ladder just behind the garage door opener so you can easily access the back of it where the control panel is located.[2]
- You may be able to use a small step-ladder for this if you’re tall. However, a 6 ft (1.8 m) ladder may be safer.
-
2Open the rear flap or remove the light cover. At the back of your garage door opener, you’ll see a plastic piece that detaches. This is your rear flap or light cover, depending on the brand of garage door opener you have.[3] Here’s how to open it:
- For a rear flap, press the tabs located on each side of the plastic flap at the same time. Then, gently pull it off to remove the control panel.[4]
- If you have a light cover, gently pull it off of the garage door opener.
Advertisement -
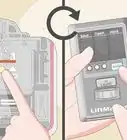
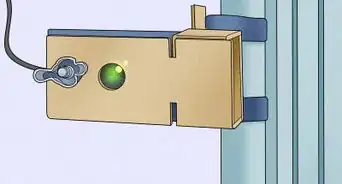
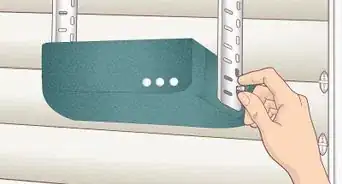
3Press the large “learn” button and hold it until the light flashes. On many models, the button is labeled. However, it may just be a colored button. Next to the button, you’ll see a small LED light that will illuminate when the button is activated. Hold the learn button down until the LED light starts flashing.[5]
- For instance, the “learn” button may be yellow or purple. However, it could be any color.
- Some models call this button a “smart” button.[6]
-
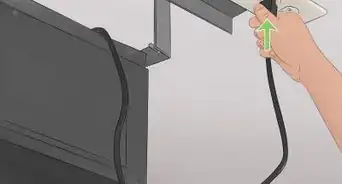
4Press your remote button while the garage door opener's LED light is flashing. You have 30 seconds to push your remote button after the light starts flashing. Click the button once to establish a link with the garage door opener. Don’t hold the button down.[7]
- If you miss the 30-second window, don’t worry. You can just press and hold the “learn” button again.
-
5Watch for the lightbulb on the garage door opener to light up. On most models, the light bulb will flash when your remote is successfully programmed or reset. This just confirms that the process works.[8]
- Some garage door openers don’t blink when the remote successfully connects.
-
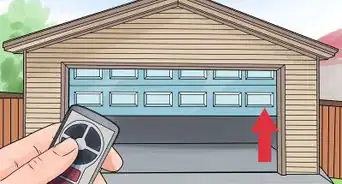
6Test your remote to make sure it works. Push the button on your remote once to make sure your garage door opens. Then, press the button again to close the garage door.[9]
- If your remote isn’t working, go through the programming process again. You might also change the battery in your remote.
- If your remote still isn’t working, try changing the light bulb on your garage door opener. Some LED bulbs emit a frequency that interferes with garage door remotes and prevents them from working.[10]


Programming a Garage Door Keypad on Your Home
-
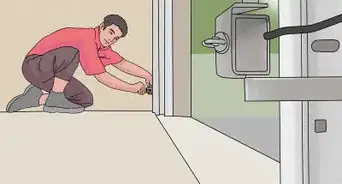
1Climb a ladder to access your garage door opener. Pick a ladder that’s tall enough for you to safely reach the garage door opener. Put the ladder right behind your garage door opener so you can access the control panel.[11]
- You may be able to use a step-ladder if you’re tall. However, it’s safest to go with a 6 ft (1.8 m) ladder.
-
2Pull off the rear flap or the light cover. The back of your garage door opener will have a plastic piece that conceals the control panel and light bulb. To open a rear flap, push the release buttons on either side of the flap and pull it open. If you have a light cover, simply pull it off of the garage door opener.[12]
- Behind the plastic flap or light cover, you’ll see several buttons and a light bulb.
-
3Reset the link by holding the “learn” button until the light goes off. There is an LED light next to your “learn” button. Hold the button for about 6 seconds and watch for the light to go out. When it does, release the “learn” button. This will clear the link between your garage door opener and the keypad and remote.[13]
- You’ll also have to reprogram your garage door remote if you have one. Follow the directions above in the section titled “Programming or Resetting a Remote.” It’s okay to do this after you program the keypad because reprogramming your garage door remote won’t clear the settings on your keypad.
-
4Press the same button again. The LED light next to the “learn” button will come on when it’s ready to be programmed. You have 30 seconds to program your keypad after the LED comes on.[14]
- Typically, the “learn” button is colored, so it may be purple, yellow, or another color. If you don’t see a label, look for a colored button.
- If you don’t make it to the keypad in time, just press the “learn” button again.
-
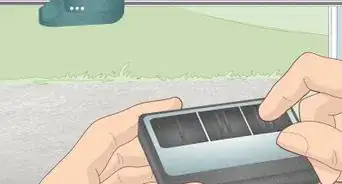
5Type any 4-digit code into the keypad and press enter. Use a new code that will be your official key code for opening and closing your garage door. If you enter it successfully, the light on your garage door opener will flash. This confirms the link is reset.[15]
- If you don’t see the light flash, go ahead and test your keypad to see if it works. However, you may need to repeat the process all over again.
-
6Watch for the garage door opener light to flash or click. The light bulb on your garage door will flash if you’ve entered the new code in time. If your garage door doesn’t have a light bulb, you may hear a click. This let’s you know your garage door opener is programmed.[16]
-
7Enter your new code to test the garage door opener. After you type in the new code, press enter. Your garage door should open or close if you entered the code correctly.[17]
- If your garage door doesn’t work, you may not have entered your new key code fast enough. Repeat the process and make sure you enter the code within the 30-second time window.
- It’s a good idea to write down your keycode in the notes on your phone or on a scrap of paper just in case you have trouble remembering it at first.


Programming Your Car’s HomeLink Garage Door Opener
-
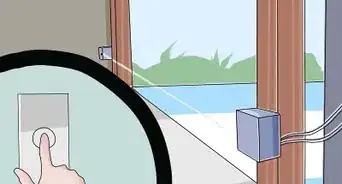
1Find the garage door remote buttons on your vehicle's HomeLink panel. The buttons are usually located on the interior roof of your car near your rearview mirror and lights. They might also be on your rearview mirror or on the visor over your driver's seat. You should see 3 buttons in a row, with a little house emblem above them.[18]
- Check your vehicle’s manual if you’re having trouble finding where the control buttons are located.
-
2Press and hold the 2 outer Homelink buttons for 20-30 seconds. This will activate your vehicle's learning mode so you can link your car to your garage door opener. Watch for the indicator light above the controls to light up.[19]
- Only hold the button down for up to 30 seconds. If you hold it longer than this, it will reset your controls back to the default factory settings.
-
3Let the buttons go when the indicator light starts flashing. The flashing light signifies that your system is in learning mode. You can now link your vehicle’s system to your garage door opener.[20]
-
4Hold your current garage door remote 2 in (5.1 cm) from the control. They need to be close to each other so they can link up. Use 1 hand to work your current garage door remote, and the other to push the control buttons on your car.[21]
-
5Press and hold your remote button and one of the Homelink buttons. At first, the indicator light will still blink slowly. However, you should notice the light speeding up as the garage door remote and your car’s remote button link up. When the light is flashing quickly, you can let go of the buttons.[22]
- You can use any of the 3 buttons on your car's Homelink control panel.
-
6Test your car’s garage door opener to see if it works. Your garage door should open and close when you press the button in your car. However, some garage door openers may not link up this way.[23]
- If this doesn’t work, you may need to set it from your garage door opener. Climb a ladder to access the rear of your garage door opener. Press the “learn” button near the light bulb. Within 30 seconds, press the garage door opener in your car 3 times to pair it.[24]
- It can take 2 or 3 times to link a car garage door remote button to a garage door opener, so don’t feel discouraged if the process doesn’t work for you at first.


References
- ↑ https://www.youtube.com/watch?v=1ppZUjn8XyY&t=14s
- ↑ https://www.thisoldhouse.com/garages/22225015/fix-a-garage-door-that-wont-close
- ↑ https://www.thisoldhouse.com/garages/22225015/fix-a-garage-door-that-wont-close
- ↑ https://www.youtube.com/watch?v=1ppZUjn8XyY&t=32s
- ↑ https://www.thisoldhouse.com/garages/22225015/fix-a-garage-door-that-wont-close
- ↑ https://www.youtube.com/watch?v=1ppZUjn8XyY&t=37s
- ↑ https://www.youtube.com/watch?v=1ppZUjn8XyY&t=92s
- ↑ https://www.youtube.com/watch?v=1ppZUjn8XyY&t=99s
- ↑ https://www.youtube.com/watch?v=1ppZUjn8XyY&t=119s
- ↑ https://www.youtube.com/watch?v=1ppZUjn8XyY&t=144s
- ↑ https://www.thisoldhouse.com/garages/22225015/fix-a-garage-door-that-wont-close
- ↑ https://www.thisoldhouse.com/garages/22225015/fix-a-garage-door-that-wont-close
- ↑ https://www.youtube.com/watch?v=6eqZts761e4&t=15s
- ↑ https://www.youtube.com/watch?v=6eqZts761e4&t=21s
- ↑ https://www.youtube.com/watch?v=AEUWlPKwIOA&t=93s
- ↑ https://www.youtube.com/watch?v=6eqZts761e4&t=29s
- ↑ https://www.youtube.com/watch?v=ee9jJvoknJo&t=136s
- ↑ https://www.youtube.com/watch?v=ZmOvGJCi0eY&t=17s
- ↑ https://www.youtube.com/watch?v=esHbZdJ-J9c&t=21s
- ↑ https://www.youtube.com/watch?v=ZmOvGJCi0eY&t=150s
- ↑ https://www.youtube.com/watch?v=esHbZdJ-J9c&t=49s
- ↑ https://www.youtube.com/watch?v=ZmOvGJCi0eY&t=233s
- ↑ https://www.youtube.com/watch?v=esHbZdJ-J9c&t=65s
- ↑ https://youtu.be/ZmOvGJCi0eY?t=292
- ↑ https://www.thisoldhouse.com/garages/22225015/fix-a-garage-door-that-wont-close
About This Article