This article was co-authored by wikiHow staff writer, Amber Crain. Amber Crain has been a member of wikiHow’s writing staff for the last six years. She graduated from the University of Houston where she majored in Classical Studies and minored in Painting. Before coming to wikiHow, she worked in a variety of industries including marketing, education, and music journalism. She's been a radio DJ for 10+ years and currently DJs a biweekly music program on the award-winning internet radio station DKFM. Her work at wikiHow supports her lifelong passion for learning and her belief that knowledge belongs to anyone who desires to seek it.
There are 14 references cited in this article, which can be found at the bottom of the page.
This article has been viewed 36,694 times.
Learn more...
If you need to put price tags on clothes, there are a few different ways you can do it. For most fabrics, a regular tagging gun with a standard needle works great. If you don't have a tagging gun, use a DIY method to affix your tags. Whether you're running a retail store or pricing clothes for a garage sale, you'll be able to get the tags on quickly.
Steps
Tagging Gun
-
1Use a standard tagging gun for most fabrics and a fine gun for delicates. A standard tagging gun is perfect for normal weight fabrics like denim, cotton, and so on. Unless you’re working with a fine fabric, like silk, the standard tagging gun will meet your needs.[1]
- Fabrics that are safe for standard tagging guns include cotton, tweed, knit, corduroy, denim, heavy nylon, twill, and polyester.
- Fine fabric guns use smaller needles and are less likely to damage delicate materials like baby clothes, silk, lightweight nylon, microfiber, linen, satin, and lingerie items.[2]
-
2Slide the lock lever on the gun forward and insert the needle. If your gun is assembled, you don’t need to worry about this! If it isn’t, slide the needle into the plastic needle guard. Push the lock lever on the front of the gun forward to unlock the gun. Keep the needle in the plastic guard and stick the back end of the needle into the front of the gun. Line up the slots on the needle and the gun and slide the lock lever back to secure the needle in place.[3]Advertisement
-
3Drop the round edge of the plastic fastener clip into the empty guide. Plastic fasteners come in bundles of 50 or more that are connected on a parallel row. Turn the fastener clip on its side to find the rounded edge and drop it into the empty guide or slot right behind the needle. Push gently until you hear a small click.[6]
- Plastic fasteners come in a variety of lengths and colors to choose from.
- In general, use shorter fasteners, like 1 inch (2.5 cm), for small items like panties and baby clothes.
-
4Remove the needle guard and squeeze the trigger to test the gun. Pull off the plastic front piece to reveal the needle. Gently squeeze the trigger once to make sure the plastic fasteners are dispensing correctly. If a single fastener shoots out when you pull the trigger, you’re ready to go![7]
- If nothing comes out when you squeeze the trigger, try gently pressing the clip deeper into the slot.
- Always keep the needle guard in place when you’re not using the gun.
-
5Put the price tag on the garment's care tag when possible. Most clothes have a care tag located somewhere on the item. If it’s a shirt or dress, check the back of the collar or the inside side seam. Look around the waistband if you’re working with pants or skirts. It’s always better to tag clothes through the care tag rather than piercing the fabric itself.[8]
- Be consistent with tag placement so your customers know where to look.
-
6Go with an inconspicuous side seam if the item doesn’t have a care tag. The needle will punch a tiny hole through the fabric, so you want to pierce it somewhere durable and inconspicuous to prevent damage. In most cases, one of the side seams is the way to go.
- For example, the side seam of a shirt, right beneath the arm pit, is a great option.[9]
-
7Push the gun’s needle through a paper price tag. Any kind of paper or light plastic material works great for price tags. If you have pre-cut price tags with holes, slip the needle through the hole. If you don’t, the needle can easily pierce right through the paper tag. Slide the price tag to the base of the needle.[10]
- Be careful since the needle is quite sharp.
-
8Pierce the care tag or side seam with the needle and squeeze the trigger. Insert the needle where you want to front of the tag to appear. When the fabric and tag are flush against the needle base, you’re all set. Gently pull the trigger one time, release it, and pull the gun away from the garment. You’ve tagged your first item![11]
- Make sure your fingers aren’t behind the price tag when you pull the trigger or you may pierce your skin.[12]


Alternative Options
-
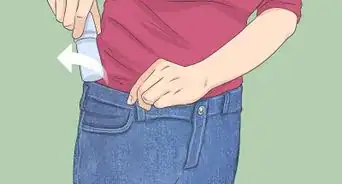
1Attach the price tag to the care tag or side seam with a safety pin. Safety pins are super useful if you have limited supplies and need to get tags on your items quickly. Place the price tag on top of the care tag and stick the safety pin through both tags. Secure the safety pin closed.[13]
- If the garment doesn't have a care tag, safety pin the price tag to a durable side seam.
-
2Use string and a hole punch to create your own hang tag. Punch a hole at the top center of the price tag using a single hole punch.[14] Cut a piece of string or yarn that's about 8 inches (20 cm) long and slip the string through the punched hole in the price tag. You have 2 options for attaching the hang tag to the garment:
-
3Put the price on an adhesive label and stick it to the front of the item. This works great if you're selling clothes at a flea market or garage sale. Buy an assortment of adhesive labels or blank stickers and write the price on the tag with a permanent marker. Then, place the sticker on the front of the item so it's easy to see.[17]


Things You’ll Need
Tagging Gun
- Standard or fine tagging gun
- Plastic fastener clips
- Paper or plastic price tags
Alternative Options
- Safety pins
- String, yarn, or cord
- Blank adhesive labels
- Permanent marker


References
- ↑ https://www.youtube.com/watch?v=SwNDeb-4GZ8&feature=youtu.be&t=15
- ↑ https://www.youtube.com/watch?v=SwNDeb-4GZ8&feature=youtu.be&t=120
- ↑ https://www.youtube.com/watch?v=NpHadz3Lux8&feature=youtu.be&t=37
- ↑ https://bizfluent.com/how-5217799-attach-price-tags-clothes.html
- ↑ https://www.youtube.com/watch?v=NpHadz3Lux8&feature=youtu.be&t=83
- ↑ https://www.youtube.com/watch?v=SwNDeb-4GZ8&feature=youtu.be&t=30
- ↑ https://bizfluent.com/how-5217799-attach-price-tags-clothes.html
- ↑ https://bizfluent.com/how-5217799-attach-price-tags-clothes.html
- ↑ https://www.youtube.com/watch?v=SwNDeb-4GZ8&feature=youtu.be&t=47
- ↑ https://www.youtube.com/watch?v=SwNDeb-4GZ8&feature=youtu.be&t=65
- ↑ https://www.youtube.com/watch?v=SwNDeb-4GZ8&feature=youtu.be&t=95
- ↑ https://bizfluent.com/how-5217799-attach-price-tags-clothes.html
- ↑ http://prelovedthreads.com/sell/prepping-tagging/
- ↑ https://www.youtube.com/watch?v=4e-pFo4cBU0&feature=youtu.be&t=251
- ↑ https://www.realthread.com/blog/how-tshirt-hang-tags-can-boost-your-brand-2018-06-07
- ↑ https://www.printpeppermint.com/faqs/hang-tags-faqs/how-do-i-attach-hang-tags-to-clothing/
- ↑ https://www.hawk-hill.com/how-to-price-flea-market-booth/
About This Article