This article was co-authored by wikiHow staff writer, Sam Browning. Sam Browning is an Emerging Technology Writer for wikiHow. Sam has not only written countless step-by-step articles for social media and tech, but he also has experience writing instructional articles on technology for Davidson College and reviewing video games. He is currently pursuing a degree in English with a minor in Digital Studies at Davidson.
This article has been viewed 21,753 times.
Learn more...
Have you ever opened a Google Doc to make a syllabus or work on a homework assignment, only to realize you don't know how to make a text box? While there is no single button that will create a box around text in Google Docs, there are several creative workarounds! This wikiHow article will teach you how to put a border around text in a Google Doc.
Steps
Using a Table
-
1Open a Google Doc. You can create or open a Google Doc through Google Drive by signing into your Google account.
-
2Click Insert. This tab is located at the top left of your screen under the title of your Google Doc.Advertisement
-
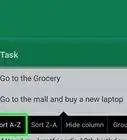
3Hover over Table and click the square in the top left. This will create a table with a single cell that will act as a border for your text.[1]
-
4Type or paste text into the table. Inserting the text into the table will give you a better idea of how big you want your border to be.
-
5Resize the table. You can adjust the size of the table by holding down on one side of the border, then dragging it and releasing at the desired size.
- This method can also be used to create a page border by resizing the table so it covers the entire page.
-
6Adjust the style of the table and border (optional). Change the background color of the table and the border color, width, and style using the four buttons at the far right of the menu.
- If you do not see these buttons, click the button at the far right of the menu with three dots as its icon. You should now see these options at the right of the sub-menu that appears.


Using Paragraph Styles
-
1Open a Google Doc. You can create or open a Google Doc through Google Drive by signing into your Google account.
-
2Click in front of the piece of text you would like to put a box around. If you have multiple pieces of text in a document and only want a border around certain text, be sure you start each paragraph on a new line.
-
3Click Format. This menu shows you a variety of adjustments you can make to the formatting of your page and content.
-
4Hover over Paragraph styles and select Borders and shading. You should now see a pop-up window titled “Borders and shading” with a variety of border customization options.[2]
-
5Click the first four boxes next to “Position”. Each of these boxes corresponds to a different line in your border, so enabling all of them will fully construct your text box.
-
6Customize your border (optional). Adjust your border width, style, color, background color, and space between your border and your text using the dropdown menus to the right of each heading.
-
7Click Apply. You should now see a box around your text!
-
8Resize your text box (optional). This method will create a box around your text that spans the entire width of the page. If you would like to shrink the box, click next to your text, then adjust the margins of that paragraph by dragging the blue arrows at the top of your page to the desired spots.


Using a Text Box in a Drawing
-
1Open a Google Doc. You can create or open a Google Doc through Google Drive by signing into your Google account.
-
2Click Insert. This tab is located at the top left of your screen under the title of your Google Doc.
-
3
-
4Click the Text box icon. This icon looks like a “T” in a box.
-
5Draw your text box. Click and drag to create a text box of the size you choose.
-
6Type your desired text. You can adjust the font, font size, color, and more using the menu at the top of the Drawing window.
- Once you have typed your text, consider resizing the text box once more to accommodate the size of its content.
-
7Click the Border weight icon and select a weight. This button is represented by three lines stacked on top of each other with the thickest line at the top. Weight translates to border thickness, so the higher the weight you select, the thicker your border.
-
8Customize other border settings (optional). Use the buttons immediately to the left and right of the Border weight button to change the fill color of your text box, the border color, and the border line style.
-
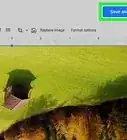
9Click Save and Close. You have now created a box around text in Google Docs! Be aware that resizing Drawings in a Google Doc can sometimes pixelate the text they contain, especially if you are shrinking them, so consider adjusting the size by clicking the Drawing, then clicking Edit instead.


Using a Rectangle Shape in a Drawing
-
1Open a Google Doc. You can create or open a Google Doc through Google Drive by signing into your Google account.
-
2Click Insert. This tab is located at the top left of your screen under the title of your Google Doc.
-
3Hover over Drawing and select New. You should now see a pop-up window titled “Drawing”.
-
4Click the Shapes button. This button is represented by a circle overlapping a square.
-
5Hover over Shapes and select the rectangle. The rectangle is the first option in the first category of shapes.
-
6Draw your rectangle. Click and drag in the Drawing window to create a rectangle of the desired size.
-
7Double-click the rectangle and add your text. You can adjust the font, font size, color, and more using the menu at the top of the Drawing window.
-
8Resize the rectangle to fit your text. Adjusting the size of the rectangle in the Drawing rather than the Google Doc itself will help prevent the pixelation of your text.
-
9Adjust the style of the rectangle as desired (optional). Use the four buttons in the middle of the Drawing window menu to adjust the fill color and border weight, color, and style of your rectangle.
-
10Click Save and Close. You now have text in a box in a Google Doc! If you plan on resizing your Drawing, consider doing so by clicking it, then clicking the Edit button that appears. Adjusting a Drawing’s size in a Google Doc can pixelate the text it contains.


Using an Image and Text Box in a Drawing
-
1Open a Google Doc. You can create or open a Google Doc through Google Drive by signing into your Google account.
-
2Click Insert. This tab is located at the top left of your screen under the title of your Google Doc.
-
3Hover over Drawing and select New. You should now see a pop-up window titled “Drawing”.
-
4Click the Image button. This button icon looks like two mountains or triangles in a square and is the furthest right option in the Drawing window menu.
-
5Choose the Search tab. If you already have a border selected and saved to your computer, choose Upload instead, then drag and drop the image into the box or select it from your files. You can also skip the next step.
-
6Search for something like document border. You can use more or less specific terms depending on the type of border you are looking for. To look through the available borders, simply scroll as you normally would through the search results.
-
7Click the border you like, then press Select. An image of the border should now be in your Drawing window.
-
8Click the Text box icon. This icon looks like a “T” in a box.
-
9Draw your text box inside the border. Be sure to shape your text box to the border; otherwise, it will not display properly.
-
10Type your text into the textbox. If you need more room, try resizing both the border and the text box by clicking each one, then dragging the corners further out.
- You can adjust the font, font size, color, and more using the menu at the top of the Drawing window.
-
11Click Save and Close. Your Drawing should now be visible in your Google Doc!
-
12Adjust the Drawing as desired in the Google Doc (optional). If resizing the border in the Google Doc itself pixelates the text or image, try clicking it, then clicking Edit and resizing it in the Drawing window.


References
About This Article

1. Click the Insert tab.
2. Hover over Table and select the top-left square to create a table with a single cell.
3. Add text to the table and resize the table as desired.
4. Adjust the style of the table and its border with the four buttons at the far right of the menu (you may have to expand your menu by clicking the button with the three dots icon).