This article was co-authored by wikiHow staff writer, Jennifer Mueller, JD. Jennifer Mueller is a wikiHow Content Creator. She specializes in reviewing, fact-checking, and evaluating wikiHow's content to ensure thoroughness and accuracy. Jennifer holds a JD from Indiana University Maurer School of Law in 2006.
This article has been viewed 13,784 times.
Learn more...
If you want to play a musical instrument, particularly a fretted stringed instrument (such as the guitar or the ukulele), learning chords is a must. You don't have to learn how to read sheet music to read chords – the system is much simpler. If you know the relationship between musical tones, you can play a chord simply by knowing its name. For fretted stringed instruments, you can also use a chord chart to figure out how to play a chord.
Steps
Deciphering Chord Charts
-
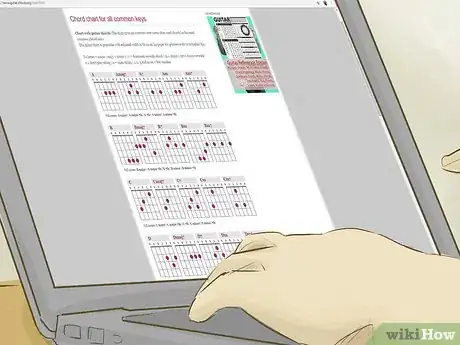
1Find the chord chart for the chord you want to learn. If you're learning to play a fretted stringed instrument, such as the guitar or the ukulele, you can use chord charts to read chords. These diagrams show you where you place your fingers on your instrument to play specific chords. The letter(s) at the top of the chord chart indicates the name of the chord.[1]
- You can search for guitar chord charts online, buy a book that includes chord charts for all major and minor chords, or download a free app on your phone or mobile device.
Tip: All chords have multiple fingering patterns. When you're transitioning between chords, you may find some fingerings are easier to switch to than others. If you're having trouble with a chord transition, try a different fingering and see if that makes it easier.
-
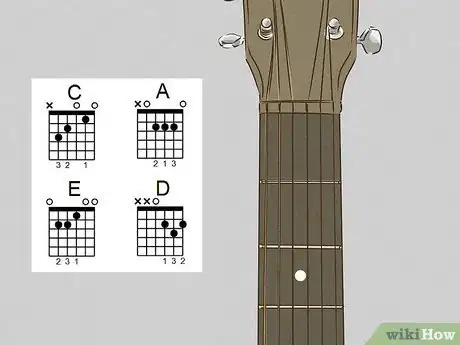
2Compare the vertical lines to the strings on your instrument. A chord chart is made up of vertical lines, each of which represents a string on your instrument. The strings are presented on the chord chart from left to right, in the order they appear on your instrument if you are holding it out in front of you so that the strings are facing you.[2]
- For example, on a guitar chord chart, the vertical line furthest to the left on the chart would be the thickest E string on your instrument. The sixth vertical line on the far right would be the thinnest E string on your instrument.
- Occasionally you will see chord charts that are horizontal rather than vertical. However, the vertical presentation is the most common. If you see a horizontal chord chart, just remember that the thinnest string is on the top, while the thickest string is on the bottom.
Tip: Chord charts are typically written for right-handed guitarists. If you're left-handed, you may have difficulty mentally flipping the chart so that it makes sense for you. There are chord charts available online that are made just for lefties.
Advertisement -
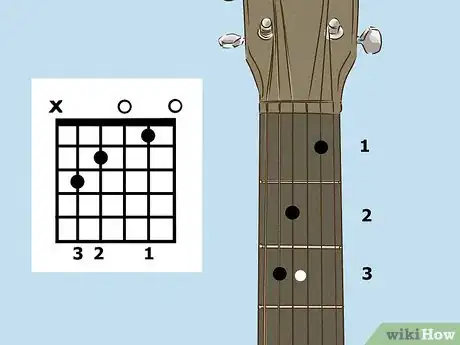
3Familiarize yourself with the frets on your instrument. The horizontal lines on a chord chart correspond to the frets on your instrument. The very top line, usually thicker than the other lines, represents the nut at the top of your fretboard. The next fret down is the first fret. The rest of the frets are numbered in sequential order.[3]
- A chord chart typically only shows the first four frets. If you're looking at a chord chart for a higher fret, the top line won't be bolded. Fret numbers will run down the side to let you know the specific frets shown so you can place your fingers on the fretboard correctly.
- If you're playing guitar and the chord requires a capo, the chord chart will indicate which fret you should clamp the capo on, then show the fret numbers down the side of the chart.
-
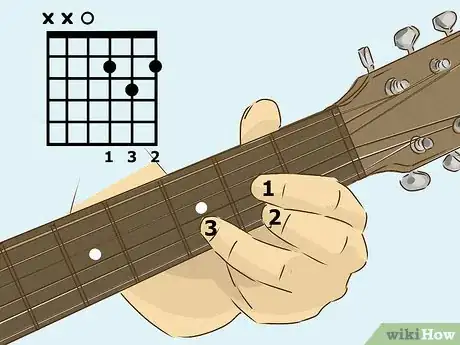
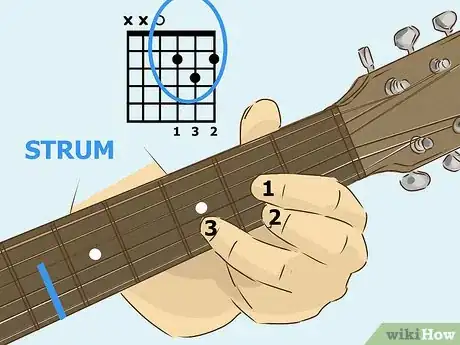
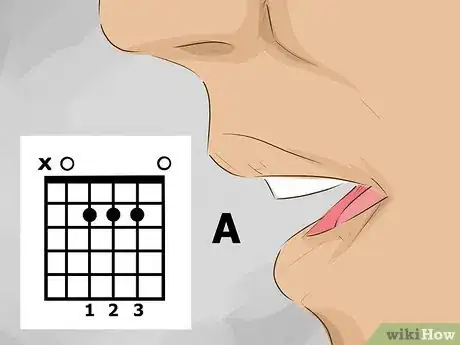
4Place your fingers where the dots on the chart indicate. Black or colored dots on the chart indicate which strings should be fretted to play the chord. Each finger is numbered: 1 is your index finger, 2 is your middle finger, 3 is your ring finger, and 4 is your pinky.[4]
- You don't need to use your thumb to play almost all guitar chords. In the rare instance where the thumb is required, the chart uses a "T."
- Finger numbers are most often printed inside the dot. However, on some chord charts, they are written along either the top or the bottom of the chord chart. Choose whichever design makes the most sense to you.
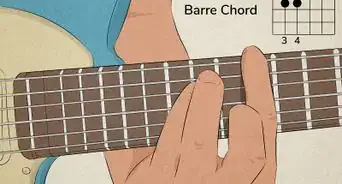
- Barre chords are typically indicated by a solid line over the fret you're supposed to barre. In most cases, you'll barre the string with your index finger, but some chords may call for alternate fingerings.
-
5Strum the strings indicated in the chart to play the chord. At the top of the chart, each string will have symbols that let you know which strings are picked or strummed to form that chord. If there's an "X" above the string, don't play that string at all. If there's an "O," play the string open without fretting it. All other strings will have a fingering listed on the chart.[5]
- If the chord sounds off, pick each string while fingering the chord. You may have a finger that is accidentally muting one of the neighboring strings.
Interpreting Chord Names and Symbols
-
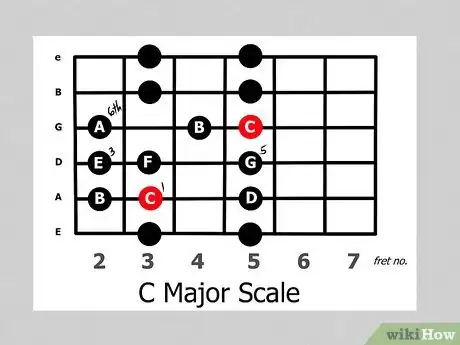
1Practice scales to understand intervals and relations between notes. Each major and minor scale have chord tones that are the same notes played for the chord of the same name. By learning the scales, you're learning chords as well.[6]
- Basic chords are made up of 3 notes: the root note, the third note of the scale, and the fifth note of the scale.
- For richer chords, intervals can be added. If you know the scale, you know the note to add just by looking at the chord's name. For example, if the chord name is G6, you would add the sixth note in the G major scale to the 3 notes of the basic chord.
-
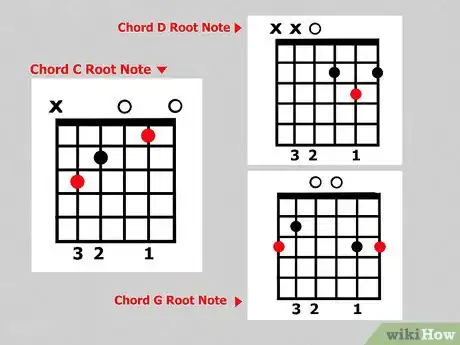
2Identify the root note. The first letter in a chord name is the root note. The root note is typically the lowest note in the chord and serves as the chord's base. [7]
- For example, the root note in the chord "Gbmadd9" is G flat. A simple chord name, such as "C," would indicate a basic C major chord.
- Sometimes you'll see a lower note after a slash ( / ). This note is not the root note. Rather, you're supposed to play this note instead of the root note. You still play the other notes in the original chord named before the slash.
-
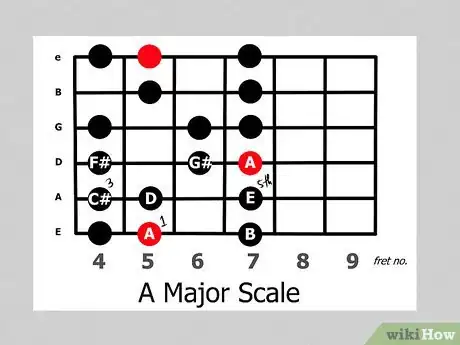
3Use the chord name to find the other notes in the basic chord. A basic chord is made up of 3 notes played at the same time: the root note of the scale, the third note in the scale, and the fifth note in the scale. If you already know the scale, you can easily fill in the third and fifth notes simply by reading the name of the chord.[8]
- For example, the A Major scale is made up of the notes A, B, C#, D, E, F#, G#, and A. So for an A Major chord, you would play A, C#, and E together.[9]
-
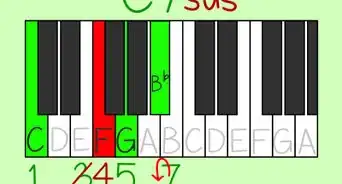
4Add an interval if included in the chord name. If you've been practicing your scales, you know which notes to play if there are any extensions beyond the basic chord included in the name of the chord. These intervals are indicated with numbers and abbreviations.[10]
- For example, suppose you see the chord name "C6." You know the root note is C, and that the chord is on the C Major scale. The C Major scale is C, D, E, F, G, A, B. For the basic chord, you would add the third and the fifth to play C, E, and G. The chord name "C6" indicates that you should also add the sixth note in the scale. So for a "C6," you would play C, E, G, and A.
Tip: You'll sometimes see other symbols in chord names, especially on lead sheets for jazz music. For example, you might see a " – " instead of an "m" to indicate a minor chord. These symbols make the chord name shorter and simpler to write out.
-
5Read the chord name aloud to get a feel for it. When you're learning how to read chords, half the battle is learning how to read the mix of symbols and abbreviations that make up a chord name. Think of the chord name as a recipe for how to build your chord. The letters, numbers, abbreviations, and symbols are all ingredients to add into the mix.[11]
- Letters and numbers are read exactly as they are written. For example, if you saw "G6," you would read it as gee six.
- If you see an m after the first letter, read it as "minor." For example, you would read "Cm7" as see minor seven.
- A "#" is read as sharp, while a "b" is read as flat. For example, you would read "Abmaj7#11" as A flat major seven sharp eleven.
- Some other abbreviations you might see include add (before a ninth) and sus (for suspended chords). Read them as you see them: a "Cadd9" is see add nine and a "Dsus4" is dee suss four.
References
- ↑ https://takelessons.com/blog/guitar-chord-charts-z01
- ↑ https://takelessons.com/blog/guitar-chord-charts-z01
- ↑ https://takelessons.com/blog/guitar-chord-charts-z01
- ↑ https://takelessons.com/blog/guitar-chord-charts-z01
- ↑ https://takelessons.com/blog/how-to-read-guitar-chords
- ↑ https://www.guitarlessons.com/guitar-lessons/lead-guitar/8-tips-for-how-to-use-guitar-scales
- ↑ https://www.stringkick.com/blog-lessons/chord-names-symbols/
- ↑ https://www.stringkick.com/blog-lessons/chord-names-symbols/
- ↑ https://www.guitarlessons.com/guitar-lessons/lead-guitar/8-tips-for-how-to-use-guitar-scales
About This Article
To read chords for guitar, look at the vertical lines of a chord chart, which represent the 6 strings from left to right. Then, recognize that each horizontal line represents a fret on your guitar. When you’re learning a chord, place your fingers where the dots on the chord chart indicate. Your fingers are numbered 1-4, starting with your index finger, which are written beneath the corresponding string on the chord chart. Once you have your fingers in the right place, look at the top of the chord chart for the X’s and O’s, which represent whether a string should not be strummed at all or strummed without fretting it. For example, to play an A chord, place your index finger on the 2nd fret of the 4th string. Then, put your middle and ring fingers either side of it on the 2nd fret. When you strum the chord, play the 2nd and 6th strings open, as indicated by the circle above the string on the diagram. For more tips, including how to recognize scales and intervals, read on!
-of-a-Song-Step-9.webp)





-of-a-Song-Step-9.webp)


