This article was co-authored by wikiHow Staff. Our trained team of editors and researchers validate articles for accuracy and comprehensiveness. wikiHow's Content Management Team carefully monitors the work from our editorial staff to ensure that each article is backed by trusted research and meets our high quality standards.
This article has been viewed 48,283 times.
Learn more...
There are many different ways to read music, but tablatures, or “tabs,” are very popular for learning how to play stringed instruments, like the ukulele. If you’re learning the ukulele, using tabs can help you understand where to position your fingers on the neck of the instrument. Playing with tabs is easy, but you’ll need to learn and understand the basics of reading tabs, learn how to play chords and special pitches, and figure out the rhythm and tempo for the song.
Steps
Basic Notes
-
1Compare the strings of the ukulele to the tab chart. The tab chart has 4 horizontal lines that correspond to the 4 strings on the ukulele. On the chart, they’re labeled from top to bottom as “A, E, C, G.” Place the ukulele flat on a table with the headstock to the left to visualize how the tab corresponds with the ukulele strings.[1]
- When you hold the ukulele up to your body to play, the G string will be the closest to your head, and the A string will be the closest to your waist.
-
2Place your finger on the fret number of the identified string. The numbers on the chart correspond to the fret number of the string that the number is on. Count the frets starting from the headstock and working down to the body of the ukulele. Then, put the pad of one of your fingers on the string and press the string down into the fret.[2]
- Try not to touch any other strings with your fingers, as this can cause them to make sounds while you’re playing.
- Keep in mind that the numbers don’t correspond with which finger you’re supposed to use. You can use whichever finger feels natural to you to press the string into the fret.
Advertisement -
3Pluck the string once to play the note. Using your fingers, your thumb, or a pick, make the string vibrate by tapping it and then letting go. Make sure you only hit the string one time if the fret is only labeled once on the tab. Then, set up your fingers to play the next note or chord.[3]
- If you don’t get a good sound out of the string the first time you pluck it, try adjusting the pressure on the fret. Make your grip slightly tighter or looser, and pluck the string again to see how the sound quality changes.
-
4Play the string without holding any frets if the number on the tab is “0.” A “0” marking tells you to pluck the string without holding your fingers on any frets. Simply use your playing hand or a pick to make the string vibrate.[4]
- Be sure to keep your fingers away from the frets on that string if it has a “0” on the tab. If your finger touches the string, it can cause the string to stop vibrating and the sound will stop.
-
5Read from left to right on the tab to play notes in sequence. Once you’ve plucked your first string, look to the right at the next column of numbers and re-adjust your fingers to play the next note that’s on the tab. Keep reading from left to right until you reach a symbol or chord that you don’t know.[5]
- Don’t move on in the tab to the next note until you feel like you’ve mastered the first one.
-
6Take your time as you work through the song for the first few times. When you’re first learning ukulele, don’t worry about working through the songs quickly or playing them exactly right. It’s best to take your time and learn where to position your fingers. Once you’ve learned where your fingers go, you can practice more frequently to get faster and play the songs up to tempo.[6]
- It may be helpful to focus on learning only one song at a time so you can begin to memorize the song as you play it.


Chords and Symbols
-
1Place your fingers on 2 or more frets when the numbers align vertically. As you’re looking at the columns on the tab, you might notice there are 2 or more numbers in the same column. Press your fingers into the noted frets for each string with a number, and check to make sure your fingers aren’t bumping other strings.[7]
- When you’re first learning a chord, your fingers might feel a bit awkward. Don’t be afraid to try different hand positions, as long as you’re still touching the right frets and strings.
- For instance, the C chord is one of the easiest chords to play and the first one many learners are able to master. It looks like this:
- A |--3--|
- E |--0--|
- C |--0--|
- G |--0--|
-
2Strum the strings with a fret number to play the chord. Once you have your fingers in position on the frets, use your other hand to play only the strings that are noted on the tab. Use a strumming motion by running your finger or a pick across the strings, or pluck multiple notes at the same time.[8]
- If one of the strings doesn’t have a number on it on the tab, don’t touch that string while you play the chord.
-
3Move your fingers to the next set of frets and strum to play the chord. After you’ve played the chord on the tab, move 1 column to the right and re-adjust your fingers for the next note or chord. Play the pitch and re-adjust your fingers again to play another pitch.[9]
- Take your time as you’re figuring out the chords for a song. Practice switching from the fingering for one chord to the next one without playing any notes. This will help your fingers get used to the motions of playing the song.
-
4Learn “hammer-on” notes to play a higher secondary pitch. Hammer-on notes are marked by a number, the letter “h,” and another number. Play them by putting your finger on the first numbered fret, plucking the string, and then quickly putting your finger on the second numbered fret and lifting the first finger you put down.[10]
- For instance, a hammer-on labeled for the A string might be “2h3.” In that case, you’d place your finger on the 2nd fret of the A string, pluck the string, and then quickly place a different finger on the 3rd fret of the A string as you lift up the finger on the 2nd fret.
- Sometimes, hammer-ons are also noted with a “^” symbol.
-
5Identify “pull-off” notes to play a lower secondary pitch. Pull-off notes are marked with a number, the letter “p,” and another number. Place your finger on the fret of the first and second numbers, and pluck the string. Then, pull the finger off of the first numbered fret.[11]
- For example, a pull-off labeled for the E string might be “3p2.” You would place your fingers on the 2nd and 3rd frets of the E string, pluck the string, and then lift up the finger on the 3rd fret to make the pitch lower.
- Like hammer-ons, pull-offs are sometimes labeled with a “^” symbol, especially when you’re going to switch between hammer-ons and pull-offs.


Rhythm and Tempo
-
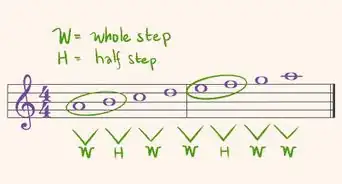
1Look at the time signature at the beginning of the tab if there’s one available. The time signature looks like a fraction without a line at the beginning of the tab. Most time signatures are a number, like 2, 3, or 4, over 4, meaning that 1 beat will be represented by a quarter note. The top number signifies how many beats there are in a measure.[12]
- For example, in a 4/4 time signature, there are 4 beats in a measure and 1 beat is represented by a quarter note.
- If there is a number other than 4 on the bottom of the time signature, like a 2, then a different note will represent 1 beat. For instance, in a 3/2 time signature, a half note is used to represent 1 beat.
- Keep in mind that not all tabs will have a time signature, and some may use lines to signify how long you should hold the pitches for.
-
2Play a quarter note if there is a long line on the bottom of the tab. A quarter note is 1 beat of a standard 4-beat or 3-beat measure. When there’s a longer line under the column, play the note or chord and count “1” in your head.[13]
- Some tabs also have measures above the tabs with standard notation. If this is the case, be sure to look at the far left of the measure for the time signature. If it isn’t two 4s on top of each other, the measures aren’t 4 beats.
- No matter how many beats there are in the measure, a quarter note will always be held for 1 beat of the measure.
-
3Hold a half note if there’s a short line on the bottom of the tab. A half note always has half as many beats as the whole note, which is normally 4 beats. In a standard 4-beat measure, hold a half note for 2 of the 4 beats.[14]
- In some rare cases, such as 2/3 time, you would hold the half note for 1.5 beats, since the bottom of the time signature denotes how many beats the whole note receives.
-
4Pluck a whole note when there’s no line under the tab. If there isn’t any notation underneath the note, let the pitch continue for the entire measure. In a standard 4-beat measure, hold a whole note for all 4 beats in the measure.[15]
- When you’re first learning how to play, your pitches might not last for all 4 beats. Just remember to count for 4 beats in your head before you move onto the next pitch.
-
5Listen to a recording of the song to get a feel for the rhythm and tempo. If you’ve never heard the song before, it might be difficult to understand how the pitches flow together using only the time signature and beats. Search for the song online played on any instrument, and listen to it closely. Then, try to hum the song as you read and play the tabs.[16]
- This will help you understand what the melody is supposed to sound like when played at the right pace and rhythm.
- If you’re having trouble understanding the rhythm, beats, or tempo, consider using a metronome. The metronome is a device that produces beats based on the desired tempo for the song. You can set the tempo to be fast or slow, or you can match it to a specific song.


References
- ↑ https://liveukulele.com/tabs/how-to-read-tab/
- ↑ http://ukulelehunt.com/2008/01/03/ukulele-101-how-to-read-ukulele-tab-part-1/
- ↑ https://liveukulele.com/tabs/how-to-read-tab/
- ↑ http://ukulelego.com/lessons/how-to-read-ukulele-tab/
- ↑ http://ukulelehunt.com/2008/01/03/ukulele-101-how-to-read-ukulele-tab-part-1/
- ↑ http://ukulelehunt.com/2008/01/03/ukulele-101-how-to-read-ukulele-tab-part-1/
- ↑ https://liveukulele.com/tabs/how-to-read-tab/
- ↑ https://liveukulele.com/tabs/how-to-read-tab/
- ↑ https://ukuguides.com/advanced/how-to-read-ukulele-tablature/
- ↑ http://ukulelego.com/lessons/how-to-read-ukulele-tab/
- ↑ https://ukuguides.com/advanced/how-to-read-ukulele-tablature/
- ↑ https://www.music-theory-for-musicians.com/time-signatures.html
- ↑ http://ukulelehunt.com/2008/01/09/ukulele-101-how-to-read-ukulele-tab-part-2/
- ↑ http://ukulelehunt.com/2008/01/09/ukulele-101-how-to-read-ukulele-tab-part-2/
- ↑ http://ukulelehunt.com/2008/01/09/ukulele-101-how-to-read-ukulele-tab-part-2/
- ↑ https://ukuguides.com/advanced/how-to-read-ukulele-tablature/
About This Article

To read ukulele tabs, note that the tab chart has 4 horizontal lines that correspond to the 4 strings on your instrument. When you hold your ukelele up to your body, the “G” string will be the closest to your head, and the “A” string will be closest to your waist, but on your tab chart, “A” is at the top and “G” is at the bottom. The numbers on the chart match the fret number of the string that the number is on, so count the frets starting from the headstock and work down to the body of the ukulele. Put the pad of 1 of your fingers on the string and press it down into the fret. To learn how to understand chords and symbols, keep reading!