This article was co-authored by Kevin Schlosser. Kevin Schlosser is a Home Improvement Specialist and the Owner of Home Tech Handyman Ltd. With over 20 years of experience, Kevin specializes in age-in-place installations, flooring, roofing, and general remodeling handyman services. Kevin holds a blend of construction and in-home technology-related certifications including NAHB Certified Age-in-Place Specialist, CEDIA membership and certifications, and a Certification from the Association of Certified Handyman Professionals. Also, he is in training to receive certifications in Construction, Project Management, and other CEDIA qualified system integrator certifications. He is fully-insured in the state of Colorado.
There are 12 references cited in this article, which can be found at the bottom of the page.
This article has been viewed 101,695 times.
If you're not a fan of the texture on your walls, you do have a few options. One option is to try scraping off the texture with water and a floor scraper or drywall blade. The second option is to cover the texture up with joint compound, which requires several layers. The second method takes longer to do, as you may need many layers of joint compound and you'll need to let it dry overnight between layers. Either way, the job is a messy one, so make sure to prep the area with tarps and drop cloths first.
Steps
Preparing Your Workspace
-
1Cover the furniture in the room. This job is very messy. You will have drywall and paint everywhere, so you need to make sure everything is well covered.[1] You can drape furniture in old sheets, drop cloths, or tarps.[2]
- You may also want to cover vents so it doesn't spread throughout your house. You can tape plastic over them to prevent dust from going through.
-
2Move furniture out if you're nervous about dust. If you're worried about damaging your furniture, it's best to just move it out of the room. You should definitely move any fragile or antique pieces out of the room, if possible.[3]Advertisement
-
3
-
4Protect yourself with safety gear. Don't forget to wear safety goggles and a dust mask to protect yourself from the debris. If you're worried about lead paint, consider wearing a respirator instead of just a dust mask. You may also want gloves when applying the joint compound.
- If you have an old house, you'll likely be dealing with lead paint. In that case, you'll need to take extra precautions, such as removing everything from the room, or covering it up with 2 sheets of plastic, each one 6 millimeters thick. You should also wear clothes you can throw away or disposable coveralls, along with gloves, goggles, a HEPA respirator, and a hair covering. Vacuum any dust off you with a HEPA-filtered vacuum cleaner.[6]


Scraping off the Texture
-
1Spray a small area with water. Start with a 2 by 2 feet (0.61 by 0.61 m) square, and thoroughly coat it with water. Don't spray a large area yet, as you'll need to practice a bit to get the technique down. Let the water soak into the wall for a few minutes. The water will help make it easier to scrape the texture off.[7]
- Touch the wall to see if it's soaked in enough. It should feel a little soft.
- If it doesn't seem soft, try spraying it again.[8]
-
2Hold a floor scraper or drywall blade at a 30° angle. Set the blade against the wall. The blade should create a 30° angle coming off of the wall. Keep it steady at this angle when you begin to scrape.[9]
-
3Scrape off the texture. Scrape the wall at an angle, adjusting as you go. You may need to scrape harder or softer, depending on how the wall responds to your scraping. That's why you're starting with a small spot first.[10]
- If the texture isn't coming off, you're not scraping hard enough. However, you don't want to scrape down into the wallboard underneath.
-
4Move around the room in small sections. Once you get your rhythm, spray another section. It can be bigger than your first section. Let it soak in, and scrape it as you did before. Keep moving around the room until you've scraped all of the texture off.[11]
- Be sure to move systematically around the room so you don't miss any spots. Pick a place to start, and make a plan for how you're going to cover the whole room, such as going up and down the wall.
- If it dries out, apply more water as needed.
-
5Sand down the texture that's left behind. After you have the whole room done, go back around with a medium-grit sandpaper in the 60- to 100-grit range. Sand down any rough spots that are left behind so you have a mostly smooth surface.[12]
- You can also use a sanding screen.
- Don't sand too hard, as you don't want to sand through the paper on the wallboard or into the wallboard.
-
6Wipe down the wall with a damp sponge. You don't want to leave dust on the area, so dampen a large sponge. Wipe down the wall as well as you can to remove the dust. You may need to wash the sponge out from time to time.[13]
-
7Apply joint compound over the wall with a wallboard knife. Use a wallboard knife that's 6 inches (15 cm) long to spread joint compound across the wall. Aim for a layer that's 1⁄8 inch (3.2 mm) thick. Smooth it out as you go, and make sure to complete each wall in one session to give it a more even look. Let the wall dry overnight.[14]
-
8Sand the walls down again. Once the wall has dried overnight, sand down any rough areas with medium-grit sandpaper or a sanding screen. Create as smooth a surface as you can.[15]
- Vacuum up the drywall dust so it doesn't float into the joint compound when you apply it again. You can use a standard vacuum, but make sure it works really well. However, you can also rent a dust drywall vacuum specifically for that purpose.[16]
-
9Apply another round of joint compound. Use your wallboard knife to apply the second and final layer of joint compound. Make a thinner layer this time, as you're mostly trying to fill in low spots. Let it dry overnight.[17]
-
10Sand again. After the joint compound has dried overnight, spend time smoothing out the walls again. Run medium-grit sandpaper over any rough areas to create a smooth surface. Vacuum up any dust.[18]
- It helps to wipe the wall down with a damp sponge again, letting it dry afterwards.
-
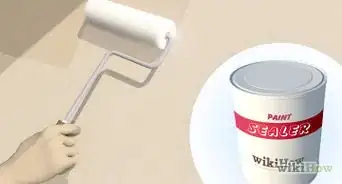
11Prime the wall. Before painting, apply primer to the wall. Use a paint roller to apply the paint primer of your choice, creating the perfect canvas for whatever paint you choose.[19]


Covering up the Texture
-
1Mix your joint compound. For this procedure, you need your joint compound to be like pancake batter. Even if you're using pre-mixed compound, you may need to add a little water to thin it out a bit.[20]
- You can use a metal mixing attachment for a standard drill. You may need to mix water in batches, as this type of mixer often isn't strong enough to mix the whole bucket at once.[21]
-
2Pick up the compound with a thick-napped paint roller. Pour some of the compound into a paint-rolling tray. Roll a paint roller into it, coating the roller in the compound. Try to get it on evenly.[22]
-
3Roll the compound on the wall. Working around the room in small sections that are about 1 by 2 feet (0.30 by 0.61 m), use the paint roller to apply the compound to the wall. Move from top to bottom and overlap each section slightly. As you go, keep the edge wet that's the adjacent to the next section. If you need to, spray it down with a bit of water.[23]
-
4Smooth the compound out with a trowel as you go. Moving up and down, create an even layer with a trowel. Smooth out each small section as you go; don't wait until the whole wall is finished. Get it as smooth as you can, but depending on how thick the texture is, this coat isn't likely to be very smooth.[24]
-
5Let the joint compound dry. The joint compound needs to dry overnight before you apply the next coat. Once you get it smoothed out, leave it alone to dry.[25]
-
6Sand as needed. If you see obvious areas that are rough or sticking up, you can try sanding them down a bit with medium-grit sandpaper. Vacuum up any dust, and wipe down the wall with a damp sponge to remove dust.[26]
- Use a drywall sanding vacuum attachment to cut down on the mess.
- Try a 60- to 100-grit sandpaper.
-
7Repeat the layers as needed. Keep adding layers of joint compound to the wall, letting it dry in between coats. Sand when you need to. Add enough layers to hide the texture of the wall. You may need to do 3 to 5 layers to cover the texture.[27]
-
8Sand the wall down with a light grit sandpaper. After you've got your texture covered up, run over the wall with a light grit sandpaper to smooth it out. Don't press down hard, as that will create more texture. Wipe it down with a damp sponge to remove dust, and vacuum up any dust left behind.[28]
- Try a sandpaper in the 120- to 220-grit range.
-
9Apply primer to the wall. Now you need to prime the wall for painting. You can apply it with a paint roller, covering it evenly to create a smooth surface for your paint.[29]


Things You'll Need
Preparing the Room
- Safety goggles
- Respirator mask
- Tarps, old sheets, or drop cloths
- Plastic covers, optional
- Painter's tape
Scraping the Texture
- Spray bottle
- Floor scraper
- Sandpaper
- Safety goggles
- Primer
Covering the Texture
- Lightweight or ultra-lightweight joint compound
- Wallboard knife
- Vacuum
- Drill with mixing attachment
- Paint roller
- Paint pan
- Water
- Primer


References
- ↑ Kevin Schlosser. Home Improvement Specialist. Expert Interview. 19 February 2021.
- ↑ https://www.apartmenttherapy.com/removing-texture-from-a-wall-142140
- ↑ https://www.homedit.com/how-to-remove-texture-from-the-wall/
- ↑ Kevin Schlosser. Home Improvement Specialist. Expert Interview. 19 February 2021.
- ↑ https://www.hunker.com/12001871/how-to-remove-popcorn-texture-from-a-wall
- ↑ https://www.health.ny.gov/publications/2502/
- ↑ https://www.homedit.com/how-to-remove-texture-from-the-wall/
- ↑ https://www.apartmenttherapy.com/removing-texture-from-a-wall-142140
- ↑ https://www.hunker.com/12001871/how-to-remove-popcorn-texture-from-a-wall
- ↑ https://www.homedit.com/how-to-remove-texture-from-the-wall/
- ↑ https://www.homedit.com/how-to-remove-texture-from-the-wall/
- ↑ https://www.apartmenttherapy.com/removing-texture-from-a-wall-142140
- ↑ https://www.homedit.com/how-to-remove-texture-from-the-wall/
- ↑ https://www.apartmenttherapy.com/removing-texture-from-a-wall-142140
- ↑ https://www.homedit.com/how-to-remove-texture-from-the-wall/
- ↑ https://www.apartmenttherapy.com/removing-texture-from-a-wall-142140
- ↑ https://www.apartmenttherapy.com/removing-texture-from-a-wall-142140
- ↑ https://www.homedit.com/how-to-remove-texture-from-the-wall/
- ↑ https://www.homedit.com/how-to-remove-texture-from-the-wall/
- ↑ https://sawdustgirl.com/how-to-skim-coat-get-rid-wall-texture/
- ↑ https://www.youtube.com/watch?v=0kAgc_b9fSU&feature=youtu.be&t=94
- ↑ https://sawdustgirl.com/how-to-skim-coat-get-rid-wall-texture/
- ↑ https://sawdustgirl.com/how-to-skim-coat-get-rid-wall-texture/
- ↑ https://sawdustgirl.com/how-to-skim-coat-get-rid-wall-texture/
- ↑ https://www.apartmenttherapy.com/removing-texture-from-a-wall-142140
- ↑ https://sawdustgirl.com/how-to-skim-coat-get-rid-wall-texture/
- ↑ https://sawdustgirl.com/how-to-skim-coat-get-rid-wall-texture/
- ↑ https://sawdustgirl.com/how-to-skim-coat-get-rid-wall-texture/
- ↑ https://www.homedit.com/how-to-remove-texture-from-the-wall/
About This Article

To remove texture from a wall, start by spraying a small section of the wall with water and letting the water soak in for a few minutes. Then, hold a floor scraper or drywall blade at a 30-degree angle to the wall, and firmly scrape the softened texture off of the wall. Repeat the process until you've scraped off all of the texture. Finally, sand the wall with medium-grit sandpaper before covering it with joint compound. To learn how to cover up texture on a wall without scraping it off, scroll down!