This article was co-authored by wikiHow staff writer, Jessica Gibson. Jessica Gibson is a Writer and Editor who's been with wikiHow since 2014. After completing a year of art studies at the Emily Carr University in Vancouver, she graduated from Columbia College with a BA in History. Jessica also completed an MA in History from The University of Oregon in 2013.
There are 7 references cited in this article, which can be found at the bottom of the page.
The wikiHow Video Team also followed the article's instructions and verified that they work.
This article has been viewed 74,571 times.
Learn more...
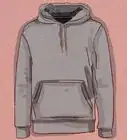
If you're tired of that hoodie you've had forever or just want to update the style, cut off the hood. Once you remove the hood, you'll have a sweatshirt with a simple round or crew neckline. That's it! If you'd rather make a sweatshirt with a collar, leave extra fabric around the neck and finish the edges with a sewing machine. You can fold the collar or leave it sticking up for a casual look.
Steps
Cutting off the Hood
-
1Lay the hoodie on a flat work surface with the front facing up. Spread out the hoodie so the hood extends away from the body. You don't want to accidentally cut into the body of the hoodie itself.[1]
- Don't work on a rug or carpeted area because you might cut into them as you remove the hood.
-
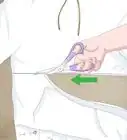
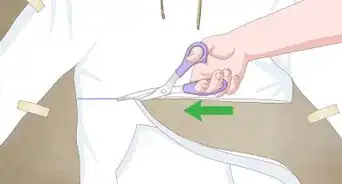
2Cut around the entire hood above the seamline to make a round neckline. To easily remove the hood, take a pair of sharp scissors and start cutting along the base of the hood where it meets the hoodie body. It's important to cut right above the seamline so the stitches don't unravel. Keep cutting from the front of the hood all the way around to the opposite side.[2]
- Rotary cutters don't work well for this project since you can't see if you're cutting through the bottom seam.
- You can throw away the hood or use the scrap of fabric for another sewing project.
Advertisement -
3Cut a V-shape on the sweatshirt if you want to change the neckline. If you'd like it to have a V-neck, take your scissors and cut a straight vertical line down the center of the neckline. Cut down as far as you want. Then, cut 2 diagonal lines from the base of the neckline up to the sides of the neck to make a V-shape.[3]
- To cut a deep V-neck, make a 5 in (13 cm) vertical line. To create a shallower V-neck, cut the vertical line about 3 inches (7.6 cm) long.
-
4Zigzag stitch along the raw edge if you want to prevent it from fraying. If you want your sweatshirt to have a more finished look, take it over to your sewing machine. Adjust your settings to make a short zigzag stitch and sew directly along the raw edge. Sew around the entire neckline so the fabric doesn't fray.[4]
- If you like the casual look, skip this step and leave the raw edge exposed. Keep in mind that the edge will fray as you wash and dry the sweatshirt.
Tip: If you don't want to see the zigzag stitch, fold 1⁄2 inch (1.3 cm) of the raw edge in towards the center of the hoodie and straight stitch around the neckline instead.
-
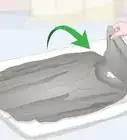
5Fold the sweater and cut across the neck to make an off-the-shoulder sweater. Once you've cut the hood off, fold the sweater in half vertically and use chalk to mark a diagonal line that's at least 2 inches (5.1 cm) away from the neckline. Cut along this line so you go through the folded sweater and open it to reveal the off-the-shoulder neckline.[5]
- Try on the sweatshirt to see if it falls down on your shoulders. If it doesn't, take it off and cut off another 1 inch (2.5 cm) from the neckline.

Creating a Collar
-
1Lay the hoodie flat so the front faces up. Pull the hood out so it extends away from the body. Then, look for the seam where the hood meets the body of the sweater. You'll be using this as a starting point for your measurements.
-
2Make 3 or 4 chalk marks that are 3 in (7.6 cm) above the seam of the hood. Place a ruler at the seam and measure 3 inches (7.6 cm) above it. Mark the fabric with chalk and repeat this on the opposite side of the hood. Then, flip over the hoodie so you can make another mark on the back of the hood.
- If you want a narrow collar, mark at about 2 inches (5.1 cm) instead of at 3 inches (7.6 cm).
- If you have tailor's chalk, use that instead since it won't smear like standard chalk.
-
3Draw a horizontal line to connect the chalk marks. Place your ruler horizontally so it passes through a few of the marks you made. Then, draw a horizontal line to connect them. Move your ruler so you can continue making the line around the entire hood.[6]
- It's important to make the line even so your collar isn't lopsided.
-
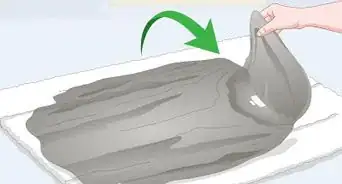
4Cut along the horizontal line to remove the hood. Take a pair of sharp scissors and start cutting along the chalk line on the front of the hood. Keep cutting along the line as you go around the hood until you reach the opposite side.[7]
- Discard the hood or save it for another sewing project.
-
5Fold the raw edge of the collar over by a total of 1 inch (2.5 cm). Take the raw edge and fold it over by 1⁄4 inch (0.64 cm) towards the inside of the hoodie. Fold it over 1 more time by about 3⁄4 inch (1.9 cm). Then, insert sewing pins horizontally through the folded fabric so the collar stays in place.[8]
- Folding the fabric a few times completely hides the raw edge.
Alternative: If you'd like the collar to stick up instead of fold over, put a collar stay on the edge of the fabric before you fold and sew it in place. This helps the collar hold its shape and it won't disintegrate when you wash the hoodie sweatshirt.
-
6Straight stitch across the folded edge to secure the collar. Start sewing at the front of the hoodie and stitch up to the corner of the collar. Then, straight stitch around the corner to the opposite side of the front and sew down to the seam. This creates a topstitch and finishes the edges of your collar.[9]
- Choose a thread color that matches your hoodie if you want it to blend in. If you'd like the topstitch to stand out, pick a thread color that compliments the hoodie. For example, if the sweater is black with a neon green logo, choose a bright green or white thread. If you want the thread to blend in, choose black thread.

Things You'll Need
Cutting off the Hood
- Scissors
Creating a Collar
- Sewing pins
- Chalk
- Sewing machine
- Ruler


References
- ↑ https://youtu.be/lJt4D3P_BmU?t=65
- ↑ https://youtu.be/dyC6dPN9PoM?t=14
- ↑ https://youtu.be/8gdHmutAV6U?t=39
- ↑ https://sewguide.com/zig-zag-stitch/
- ↑ https://youtu.be/3PWVChkypq8?t=22
- ↑ https://youtu.be/lJt4D3P_BmU?t=95
- ↑ https://youtu.be/dyC6dPN9PoM?t=14
- ↑ https://sewguide.com/how-to-hem/
- ↑ https://sewguide.com/how-to-hem/
About This Article