This article was co-authored by Josef Storzi and by wikiHow staff writer, Travis Boylls. Josef Storzi is an Apple and Mobile Phone Repair Specialist and the Owner of Imobile LA, a mobile phone repair company based in Los Angeles, California. Josef specializes in repairing screens, charging ports, batteries, water damage, speakers, and microphones on all mobile phone brands including Apple, Samsung, LG, Nokia, and Sony. He also specializes in tablet, laptop, and computer repairs as well as the pros and cons of recent mobile software updates.
The wikiHow Tech Team also followed the article's instructions and verified that they work.
This article has been viewed 1,154,498 times.
Did you accidentally get your iPhone wet? It's a common accident. Your iPhone is delicately perched in your hand when all of a sudden...kerplunk. Into the pool/lake/puddle/toilet it goes. Water damage doesn't just happen at lakes, pools, and in the bathroom. It can happen anywhere. One drop of water can wreak havoc on cell phones and other electronic devices. But don't panic, there are things you can do to try to salvage and repair your iPhone. If it can't be repaired, you may be able to work around the water damage. This wikiHow article teaches you how to salvage, repair and use a water-damaged iPhone. So let's dive in (too soon?)!
Things You Should Know
- If your iPhone gets wet, power it off immediately and dry it off with a lint-free absorbent cloth.
- Place your iPhone in a dry area and let it sit for at least 48 hours.
- if the indicator inside the SIM card tray turns red, your iPhone has received water damage.
Steps
Salvaging a Wet iPhone
-
1Remove your iPhone from the wet area immediately. The longer your iPhone is exposed to liquid, the more extensive the damage will be.
-
2Power down the phone. To do so, press and hold the Power button, then slide the button at the top of the screen right when prompted. The sooner you can turn off your iPhone, the higher its chances of recovery will be.
- Do not attempt to power your phone back on or test it until it is completely dry. Powering on a water-damaged phone can cause the electronic components to short out, which will permanently damage your iPhone.
- If the phone is plugged in, unplug the charger quickly.[1]
- If the screen is off but you're not sure if the phone is on, quickly press the Power button to see if the screen turns on. If it does, proceed to power the phone off. If it doesn't, leave it off.
Advertisement -
3Remove any case that is on the iPhone. If your iPhone has a case, it may be holding in moisture; removing the case will allow the phone to breathe.
-
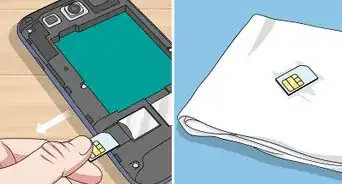
4Remove your iPhone's SIM card and tray. To do so, insert a SIM removal tool or an unbent paperclip into the SIM tray's hole to pop the SIM tray out. Completely remove the tray so that water can escape.
-
5Use a dry, absorbent cloth to wipe down the phone. Get all of the excess moisture off with an absorbent cloth. Make sure to get the moisture out of the charging port, the volume keys, the headphone jack, and any other crevices.
-
6Swab out ports with a cotton swab and a piece of cloth. Get a thin piece of cotton, like an old shirt, and wrap a single layer around the end of a toothpick. Use this to absorb any excess water from the charging port and headphone jack.
-
7Place the iPhone in a warm, dry location. The best way to get rid of the water inside of your iPhone is to simply let it air dry in a warm place for as long as possible.
- Many guides will report that placing your iPhone in a bag of rice will help draw the water out. This has been proven false--simply letting your iPhone air dry is the most effective way to fix it.[2] Also, the rice can leave a residue inside the charging part, which could cause even more damage to your device.[3] However, you can use silica gel packets.
- Air drying will be more effective if you are able to remove the battery from the iPhone.
-
8Wait at least 48 hours. Wait until your iPhone is completely dry inside and out before turning your phone back on. The longer you can wait, the greater the chance of recovery. If you can wait longer than 48 hours, 72 hours maybe even more effective.
- Consider taking your phone to a local repair shop to have it serviced right away, or contact Apple if you have AppleCare. Seeking a repair sooner than later could save you money—the longer the liquid is inside the device, the more damage it can cause.
-
9Check for the water damage indicator. Each iPhone has a small indicator that tells repair technicians that the phone has received water damage. The indicator is a piece of plastic that turns red when it comes in contact with too much water. You can check this indicator yourself to see if your phone may be damaged. Use a flashlight to help you see inside the port.
- This indicator usually means that you likely won't qualify for free repair, in which case you may want to consider fixing the phone yourself.[4]
- iPhone 5 and up - Look for a red indicator in the SIM tray port on the screen side of the phone.
- iPhone 4S and below - Look for a red indicator in the charging port or in the headphone jack.


Working Around Water Damage
-
1Back up your iPhone immediately after turning it back on. Backing up your iPhone as soon as possible will ensure that, even if your iPhone quits working a few days later, its information can be installed on a new device.
-
2Use AssistiveTouch if your Home button stops working. A common symptom of water damage is a non-working Home button; you can bypass this issue by enabling the "AssistiveTouch" accessibility option that places shortcuts for hardware buttons on your screen.
- AssistiveTouch will also allow you to lock your screen, alter your phone's volume, and take screenshots.
-
3Use a USB dock or Bluetooth headphones to play sound. If water damage has caused your iPhone's speaker or headphone jack, you may need to use an alternative audio output device instead of your iPhone's speaker. Try using a USB dock or Bluetooth Headphones.
- Try to connect a USB dock that is compatible with your iPhone to the charging port at the bottom of your iPhone. It should be detected automatically.
-
4Use a wireless charger. If your iPhone's charging port stops working, you won't be able to charge it using a charging cable. However, you may still be able to charge it using a wireless charger, which you can purchase from an Apple.[5]
-
5Keep your iPhone charged if your power button stops working. If your power button stops working, powering your iPhone on and off becomes very difficult. You’ll need to keep it charged and turned on to keep using it.
- If your iPhone runs out of battery and shuts off, it will turn on again when you plug it into power.
- On phones with the "Raise to Wake" feature enabled, simply picking up your iPhone will turn on the screen.


Performing Advanced Repairs
-
1Power down the phone. To do so, press and hold the Power button, then slide the button at the top of the screen right when prompted.
-
2Remove the SIM card. Take the SIM card tray and the SIM card out before you begin taking apart the iPhone.
-
3Remove the screws from the bottom of the iPhone. You’ll need a pentalobe (5-prong) screwdriver to remove the screws. The screws can be found to the left and right of the charging port.
- You can purchase a repair kit for your specific iPhone model online. It should contain the tools needed to open it, cotton swabs and a cloth, a replacement battery, a corrosion cleaning solution, and a repair video.[6]
- Different iPhone models are assembled differently. Some may open from the front and some may open from the back. You can find repair guides for your specific phone model online.
-
4Use a suction cup to remove the front cover. A strong suction cup is one of the easier ways to remove the front part of the iPhone body. This will prevent scratches when trying to pry the halves apart.
- Place a suction cup on the front and hold the back of the case with your other hand.
- Once the suction cup is applied, pull it apart from the back half.
- Use an opening pick or flat edge, like a flathead screwdriver to cut through the adhesive. Heating the adhesive with a blow dryer or heating pad can help loosen it.
-
5Use a Phillips screwdriver or other flat tool to remove the battery. Set the battery off to the side for now.
- If the battery appears damaged, swollen, bloated, discolored, or melted, carefully remove it and put it in a fireproof container, and take it to a battery recycling center. A fireproof container is any container made out of glass, metal, or ceramic.
-
6Remove the cable connectors. There are several cable connectors that will need to be removed before you can access the logic board. Some of these will be pried off while others may require a Phillips screwdriver.
-
7Remove the logic board from the plastic case. Once you’ve completely detached the logic board, you can remove it from the plastic housing.
-
8Submerge the logic board in 97% isopropyl alcohol. Let it soak until any visible residue has become loose.
-
9Use a soft brush to scrub away visible residue. Make sure to clean all contacts and connectors. Scrub the chips on the logic board. Repeat the cleaning process if necessary.
-
10Allow the logic board to air dry completely before reassembling. Make sure the logic board is completely dry. If it is still damp, you may cause more damage when you try to turn it on.
-
11Wipe down the LCD with the isopropyl alcohol. Wiping down the LCD screen can remove any liquid residue. Avoid submerging the screen, as this can cause permanent damage to the display.
-
12Wait for your components to dry. Isopropyl alcohol will take a little while to completely dry, so leave all of your components out for at least four hours before reassembling the iPhone.
-
13Reassemble your iPhone. Put your iPhone back together by replacing all of the connectors and reinserting the screws in the reverse order that you took them out in.
-
14Power on your iPhone. If you’re sure that the iPhone is dry, you can try powering it on. If you performed a thorough cleaning and the parts weren’t too corroded, the phone may work again.[7]


Expert Q&A
Did you know you can get premium answers for this article?
Unlock premium answers by supporting wikiHow
-
QuestionWhat do I do if my iPhone gets wet?
 Josef StorziJosef Storzi is an Apple and Mobile Phone Repair Specialist and the Owner of Imobile LA, a mobile phone repair company based in Los Angeles, California. Josef specializes in repairing screens, charging ports, batteries, water damage, speakers, and microphones on all mobile phone brands including Apple, Samsung, LG, Nokia, and Sony. He also specializes in tablet, laptop, and computer repairs as well as the pros and cons of recent mobile software updates.
Apple & Mobile Phone Repair SpecialistThe first thing to do for any electronic device that has liquid damage is to remove its power source. This will stop your device from becoming damaged further, and it could prevent any damage from occurring to your device. For phones, this includes both the charger and the battery.
Support wikiHow by unlocking this expert answer.
-
QuestionWhat if I can't take the battery out of my iPhone?Josef StorziJosef Storzi is an Apple and Mobile Phone Repair Specialist and the Owner of Imobile LA, a mobile phone repair company based in Los Angeles, California. Josef specializes in repairing screens, charging ports, batteries, water damage, speakers, and microphones on all mobile phone brands including Apple, Samsung, LG, Nokia, and Sony. He also specializes in tablet, laptop, and computer repairs as well as the pros and cons of recent mobile software updates.
Apple & Mobile Phone Repair SpecialistVisit a local repair shop as soon as possible to have the device professionally disassembled and inspected, even if it's still working. The reason for this is that damage can occur over time from liquid exposure, and in many cases devices will function for anywhere from a day up to a week before the liquid causes enough damage to decommission the device.Support wikiHow by unlocking this expert answer.
-
QuestionShould I put my iPhone in rice if it gets wet?Josef StorziJosef Storzi is an Apple and Mobile Phone Repair Specialist and the Owner of Imobile LA, a mobile phone repair company based in Los Angeles, California. Josef specializes in repairing screens, charging ports, batteries, water damage, speakers, and microphones on all mobile phone brands including Apple, Samsung, LG, Nokia, and Sony. He also specializes in tablet, laptop, and computer repairs as well as the pros and cons of recent mobile software updates.
Apple & Mobile Phone Repair SpecialistIn most cases, this will not help. Modern mobile devices are well-sealed, which prevents the rice from making its way inside the device to absorb the water. In many cases, the rice may leave behind a residue that will cause even more damage.Support wikiHow by unlocking this expert answer.


References
- ↑ Josef Storzi. Apple & Mobile Phone Repair Specialist. Expert Interview. 7 December 2020.
- ↑ http://www.theverge.com/2015/9/14/9326035/can-rice-actually-save-your-wet-phone
- ↑ Josef Storzi. Apple & Mobile Phone Repair Specialist. Expert Interview. 7 December 2020.
- ↑ http://osxdaily.com/2013/04/11/dropped-iphone-into-water-save-damage/
- ↑ https://www.apple.com/shop/accessories/all/wireless-chargers
- ↑ https://www.cellphonerepair.com/common-issues/iphone-water-damage-repair/
- ↑ https://www.ifixit.com/Guide/Repairing+iPhone+Liquid+Damage/5825
About This Article

1. Remove phone from water source.
2. Power down the phone.
3. Remove the case.
4. Remove the SIM card and tray.
5. Wipe phone with a dry, absorbent cloth.
6. Swab ports with a toothpick and piece of cloth.
7. Place phone into a warm, dry location.
8. Wait 48 hours or more before turning back on.