This article was co-authored by Steve Linton and by wikiHow staff writer, Hunter Rising. Steve Linton is the President of Deltec Homes, a custom home building company in Asheville, North Carolina. With nearly 20 years of experience, he oversees all home building projects for Deltec Homes. He specializes in hurricane-resistant homes, green home design, and sustainable building. Steve holds a BS in Structural Engineering from Cornell University and is a LEED Accredited Professional.
There are 14 references cited in this article, which can be found at the bottom of the page.
This article has been viewed 15,474 times.
Storm doors are lighter and damage more easily, so you may need to replace them sooner than other exterior doors on your home. When you want to install a new storm door, first remove the existing one from the frame and get rid of it. Make sure you use a new door that fits the space tightly so you can hang it in the existing frame. Once you hang the door, all you need to do is install the hardware to open and close your door before you can use it!
Steps
Removing the Old Door
-
1Release the pneumatic closer from the mounts to remove the lock pins. The pneumatic closer is the cylindrical tube on the inside of your door that pulls it closed. The lock pins are small metal pieces that hold the closer in place so it doesn’t move around. Push up from the bottom of the lock pin so you can pull it out from the top. Remove the pin from each of the mounts to pull the closer off of the door and frame.[1]
- You may need to use a screwdriver or a wrench if the lock pins screw into place or have nuts secured to them.
-
2Take out the screws holding the closer mount on the door frame. Locate the screws holding the mount on your door frame. Use either a flathead or Phillips-head screwdriver depending on which type of screw it has, and turn the screws counterclockwise to loosen them. Once you loosen the screws, pull the mount off of the frame and throw it away since it won’t work with your new door.[2]
- You don’t need to remove the closer mount that’s attached to the old storm door since you’re replacing it anyway.
Advertisement -
3Unscrew the hinges from the storm door’s frame. Open the storm door completely so you can access the hinges screwed into the frame. Use an electric or manual screwdriver to take out each of the screws holding the door in place. Start from the bottom screw and work toward the top so the door is less likely to fall off while you’re working on it. Support the bottom of the door with your foot while you remove the top screw so it doesn’t drop down.[3]
- You can either save the screws from your old storm door for future projects, or you can throw them away. Your new door will come with the screws and hardware you need to install it.
Tip: Ask a helper to hold the storm door while you unscrew the hinges so you don’t have to support its weight yourself.
-
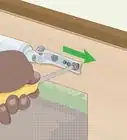
4Remove the other frame pieces from the top and side of the door opening. Your old storm door will have metal frame pieces attached to the sides of the opening. Locate the screws along the side and front of the pieces and turn them counterclockwise to remove them. Take off the frame from the top and side opposite of the hinges so you can easily fit your new door in the space.[4]
- The screws may be hidden underneath a plastic or metal cover, so be sure to double check the pieces if you cannot remove them easily.


Hanging the New Door
-
1Measure the opening so you know what size storm door you need. Start your tape measure against the threshold and extend it to the top corner of the opening. Check the height measurement from both sides of the door to make sure it's the same. Then extend the tape measure from the left to the right side of the doorway to find the width. When you get your storm door, make sure the door’s dimensions are the same or else it won’t create a tight seal.[5]
- If your height measurement is different on both sides of the door, then you may need to install shims on the top or bottom until they’re level.
- You can buy new storm doors from your local home improvement or hardware store. Choose a style that matches the rest of your home.
-
2Trim the hinge plate with a hacksaw so it’s the same height as the opening. Look in the storm door’s box for the long metal piece with the hinges attached to it. Set the hinge plate on a flat work surface and start a tape measure on one end of it. Extend the tape measure so it’s the same length as the height measurement you took and mark it on the hinge plate. Use a hacksaw to cut through your mark so the hinge plate fits into the door frame perfectly.[6]
- You can cut the hinge plate from either end.
- You will usually need to cut the hinge plate unless it already fits into your door frame.
-
3Screw the hinge plate to the side of the door that you want it to open from. Place the hinge plate on the same side of the storm door as the hinges on the main exterior door. Set the door on its side and line up the hinge plate with the side so it extends about 1⁄8 inch (0.32 cm) past the top. Make sure the weatherstripping on the hinge plate faces the inside of the door so it makes a tight seal. Use an electric screwdriver and the provided screws to attach the hinges along the side of the door.[7]
- Sometimes, the storm door will have a screw already in it or have predrilled holes so you can line up the hinge plate easier.
Tip: If it’s difficult to attach the screws, try drilling into the door with a bit that’s slightly smaller than the screws. For example, if the screws have a diameter of 1⁄4 inch (0.64 cm), then drill a hole that’s 1⁄8 inch (0.32 cm) wide. That way, the door won’t get damaged and the screws will go in easier.
-
4Attach the screws on the hinge plate to the door frame to hang it. Hold the storm door up to your door frame, using your foot to support the weight. Line up the top corner of the door with the corner of the door frame so it's flush against the top. Use your electric screwdriver to put screws into the frame along the guide holes on the hinge plate. Work from the top screw toward the bottom so you don’t have to support the weight of the door the whole time.[8]
- Ask a helper to hold the door in place for you so you don’t have to support the door and screw it in at the same time.
- Make sure the door doesn’t move around while you’re screwing it in since it may hang crooked otherwise.
-
5Secure the top plate above the door so water can’t get inside. Close your storm door completely so you can see where it lines up with the door frame. Find the shorter top piece and hold it against the top of your storm door so it’s against the door frame and the angled side is on top. Screw the top piece in place using the guide holes and the screws provided with the storm door.[9]
- The top piece guides water away from the door so it doesn’t drip inside or cause any internal damage.
- If there’s more than a 1 in (2.5 cm) gap between the top of your door frame and the top of your storm door, then you need to screw a header board into the top of the frame to close the gap.
-
6Put the side plate on the frame so the door fits tightly when it’s closed. Find the long metal piece in your storm door’s box and hold it against the other side of the frame. Line up the top edge of the side plate with the corner of the door frame and use the provided screws to attach it in place. Test closing the door to see if there is a 1⁄4 in (0.64 cm) gap between it and the side piece. If not, then readjust the frame piece or add shims to close the gap.[10]
- You may also need to trim the side plate so it fits in your door frame.
- Make sure the weatherstripping on the side piece faces the inside of your door or else it will still let it in a draft.


Attaching the Hardware
-
1Attach the drilling template to the door where you want to place the handles. Look for the adhesive drilling template used for the handles on your door. Wrap the template around the side of the door at the height you want for your handles and press it firmly against it the door so it sticks. Check that the template isn’t crooked with a straightedge and readjust the template if you need to so it’s straight.[11]
- If the drilling template doesn’t have an adhesive back, then use pieces of tape to hold it in place.
-
2Drill through the marked holes on the template. Find the drill bits that match the size of the holes on the template and attach one of them to your drill. Push your drill through the guide and into the door so your hole stays straight. Continue drilling all of the holes to their proper size so you can fit the handle and latch pieces inside.[12]
- If your drill slips while you’re working, use a metal punch to make a starting hole in the center of each template so the drill bit catches and stays in place.
-
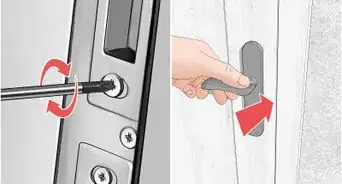
3Screw the handle pieces onto the door and frame with the provided hardware. Find the pieces of your storm door handle in the packaging and assemble them following the manufacturer’s instructions. Push the pieces of the handle into the holes you drilled, making sure the interior and exterior pieces are on the correct sides. Use a screwdriver to secure the pieces in place.[13]
- The type of handle on your storm door depends on the model you buy. Some may be more complex to assemble than others.
-
4Slide the sweep onto the bottom of the storm door so it’s flush with the threshold. The sweep is a U-shaped metal piece that prevents drafts from coming underneath the storm door. Open your storm door and slide the sweep onto the bottom, using the screws and guide holes provided to secure it in place. Close your door to make sure the sweep extends completely down to the threshold so it forms a tight seal.[14]
- If it doesn’t form a tight seal, loosen the screws holding the sweep in place and push it down until it contacts the threshold.
-
5Position the closer mount on the side of the door frame and screw it in. Find the mounts for the pneumatic closer and find the one labeled “Frame.” Hold the mount against your door frame where you want to install the closer, and mark where the holes are so you know where to drill. Use a drill bit that’s 1⁄8 inch (0.32 cm) smaller than your screws for the holes. Then put the mount back over the holes and screw it into place.[15]
- You can put the closer anywhere along the side of the door that has the hinges. If you want to access it easily, put it at waist-height or the bottom of the door. Otherwise, you can attach it to the top of the door if you like.
-
6Secure the closer to the mount with the locking pin. Grab the new closer tube for your storm door and locate the side that has a rod that extends out. Put the rod end of the tube in the mount and slide one of the locking pins through the mount to hold it in place. The closer should stay in place so you can figure out where to place your other mount on the door.[16]
- You may need to screw in the locking pin or secure a nut to it so it doesn’t move or come loose.
-
7Attach the other closer mount to the storm door so it has slight tension. Pull the rod out about 1⁄2–3⁄4 inch (1.3–1.9 cm) so it has a slight amount of tension and secure it in place with the square metal tab. Attach the other mount to the tube with the locking pin and hold it against your storm door. Screw the mount into the storm door to secure it in place.[17]
Tip: Test opening and closing the door to make sure it swings back slowly when you let go of it. If it slams shut, loosen the screws on the door mount and reposition it closer to the hinges so it doesn’t have as much tension.


Expert Q&A
-
QuestionShould I remove my storm door?
 Steve LintonSteve Linton is the President of Deltec Homes, a custom home building company in Asheville, North Carolina. With nearly 20 years of experience, he oversees all home building projects for Deltec Homes. He specializes in hurricane-resistant homes, green home design, and sustainable building. Steve holds a BS in Structural Engineering from Cornell University and is a LEED Accredited Professional.
Custom Home BuilderYou can, but should see if air leaking through other spots in your home. A lot of air leakage is actually hidden and may be coming through your attic or basement.
Things You’ll Need
- Screwdriver
- Tape measure
- Hacksaw
- Drill
- Caulk
- Caulk gun
- Tape


References
- ↑ https://youtu.be/FnKazBAJxdE?t=15
- ↑ https://youtu.be/FnKazBAJxdE?t=15
- ↑ https://youtu.be/FnKazBAJxdE?t=34
- ↑ https://youtu.be/FnKazBAJxdE?t=57
- ↑ https://www.lyftym.com/wp/wp-content/uploads/Falcon-Storm-Door-Installation.pdf
- ↑ https://www.todayshomeowner.com/video/how-to-add-a-storm-door-to-your-home/
- ↑ https://www.todayshomeowner.com/video/how-to-add-a-storm-door-to-your-home/
- ↑ https://www.todayshomeowner.com/video/how-to-add-a-storm-door-to-your-home/
- ↑ https://youtu.be/FnKazBAJxdE?t=500
- ↑ https://youtu.be/0LLg4B0E6vE?t=193
- ↑ https://youtu.be/X3hLtgOHEkw?t=281
- ↑ https://youtu.be/X3hLtgOHEkw?t=289
- ↑ https://youtu.be/X3hLtgOHEkw?t=301
- ↑ https://www.todayshomeowner.com/video/how-to-add-a-storm-door-to-your-home/
- ↑ https://youtu.be/FnKazBAJxdE?t=736
- ↑ https://youtu.be/0LLg4B0E6vE
- ↑ https://youtu.be/0LLg4B0E6vE?t=342
- ↑ Steve Linton. Custom Home Builder. Expert Interview. 23 June 2021.
About This Article