This article was co-authored by Jason Phillip and by wikiHow staff writer, Jessica Gibson. Jason Phillip is a handyman specializing in mounting and hanging objects onto walls. With over five years of experience professionally mounting and installing objects through his company, Jason's Handyman Services, Jason's work includes working with mounting window AC units, designing art gallery walls, installing kitchen cabinets, and replacing light fixtures on drywall, brick, and plaster. He has been rated a "Top Pro" every year since 2016 by Thumbtack for being one of the highest-rated, most popular professionals on Thumbtack.
This article has been viewed 586,737 times.
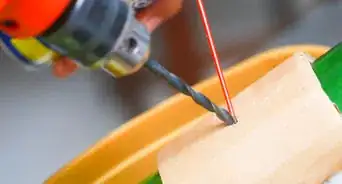
Power drills are super handy and versatile, but you need the right drill bit for the job. If you’re not sure how exactly you’re supposed to change out one drill bit for another, don’t worry! We’ll walk you through it step-by-step, whether you have a keyless drill or a keyed chuck drill. The process is surprisingly easy either way. In just a few minutes, you’ll be ready to start drilling.
Steps
Changing Bits on a Keyless Drill
-
1Loosen the chuck. The chuck is piece on the end of the drill that loosens and tightens to hold the bit. Grasp the chuck with one hand while you hold the handle of the drill with your other hand. Twist the chuck counterclockwise to loosen it. Another option is to pull the trigger gently while holding the chuck.[1]
- Loosening the chuck will open the jaws that clamp onto the drill bit.
-
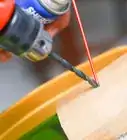
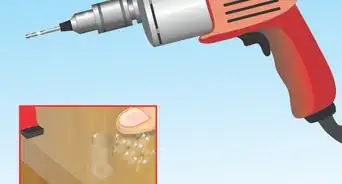
2Remove the bit. Once you loosen the chuck, the drill bit that you currently have in the drill will start to wobble. You should be able to easily pull it out of the drill once the jaws that clamp it to the drill are loose.[2]
Always inspect the bit when you remove. If it looks damaged or worn, throw it out so you don't accidentally use it again later.
Advertisement -
3Set the bit. Hold the bit with your thumb and index finger so that the smooth part of the bit (the shank) is facing the jaws of the chuck. Insert the bit into the chuck and immediately pull it back towards you about a centimeter.[3]
- Keep your fingers on the bit and the chuck since the bit isn't secured and could fall out.
-
4Squeeze the trigger. Tighten the bit into place by giving the trigger a few short squeezes. Your other hand should still be loosely holding the bit in place while you do this.[4]
Lightly hold the bit while squeezing to ensure that the bit is installed straight.
-
5Engage the ratcheting mechanism if needed. If your drill has a ratcheting mechanism to apply extra pressure to the shank of a drill bit, you'll need to click it into place. To engage it, firmly twist the ratcheting mechanism next to the chuck in a clockwise motion.[5]

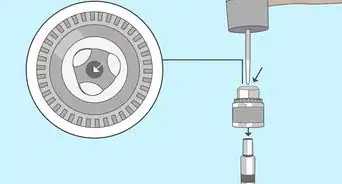
Using a Chuck Key
-
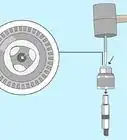
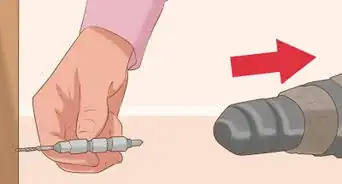
1Insert the chuck key. If your drill came with a chuck key, you'll need to use this in order to loosen the chuck. The end of the drill key will look like a cog that has teeth. To insert the chuck key, line up the teeth so that they match the teeth on the chuck and insert the tip into one of the holes on the side of the chuck.[6]
- Many drills that use a chuck key have a secure place on the drill where you can store the key.
- Typically you’ll see a key chuck on a power drill rather than a cordless model.
-
2Turn the chuck key counterclockwise. As you turn the key, the jaws on the chuck will begin to open. Continue turning until the chuck opens enough to easily slide the drill bit out.[7]
The jaws are the three or four pieces in the mouth of the chuck that extend to hold the bit in place.
-
3Remove the bit. Pull the bit out using your thumb and index finger once the chuck is loosened. If the chuck is opened wide and you turn the drill face down, it may just fall out.[8]
- Inspect the bit once you've removed it. Check for damage or worn areas. If the bit is dull, you should replace it. If it's bent or shows signs of cracking, throw it out so you won't mistakenly use it again.
-
4Insert a bit. While the jaw on the chuck are open wide, insert your new bit. Hold the bit with your thumb and index finger so that the smooth part of the bit (the shank) is facing the jaws of the chuck and insert it.[9]
- Keep your fingers on the bit and the chuck since the bit isn't secured and could fall out.
-
5Tighten the chuck. While holding the bit in place with one hand, turn the chuck key clockwise to tighten the chuck's jaws with your other hand. Make sure to tighten it firmly so that the bit is secured. Remove the chuck key.[10]
- Remove your hand from the bit and turn on the drill to test it before using it.

Expert Q&A
-
QuestionMy chuck key won't turn. How should I fix this?
 Mark SpelmanMark Spelman is a General Contractor based in Austin, Texas. With over 30 years of construction experience, Mark specializes in constructing interiors, project management, and project estimation. He has been a construction professional since 1987.
Construction ProfessionalApplying a little WD-40 or another lubricating agent can help a still key move. -
QuestionHow do you loosen a drill bit?
 Jason PhillipJason Phillip is a handyman specializing in mounting and hanging objects onto walls. With over five years of experience professionally mounting and installing objects through his company, Jason's Handyman Services, Jason's work includes working with mounting window AC units, designing art gallery walls, installing kitchen cabinets, and replacing light fixtures on drywall, brick, and plaster. He has been rated a "Top Pro" every year since 2016 by Thumbtack for being one of the highest-rated, most popular professionals on Thumbtack.
HandymanOn almost all drills these days, you just turn the front of the drill to loosen up the drill bit in order to replace it.
Things You'll Need
- Power drill
- Replacement bit
- Chuck key (if needed)


References
- ↑ https://youtu.be/4FjCpf1uUB8?t=35
- ↑ https://youtu.be/4FjCpf1uUB8?t=40
- ↑ https://startwoodworkingnow.com/how-to-change-a-drill-bit/
- ↑ https://startwoodworkingnow.com/how-to-change-a-drill-bit/
- ↑ https://startwoodworkingnow.com/how-to-change-a-drill-bit/
- ↑ https://startwoodworkingnow.com/how-to-change-a-drill-bit/
- ↑ https://toolsdoctor.com/how-to-change-a-drill-bit/
- ↑ https://toolsdoctor.com/how-to-change-a-drill-bit/
- ↑ https://toolsdoctor.com/how-to-change-a-drill-bit/
- ↑ http://safety.ucanr.edu/files/1574.pdf
- Videos provided by NoClueHowTo
About This Article

To change a drill bit on a keyless drill, twist the chuck counterclockwise to loosen it, then pull it out. Hold the new bit with your thumb and index finger, then insert it into the chuck. Squeeze the trigger a few times to tighten the bit into place, then twist the ratcheting mechanism next to the chuck in a clockwise motion. If your chuck has a key, insert the key and turn it counterclockwise, then slide the bit out. Insert the new bit and turn the key clockwise to tighten the chuck. To learn more from our General Contractor co-author, like how to tell if a drill bit is worn or damaged, keep reading the article!