This article was co-authored by Ryaan Tuttle. Ryaan Tuttle is a Home Improvement Specialist and the CEO of Best Handyman, Inc. in Boston, Massachusetts. With over 17 years of experience, he specializes in building home service businesses, focusing on creating scalable and efficient brands. With the help of his global team, the companies have achieved over 10+ million in sales and received recognition through magazine features, and enjoy partnerships with wikiHow and Jobber field service software. Boston Magazine and LocalBest.com have named Best Handyman Boston the Best Handyman in Boston. Ryaan holds Construction Supervisor and Home Improvement Contractor Licenses.
There are 13 references cited in this article, which can be found at the bottom of the page.
This article has been viewed 60,406 times.
Removing a broken drill bit can seem like a hassle, but it doesn’t have to be! Whether the bit is stuck in metal, wood, drywall, or any other material, if you can see the end of the drill bit, try clamping a pair of locking pliers onto it and rotating the bit counterclockwise to pull it out. If the drill bit is deeply embedded in the material, chisel off any jagged edges, create a divot with a centerpunch, bore a small hole into the broken bit, and then use a tap extractor to remove it. You can also take preventative measures to help prevent the drill bit from breaking in the future.
Steps
Pulling out a Broken Drill Bit
-
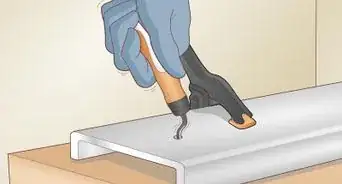
1Wipe the end of the broken bit with a clean cloth. Broken drill bits can be coated with lubricating oil and small particles of debris that can make it difficult to get a grip on them with a pair of pliers. Take a clean cloth and give the end of the broken bit a good wipe down.[1]
-
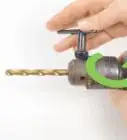
2Clamp a pair of locking pliers onto the broken end of the bit. Place the jaws of the pliers on the end of the broken drill bit and squeeze the handles together. Continue squeezing until the jaws lock into place and remain closed shut around the broken bit.[2] [3]
- Test that the pliers are secure by wiggling them around a little bit.
Tip: If you don’t have locking pliers, use a pair of pliers that have serrated jaws so you can grip the end of the broken drill bit.
Advertisement -
3Rotate the pliers counterclockwise to loosen the drill bit. Keep the pliers clamped shut on the end of the broken bit and start to turn them the opposite direction that you were drilling, which is generally counterclockwise. The broken bit will loosen and start to turn. Continue rotating the pliers to start removing the broken drill bit.[4] [5]
- It may be difficult to turn the pliers at first, but it will get easier as the drill bit starts to loosen.
- Apply a small drop of cutting oil to lubricate the broken bit and help it turn.
- Don’t snap, bend, or jerk the pliers or you could break off the end of the drill bit and make it harder to remove.
-
4Pull the drill bit out of the material gently. Keep turning the pliers until the broken drill bit is nearly out of the material. When all of the threading of the bit has come out of the material, gently wiggle the bit and pull it out.[6] [7]
- Don’t yank the drill bit out. If it’s too difficult to remove, continue rotating it until it’s loose enough to pull out.


Using a Screw Extractor
-
1Put on a pair of safety glasses to protect your eyes. Drilling into a broken bit and extracting it can cause tiny pieces of metal to fly off at high speeds. If a small shard pierces your eye, it could cause a serious injury and potentially blind you. Before you start working to extract the drill bit, put on a pair of sturdy safety glasses.[8]
- You can find safety glasses at home improvement stores, department stores, and online.
- Make sure the glasses fit your face securely and there aren’t any gaps around the edges so your eyes are protected.
-
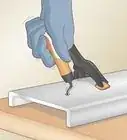
2Chisel off any jagged edges of the broken drill bit. You need as flat of a surface on the end of the broken bit as possible so you can drill a guide hole to extract it. Place the end of a chisel against the broken edge of the drill bit. Use a hammer to strike the opposite end of the chisel and break off any jagged pieces from the end of the broken bit.[9]
- Chisel the bit until you’ve created as flat of a surface as you can.
-
3Create a divot on the bit with a center punch. A center punch is a metal tool with a point that you can use to make a divot. The divot will help guide the drill bit that you’ll use to drill into the broken bit. Place a center punch on the end of the broken drill bit. Take a hammer and strike the end of the center punch to make a small divot.[10]
- Try to make a small indention in the center of the broken drill bit.
- You can find center punch tools at hardware stores, home improvement stores, and online.
-
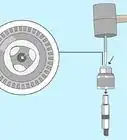
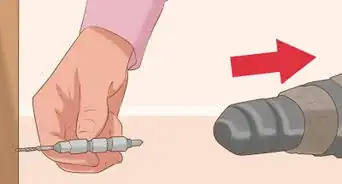
4Insert a smaller drill bit into a power drill and apply cutting oil to the end. Use a drill bit that is smaller in diameter than the broken bit and secure it to your power drill. To lubricate the drill and make it easier to penetrate the metal of the broken bit, put a drop of cutting oil on the end of the bit.[11]
- Place cutting oil on top of the broken drill bit as well to help loosen it.
- You can find cutting oil at hardware stores and online.
-
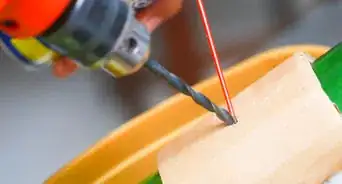
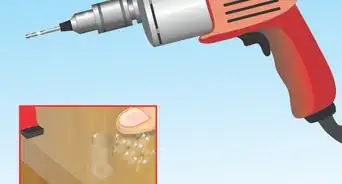
5Drill about 1⁄4 inch (0.64 cm) into the broken bit. Place the end of the drill bit onto the divot you created with the center punch. Start the drill slowly and keep it aligned with the broken bit so it drills straight into it. Bring the drill up to full speed and apply pressure with your hands to drill into the end of the broken bit.[12]
- Don’t wiggle the drill as you work. Keep it held straight and drill directly into the broken bit.
Tip: If you feel the drill heating up, take a 5-minute break to let it cool down before you continue or you could damage your drill.
-
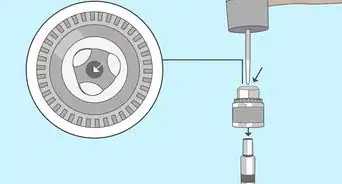
6Insert a tap extractor onto the drill bit. A tap extractor is a metal tool with a long handle that fits over a broken drill bit or tap so you can remove it. Take the top of a tap extractor and insert it into the hole you created in the broken drill bit. Secure the extractor into place by tapping the end of it with a hammer and sliding the metal collar as far down as you can so it’s tight over the broken drill bit.[13]
- Use a screw extractor that fits into the hole you bored.
- You can find screw extractors at hardware stores, home improvement stores, and online.
-
7Turn the extractor counterclockwise to remove the broken drill bit. Take a wrench that fits on top of the extractor and start turning it. Continue turning it until the broken drill bit comes out of the material that it is embedded in.[14]
- It may be difficult to turn the extractor at first, but it should get easier as you loosen the broken bit.
- Add a drop of cutting oil over the broken bit to lubricate the threads so it comes out easier.


Preventing Future Breaks
-
1Lubricate your drill bit before you use it. Whenever you’re drilling into anything, especially hard materials such as metal or steel, apply a drop of cutting oil to the end of your drill bit. This will help prevent the bit from snapping off while you’re drilling and keep your drill from overheating.[15]
- You can find cutting oil at hardware stores and online.
-
2Insert the drill bit as far into the drill as possible. Fit the end of the drill bit as far into the drill as it will go whenever you install it before use. This will keep it held secure and reduce the strain on the bit, which will keep it from snapping off when you’re drilling into something.[16]
- Make sure you change drill bits correctly. Tighten the chuck completely whenever you install a new bit.
Warning: Don’t insert the bit past the flutes or the cutting edge of the bit or you could damage your drill.
-
3Bring the drill up to speed slowly when you work. Place the end of the drill bit against the material you’re drilling and start the drill slowly. Allow the drill to come up to full speed slowly so it doesn’t put additional strain and heat on the bit, which will keep it from breaking easily.[17]
- Hard materials like metal can cause the drill bit to slip if you start drilling at full speed.


Expert Q&A
-
QuestionHow do you get a broken drill bit out of a metal?
 Ryaan TuttleRyaan Tuttle is a Home Improvement Specialist and the CEO of Best Handyman, Inc. in Boston, Massachusetts. With over 17 years of experience, he specializes in building home service businesses, focusing on creating scalable and efficient brands. With the help of his global team, the companies have achieved over 10+ million in sales and received recognition through magazine features, and enjoy partnerships with wikiHow and Jobber field service software. Boston Magazine and LocalBest.com have named Best Handyman Boston the Best Handyman in Boston. Ryaan holds Construction Supervisor and Home Improvement Contractor Licenses.
Home Improvement SpecialistGrab a pair of channel locks and tighten them up around the drill bit. Then, unscrew the drill bit manually with the channel locks.
Things You’ll Need
Using a Pair of Pliers
- Locking pliers
Extracting a Broken Bit
- Safety glasses
- Hammer
- Chisel
- Center punch
- Cutting oil
- Tap extractor


References
- ↑ https://youtu.be/TYGLS4Gbfoo?t=362
- ↑ Ryaan Tuttle. Home Improvement Specialist. Expert Interview. 18 June 2021.
- ↑ https://www.bobvila.com/articles/1131-pliers/
- ↑ Ryaan Tuttle. Home Improvement Specialist. Expert Interview. 18 June 2021.
- ↑ https://youtu.be/K34RS6M11uw?t=216
- ↑ Ryaan Tuttle. Home Improvement Specialist. Expert Interview. 18 June 2021.
- ↑ https://youtu.be/K34RS6M11uw?t=216
- ↑ https://youtu.be/7JCfEMrCjhc?t=130
- ↑ https://youtu.be/7JCfEMrCjhc?t=158
- ↑ https://youtu.be/KSYpVbx-9fg?t=513
- ↑ https://youtu.be/1uwz7BhAWZE?t=460
- ↑ https://youtu.be/KSYpVbx-9fg?t=525
- ↑ https://youtu.be/IZsjj7pqBXc?t=397
- ↑ https://youtu.be/qiDohWlEe4A?t=610
- ↑ https://nancylthamilton.com/resources/recipes/removing-drill-bits/
- ↑ https://nancylthamilton.com/resources/recipes/removing-drill-bits/
- ↑ https://boingboing.net/2014/08/25/a-beginners-guide-to-drills.html
About This Article