wikiHow is a “wiki,” similar to Wikipedia, which means that many of our articles are co-written by multiple authors. To create this article, 9 people, some anonymous, worked to edit and improve it over time.
This article has been viewed 31,948 times.
Learn more...
The water inlet valve is an electronically operated device that connects the household water supply to your fridge if you have an icemaker and/or water dispenser. This valve is usually located at the back of the fridge near the bottom. It supplies water to the dispenser and water the icemaker. The electronic part of the valve can become faulty over time, resulting in such problems as the water dispenser not working, water leaking from the bottom of the fridge or the icemaker not making any ice. Replacing a water inlet valve in a refrigerator is usually a simple process.
Steps
Preparing the refrigerator
-
1Pull the refrigerator forward so that you can get behind it with ease to change the part. Before messing with the back, be sure to unplug the refrigerator and turn off the water supply.
-
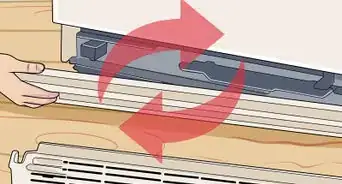
2Remove the cardboard cover on the back of the fridge. Locate the screws in the upper right hand corner of the refrigerator and use a nut-driver to remove them.
- Depending on your model, there will probably be two or three screws.
- When removing these screws, make sure that you don't lose them. It's highly recommended that you place them in a small plastic container.

Replacing the inlet valve
-
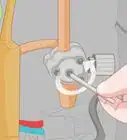
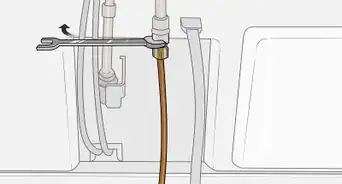
1Remove the backing. You should now be able to locate the water valve. Using your quarter-inch screwdriver, you will want to remove the machine screws that are holding the water valve to the cabinet. Once these screws have been removed, you should be able to pull the valve outside of the cavity, allowing access.
-
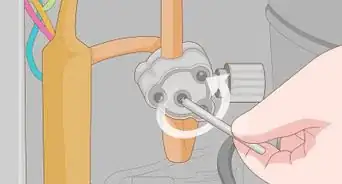
2Behind the water valve, you will have to disconnect the two electrical harnesses. Each harness will have two different pin sizes. When the pins have been removed, slightly pull the tubing out. When doing so, it's normal to see some water spill out.
-
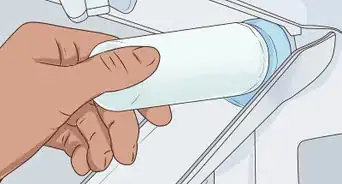
3Clean the tubing when it has been removed. Clean up the rough edges of this tubing by cutting a bit of it off. To cut it, use a block of wood and putty knife on the floor. (Try to trim it and avoid cutting too much off.) Set this tubing aside.
-
4Purchase your new replacement valve. You may notice an extra piece on it; depending on the model of your refrigerator, you may or may not need this piece. If your existing piece had that additional part, keep it on. However, if it didn't, it's okay to snap it off.
-
5Reinsert the tubing that you polished up earlier. Lightly push it in to make sure that the new tubing snaps into place. When inserting the tubing, just make sure that it's firmly in place and doesn't move around when you poke at it, and that it is snug.
-
6Reinstall the terminals. Each pin will be a different size, so it will be impossible to mix up the connections.
-
7Reinstall the mounting screws and tuck the water tubing out of the way. Turn on your water supply to make sure there are no leaks. If there are no leaks, you can safely put the back cover back on using those screws you set aside in the plastic container.
-
8Plug in the refrigerator. Push into place and your water inlet valve should be working like new.


Community Q&A
-
QuestionIs it possible for the water dispenser to work but not the icemaker?
 Community AnswerYes, it is possible. There is probably an issue with the icemaking mechanism and not the water line.
 -
QuestionI replaced the solenoid water valve to the ice maker and door dispenser. Now neither is working. What should I check?
 Community AnswerYou either installed it wrong or you may just need to unplug the fridge for a full minute for the replacement to be reset.
 -
QuestionWhere do I get the little round rings that are on the tubing?Community AnswerNowhere, you have to replace the entire water inlet valve, they're integrated into it.
Warnings
- Shut off the fridge's water supply to avoid any water spills⧼thumbs_response⧽
- Unplug the refrigerator to avoid injuries⧼thumbs_response⧽
Things You'll Need
- 1/4-inch nut driver
- Screwdriver
- Putty knife
- Plastic container, small


References
- https://www.partselect.com/Repair/Refrigerator/Leaking/ -- Research source from original author
- http://www.youtube.com/watch?v=eNGe_VUDIBA --Research source from original author