This article was co-authored by wikiHow staff writer, Jack Lloyd. Jack Lloyd is a Technology Writer and Editor for wikiHow. He has over two years of experience writing and editing technology-related articles. He is technology enthusiast and an English teacher.
The wikiHow Tech Team also followed the article's instructions and verified that they work.
This article has been viewed 42,462 times.
Learn more...
This wikiHow teaches you how to use Android apps while on a Windows computer by using the free BlueStacks Android emulator. Keep in mind that BlueStacks requires a significant amount of memory to run correctly, so your computer may suffer some slow-down issues if your operating system or hardware is outdated. Since BlueStacks is technically a tablet emulator, some apps may not be compatible with it.
Steps
Installing BlueStacks
-
1Open the BlueStacks website. Go to https://www.bluestacks.com/ in your computer's web browser.
-
2Click Download BlueStacks. It's a green button in the middle of the page.Advertisement
-
3Click Download. This green button is at the top of the page. Doing so prompts the BlueStacks setup file to begin downloading onto your computer.
- Depending on your browser's settings, you may first have to select a save location or confirm the download.
- If your browser alerts you that BlueStacks may be harmful, download BlueStacks anyway—BlueStacks isn't a harmful program, and as long as you're downloading from the BlueStacks website, you won't be downloading malware.
-
4Double-click the downloaded setup file. You'll find this green, red, yellow, and blue square icon in your web browser's default downloads location.
- For example, if you used Google Chrome to download the file and Chrome usually downloads items into your PC's "Downloads" folder, that's where you'll find the BlueStacks setup file.
-
5Click Yes when prompted. Doing so opens the BlueStacks installation window.
-
6Click Install now. It's at the bottom of the installation window. BlueStacks will begin installing onto your computer.
- This can take up to 10 minutes.
-
7Click Complete. This blue button is at the bottom of the page. Doing so completes the installation and opens BlueStacks, at which point you can proceed with setting up BlueStacks.
- This will start BlueStacks. For instructions on opening BlueStacks from your computer's Start menu, check the first three steps in the next part.


Setting up BlueStacks
-
1
-
2Search for BlueStacks. Type in bluestacks to do so. You should see a list of matching programs appear in the Start menu.
-
3Click BlueStacks. It's the green, yellow, red, and blue square icon at the top of the Start menu.
-
4Click LET'S GO. This yellow button is in the middle of the BlueStacks window.
- If you need to change BlueStacks' language, first click the current language above the LET'S GO button and then click the language you want to use.
-
5Enter your Google Account email address. Type in the email address for the Google Account you want to use as your BlueStacks login.
- If you don't have a Google Account, create one before proceeding.
-
6Click Next. It's at the bottom of the page.
-
7Enter your password. Type in the password for your Google Account.
-
8Click Next. This is at the bottom of the page.
-
9Click I agree. You'll find this blue button is at the bottom of the window.
-
10Click Start using BlueStacks. It's a blue button in the middle of the window. At this point, you're ready to install and use your first app.


Installing an App
-
1
-
2Click the search bar. This is at the top of the Google Play Store. Doing so places your cursor in the search bar.
-
3Enter your app's name. Type in the name of the app you want to install.
-
4Press ↵ Enter. Doing so will bring up a list of apps matching your typing.
- You can also click the app's name in the drop-down menu that appears below the search bar. If this takes you to the app's page, skip the next step.
-
5Select an app. Click the app you want to install to open the app's page.
-
6Click INSTALL. It's a green button in the upper-right corner of the page.
-
7Click ACCEPT if prompted. Your app will begin installing.
- If the app begins installing immediately after clicking INSTALL, skip this step.
-
8Open the app. Once the app finishes installing, click OPEN in the Google Play Store to open the app directly, or click the Home tab in the upper-left side of the BlueStacks window and then click the app's icon.
-
9Consider installing an APK file for unsupported apps. If your preferred app isn't available in the Google Play Store, you can use an app file (known as an APK file) to install the app directly from outside of the Google Play Store:
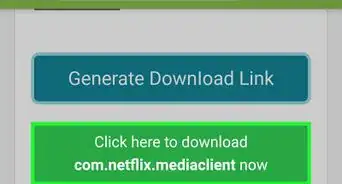
- Download an APK file for the app you want to install.
- Select the ⋮ icon to the right of the "Installed apps" heading on the BlueStacks Home tab.
- Click Install apk in the pop-out menu that appears.
- Select the APK file by clicking it once.
- Click Open in the bottom-right corner of the window.


Community Q&A
-
QuestionHow can I run Android apps on my PC?
 WikiHowUser20180421181810Community AnswerThere are multiple Android emulation/simulation programs for PCs. You can also try Genymotion. Another option is to use appetize.io or a similar web service.
 -
QuestionWhy do I need to install Bluestacks? Can't I simply install an app from the Play Store?
 Community AnswerBluestacks is an Android device emulator package that allows you to run phone apps on your PC.
 -
QuestionIs Blue Stacks a safe app?
 Community AnswerIt is safe but can cause some older operating systems to crash. Mine crashed and I was using Windows 7.
Warnings
- If your computer is more than a few years old, it may struggle to run BlueStacks.⧼thumbs_response⧽

-Step-34.webp)