This article was co-authored by wikiHow staff writer, Christopher M. Osborne, PhD. Christopher Osborne has been a wikiHow Content Creator since 2015. He is also a historian who holds a PhD from The University of Notre Dame and has taught at universities in and around Pittsburgh, PA. His scholarly publications and presentations focus on his research interests in early American history, but Chris also enjoys the challenges and rewards of writing wikiHow articles on a wide range of subjects.
This article has been viewed 173,483 times.
Learn more...
If you're installing granite countertops as part of your kitchen remodel, there's a good chance you'll need 2 or more pieces of granite due to size and transportation limitations. Since granite countertops are expensive, you want to take care when joining seams in order to make them as unnoticeable as possible. Finding the right color epoxy and mixing it well are just as important as a smooth final seam. If you work carefully, you can seam granite in a way that is durable and nearly unnoticeable.
Steps
Inspecting and Masking the Cut Edges
-
1Pick out granite pieces that have similar veining and coloring. Unlike man-made countertop materials, the colors and patterns of 2 pieces of granite will never match perfectly at a seam. If you’re cutting the granite slabs yourself, or—more likely—picking out slabs from a supplier, take the time to identify pieces that match up as closely as possible in terms of coloring and veining. This will make the seam much less noticeable to the eye.[1]
- Professional granite suppliers are usually experts at picking out pieces of granite that will create inconspicuous seams--they can often visualize the best cuts from a granite slab with just their eyes, and perhaps with the help of imaging software. Find a supplier you trust and rely on their expertise.
-
2Dry-fit and examine the cut edges for proper smoothness and alignment. Before you even think about adhering the pieces together, dry-fit them in place. If the seams don’t line up properly or are rough, remedy the problem. Don’t seam your granite until you’re happy with the edges and fit.[2]
- Smooth, straight, and properly aligned granite edges are the result of careful measuring and cutting with the proper saw, blade, and skill. Most DIYers don’t have the tools or the skills needed to cut granite properly, so it’s essential that you work with a high-quality supplier.
- Uneven or rough edges can be remedied, but once again it’s best to rely on your supplier to make these adjustments.
Advertisement -
3Wipe down the granite edges with a slightly damp cloth. Grab a soft, clean, lint-free cloth and dampen it lightly with water. You don’t need any special cleaners here—just plain, clean water. Wipe the edges that will be joined, along with the surrounding tops and bottoms of the granite pieces. Let them air dry before proceeding.[3]
- The goal here is simply to remove any dirt or dust before adding the epoxy.
-
4Apply masking tape along the edges of the 2 pieces that you’re seaming. Run the strips of tape along the top faces of the granite pieces, on the 2 sides that will be joined. This simple effort will make cleanup much easier down the line.[4]
- Some epoxies claim that they don’t stick to polished granite, meaning you shouldn’t need tape. However, even in this case, it never hurts to go with the tape when you seam granite.


Aligning the Seam and Adding Clamps
-
1Lay the 2 pieces of granite side-by-side. Place the 2 edges that you’re going to seam together in close proximity—roughly 1–2 in (2.5–5.1 cm) apart. This will give you enough space to apply the 2-part epoxy to the edges, but also make it easier to squeeze the pieces together quickly.[5]
- This also gives you the opportunity to take one more look at how well the 2 pieces match up.
-
2Thread turnbuckles through 2-3 pairs of suction cups. Buy a kit with rubber suction cups and metal turnbuckles (which look like very long bolts) that are intended for clamping countertop seams. For each pair of suction cups, thread a turnbuckle through the openings in the top by turning it clockwise. You want the suction cups to be spaced about 4–6 in (10–15 cm) apart on the turnbuckle so you’ll have room to work between and beneath them.
- 2 pairs of suction cups and 2 turnbuckles should be sufficient for most countertop seams, but you can use 3 or more for longer seams.
- You can also buy or rent a tool known as a “seam puller” or “seam setter” that uses vacuum pumps to pull and hold the granite pieces together. If you choose one of these, follow the instructions for proper use.[6]
-
3Stick each pair of suction cups on either side of the granite seam. Think of it as placing 2 or 3 “bridges” over the seam, with each turnbuckle serving as the bridge span and the suction cups as the bridge piers. Try to space the suction cups an equal distance from the seam—roughly 2–3 in (5.1–7.6 cm) each.[7]
- Make sure the suction cups stick well to the granite. Try moistening the underside of each cup with a damp fingertip if needed.
- After you apply the 2-part epoxy to the seam, you’ll tighten the turnbuckles to pull the pieces of granite tightly together.


Mixing and Applying the Epoxy
-
1Add tint to a clear, 2-part epoxy to match the color of your granite. Scoop or squeeze out a golf ball sized glob of a clear epoxy resin (intended for stone applications) onto a scrap of cardboard. Follow up with a smaller glob of your chosen tint color and place it near the epoxy resin glob. Scrape small amounts of the tint over to the epoxy resin with a putty knife and stir them together completely until you get the color shade you’re seeking.[8]
- You can also mix up several test batches of tinted epoxy before deciding on a mixture. Blend together lighter and darker shades of a single tint color, or blend multiple tint colors. Let the tinted epoxy dry for 15-20 minutes, then determine the best match.
-
2Mix the hardener into your tinted epoxy resin. Follow the package instructions for your 2-part stone epoxy to determine the proper ratio of hardener to resin. Don’t mix the hardener into the resin until you are ready to adhere the granite pieces together.[9]
- Stir the hardener into the resin thoroughly with a small putty knife.
- 2-part epoxies don’t become adhesives until they are mixed, but they harden quickly after being mixed. You’ll have 10 minutes or fewer to work with the mixed epoxy before it hardens.
-
3Butter the edges of your granite with your activated epoxy. The mixed epoxy will have a similar consistency to peanut butter, and you can similarly spread it onto the 2 facing edges of the granite pieces. Use a small putty knife and spread even layers of epoxy over the entirety of both facing edges.[10]
- Apply a thick enough layer of epoxy so that there are no gaps along the facing edges. However, you don’t need to plop on huge globs of epoxy—the excess will just get squeezed out when the pieces are pulled together anyway.


Clamping and Cleaning the Seam
-
1Tighten the turnbuckles to squeeze the 2 pieces of granite together. Hand-tighten the turnbuckles by rotating the ends clockwise. Don’t over-tighten them—by using a wrench, for instance—or you’ll pull the suction cups off the granite. Tightening the turnbuckles will bring the suction cups together, which in turn will pull the 2 pieces of granite together.
- If you’re using a “seam puller” or “seam setter,” follow the product instructions for use.
- Once the 2 pieces of granite are drawn together, make sure they are even and level with each other. If necessary, you can use your hand or a soft rubber mallet to make minor adjustments.[11]
-
2Scrape off the excess epoxy with a wet razor blade or putty knife. Glide the blade or knife over the 2 strips of tape and the closed seam between them. This will remove the epoxy that was squeezed out of the seam.[12]
- You don’t have to remove every bit of excess epoxy right now, but it’s easier to remove most of the excess now, before it dries.
-
3Remove the suction cups and tape after 15-20 minutes of drying time. Most epoxies set in 15-20 minutes, but follow the recommendations on the package. After this time has elapsed, you can peel up the suction cups and pull off the tape.[13]
- Some epoxies may take longer to dry in humid conditions, so consider extending the drying time on a hot and sticky day.
-
4Scrape off any remaining dried epoxy with a razor blade. After you’ve peeled off the tape, glide a clean, sharp razor over the seam to scrape away any remaining epoxy. Work carefully, but don’t worry too much about scraping or damaging the granite—it’s a very hard surface![14]
- The sharper the razor blade, the easier it will be to scrape off the dried epoxy. So don’t try to reuse a dulled blade for this job.
-
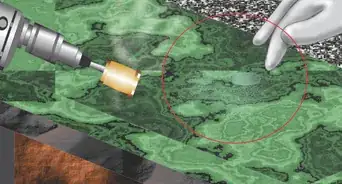
5Wipe down and polish the countertop to finish the job. Once you’ve given the granite seam a close shave with the razor, it’s time for the final cleanup. Moisten a clean cloth with acetone and wipe it over the seam to remove any last remnants of dried epoxy.[15]
- After the acetone evaporates, you can spray on a granite polish, then buff it according to the product instructions.


Community Q&A
-
QuestionWhere do I purchase Insta-Bond?
 Community AnswerHardware stores always have a large selection. Some automotive and big-box stores carry it.
Things You’ll Need
- masking tape
- suction cups with turnbuckles
- 2-part epoxy with selected tinting
- small putty knife
- sharp razor blade
- acetone
- clean cloth


References
- ↑ https://www.stoneworld.com/articles/85422-in-pursuit-of-the-invisible-seam
- ↑ https://www.stoneworld.com/articles/85422-in-pursuit-of-the-invisible-seam
- ↑ https://www.todayshomeowner.com/video/how-to-join-seams-in-granite-countertops/
- ↑ https://youtu.be/A2ukEQYwVxM?t=50s
- ↑ https://www.stoneworld.com/articles/85422-in-pursuit-of-the-invisible-seam
- ↑ https://www.todayshomeowner.com/video/how-to-join-seams-in-granite-countertops/
- ↑ https://www.todayshomeowner.com/video/how-to-join-seams-in-granite-countertops/
- ↑ https://youtu.be/A2ukEQYwVxM?t=50s
- ↑ https://youtu.be/A2ukEQYwVxM?t=1m20s
- ↑ https://youtu.be/A2ukEQYwVxM?t=1m20s
- ↑ https://www.todayshomeowner.com/video/how-to-join-seams-in-granite-countertops/
- ↑ https://www.todayshomeowner.com/video/how-to-join-seams-in-granite-countertops/
- ↑ https://youtu.be/A2ukEQYwVxM?t=1m50s
- ↑ https://youtu.be/A2ukEQYwVxM?t=1m50s
- ↑ https://youtu.be/A2ukEQYwVxM?t=1m50s
- ↑ https://www.youtube.com/watch?time_continue=3&v=Z_mXLTVMx2k
About This Article